I was standing in my kitchen, staring down a mountain of onion rings that had turned out limp and soggy, when my roommate dared me to create something that would make those boring appetizers extinct. I accepted the challenge, but not before I whispered a promise to myself: “I’ll turn this disaster into a masterpiece that will have people lining up for seconds.” The next 90 minutes were a whirlwind of sizzling oil, the intoxicating aroma of bacon, and a cheesy mac mixture that clung to the meat like a lover’s embrace. By the time the first batch hit the plate, the kitchen was alive with the sound of a crackling fry, a golden chorus that sang, “You’ve never tasted anything like this.”
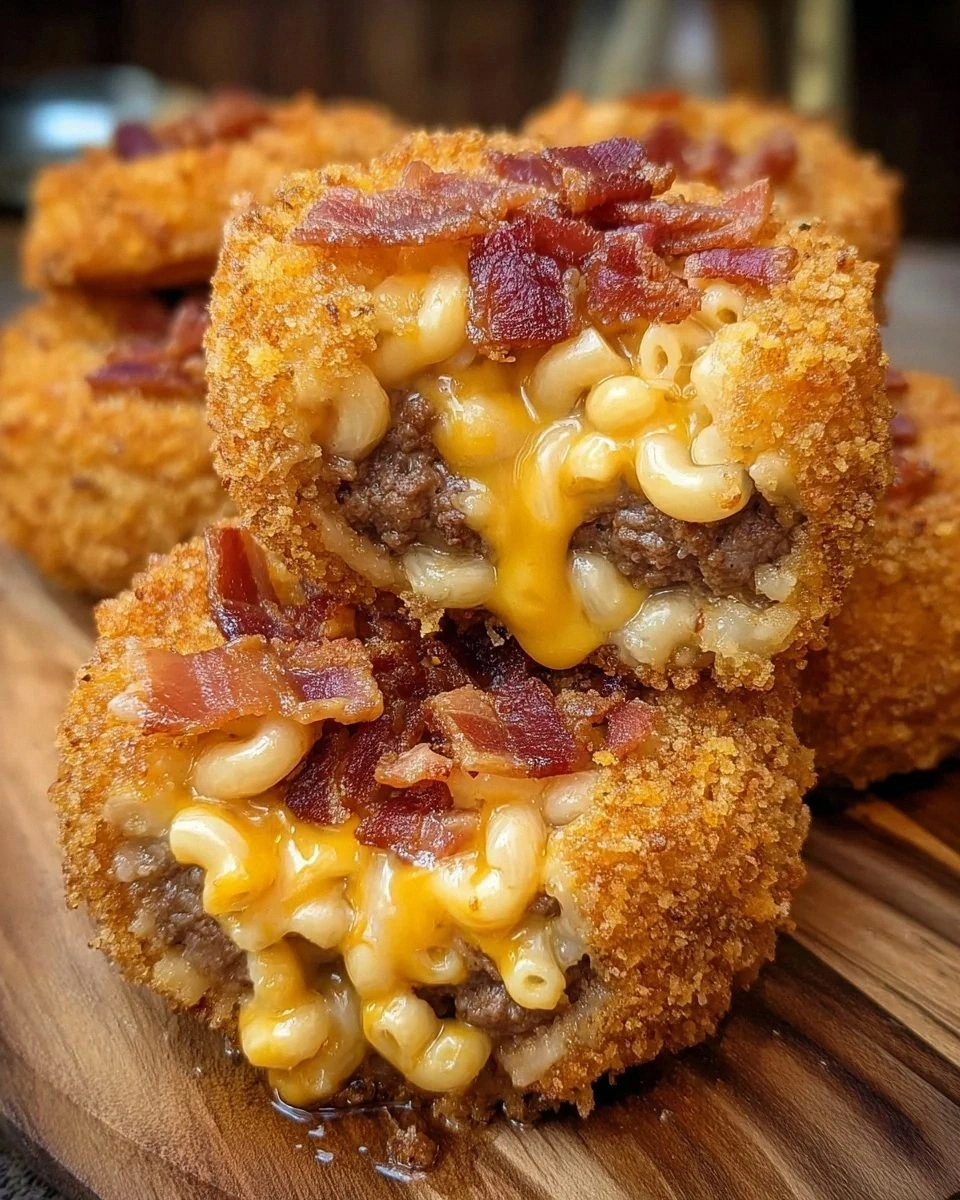
Imagine the first bite: a crunchy onion shell that shatters like thin ice, revealing a molten core of seasoned beef, gooey cheddar, and macaroni that’s as creamy as a velvet night. The smoky bacon whispers its crisp secret while the sweet onion lends a subtle bite that balances the richness. It’s a flavor rollercoaster that makes you gasp, “I dare you to taste this and not go back for seconds!” And trust me, I’ve already eaten half the batch before anyone else got a chance to try it – confession time: I’m a selfish foodie, but this level of indulgence deserves a little self‑service.
Most recipes for stuffed onion rings either drown the onion in sauce or skimp on the filling, leaving you with a hollow crunch that feels like a culinary letdown. Here’s the secret: we treat the onion like a delicate vessel, coat it with a light flour‑egg‑breadcrumb armor, and then stuff it with a hearty mac‑burger mixture that’s been seasoned to perfection. The result? A bite that is simultaneously crunchy, cheesy, meaty, and just a tad sweet, all wrapped in that unmistakable onion perfume. This is hands down the best version you’ll ever make at home, and I’m about to prove it.
But wait – there’s a twist you won’t see coming. I’m adding a splash of Worcestershire sauce to the beef and a pinch of smoked paprika to the breadcrumb coating, which gives the rings a subtle depth that most recipes miss. This little hack elevates the entire dish from “good” to “legendary.” Okay, ready for the game‑changer? Let me walk you through every single step — by the end, you’ll wonder how you ever made it any other way.
What Makes This Version Stand Out
- Flavor Explosion: The combination of juicy beef, smoky bacon, and cheesy macaroni creates a symphony of taste that hits every palate note, from savory to sweet.
- Texture Harmony: Crunchy onion exterior meets creamy interior, delivering a satisfying contrast that keeps you chewing happily.
- Simplicity Meets Sophistication: Despite the impressive result, the recipe uses pantry staples and a straightforward method that anyone can master.
- Unique Ingredient Pairing: Stuffing mac‑and‑cheese into a burger patty and then into an onion ring is a novelty that surprises and delights.
- Crowd‑Pleaser Factor: Whether it’s a game night, a party, or a midnight snack, these rings become the star of the table, prompting endless compliments.
- Quality Ingredients: Using fresh ground beef and real smoked bacon ensures a depth of flavor that frozen shortcuts can’t match.
- Cooking Method Mastery: The double‑coating technique (flour‑egg‑breadcrumbs) guarantees a golden crust that stays crisp even after the filling cools.
- Make‑Ahead Potential: You can prep the filling and coat the rings ahead of time, then fry them fresh for that unbeatable crunch.
Inside the Ingredient List
The Flavor Base
Ground beef is the star protein that provides a juicy and flavorful patty base. I always opt for an 80/20 blend because the fat renders into a buttery richness that carries the other flavors. If you skip the beef, you lose that essential meat‑mouthfeel, and the whole concept collapses into a mere cheese‑filled onion ring. For a leaner version, try ground turkey, but add a tablespoon of olive oil to compensate for the missing fat.
The Texture Crew
Cooked macaroni adds a delightful twist of texture, reminiscent of classic mac and cheese, while shredded cheddar cheese ties the filling together with melty goodness. Skipping the pasta makes the filling dense and overly meaty; skipping the cheese leaves you with a dry interior that screams for moisture. If you’re gluten‑free, substitute the macaroni with rice pasta or even small cauliflower florets for a low‑carb twist.
The Unexpected Star
Cooked bacon, crumbled for that crispy, smoky flavor, elevates the dish from good to unforgettable. Bacon’s salty crunch contrasts beautifully with the soft onion and creamy mac. If you’re vegetarian, try smoked tempeh or coconut bacon for a similar umami hit.
The Final Flourish
Large onion, sliced into rings, are the vessel holding the entire masterpiece. The onion’s natural sugars caramelize during frying, giving a subtle sweetness that balances the savory filling. When selecting onions, choose firm, dry ones; avoid any that feel soft or have sprouting greens. For a milder bite, use sweet Vidalia onions, but regular yellow onions provide the classic bite most people love.
Everything's prepped? Good. Let's get into the real action...
The Method — Step by Step
Start by heating a large skillet over medium‑high heat and adding a splash of oil. Toss in the ground beef, breaking it up with a wooden spoon, and season with salt, pepper, and a dash of Worcestershire sauce. Cook until the meat is browned and the juices have evaporated, about 6‑8 minutes, and then set it aside to cool slightly. This is the moment of truth – the beef needs to develop a deep, caramelized crust to give the filling its signature richness.
Kitchen Hack: After browning, run the beef through a fine sieve to remove excess fat; this keeps the filling from becoming greasy.While the beef rests, bring a pot of salted water to a boil and cook the macaroni al dente, usually 8‑9 minutes. Drain and immediately toss with a tablespoon of butter and half of the shredded cheddar, letting the cheese melt into a glossy coating. This step ensures each pasta piece is slick, preventing clumps in the final filling. If you’re short on time, you can use pre‑cooked pasta, but reheating it with butter is essential.
Crumble the cooked bacon into bite‑size pieces and set aside. In a large mixing bowl, combine the browned beef, cheesy macaroni, bacon, the remaining cheddar, and a sprinkle of smoked paprika for an extra depth. Mix everything with your hands until it forms a cohesive, slightly sticky mass – this is the heart of the stuffed onion ring. Feel free to taste a spoonful; if it needs more salt, now is the moment to adjust.
Slice the large onions into ½‑inch rings, carefully separating each layer. Pat them dry with paper towels – moisture is the enemy of crispness. Set aside the inner rings for stuffing and keep the outer rings for the coating; the outer rings will become the crunchy armor.
Prepare three shallow dishes: one with flour seasoned with a pinch of salt and pepper, the second with beaten eggs, and the third with breadcrumbs mixed with a dash of smoked paprika. Dip each onion ring first into the flour, shaking off excess, then into the egg, and finally coat it generously with breadcrumbs. This triple‑dip creates a barrier that locks in moisture while delivering that golden crunch we all crave.
Watch Out: If the breadcrumb layer is too thin, the onion will absorb oil and become soggy; press the crumbs onto the ring firmly.Heat a deep pan or Dutch oven with enough neutral oil (like canola or vegetable) to reach a depth of 2‑3 inches, aiming for 350°F (175°C). When the oil shimmers, gently lower a few coated onion rings, being careful not to overcrowd the pan. Fry for 2‑3 minutes per side, or until the exterior turns a deep, inviting amber and the edges start pulling away from the pan.
While the rings fry, spoon a generous heap of the mac‑burger mixture onto the center of each inner onion ring. Fold the outer coated ring over the filling, pressing lightly to seal. The heat from the oil will begin to melt the cheese inside, creating a molten core that oozes out when you bite.
Once fried to perfection, transfer the stuffed rings to a wire rack set over a baking sheet to drain excess oil. Sprinkle a final pinch of sea salt and a drizzle of hot sauce if you like a kick. Let them rest for a minute – this short pause lets the interior settle, ensuring the cheese doesn’t spill everywhere when you cut into it.
Kitchen Hack: Finish the rings with a quick 30‑second blast in a preheated 400°F oven; this locks in the crunch and keeps them warm without over‑cooking the filling.
That's it — you did it. But hold on, I've got a few more tricks that'll take this to another level...
Insider Tricks for Flawless Results
The Temperature Rule Nobody Follows
Keeping your oil at a steady 350°F is critical; too hot and the breadcrumb burns before the interior heats, too cool and the rings absorb oil like a sponge. Use a candy thermometer and adjust the heat in small increments. A quick test: drop a breadcrumb in – it should sizzle and rise to the surface within 20 seconds.
Why Your Nose Knows Best
Before you even see the color change, trust the scent. When the onion‑bread coating starts to emit a nutty, toasted aroma, you’re halfway to perfection. If you smell a faint burnt odor, pull the pan off the heat immediately; the rings will continue cooking from residual heat.
The 5‑Minute Rest That Changes Everything
After frying, let the rings sit on a cooling rack for five minutes. This rest lets the steam escape, preventing sogginess, and allows the cheese to set just enough to stay inside when you bite. Skipping this step often results in a cheesy mess that drips onto the plate.
Seasoning the Breadcrumbs
Add a pinch of smoked paprika, garlic powder, and a dash of dried thyme to the breadcrumb mix. This subtle flavor boost turns a simple coating into a flavor‑packed shell. I once tried plain breadcrumbs and the rings felt flat; the seasoned version sings.
Double‑Coat for Extra Crunch
If you crave an ultra‑crunchy exterior, give each ring a second dip in the egg‑flour‑breadcrumb trio after the first coat. This creates a thicker crust that stays crisp even after reheating. Be careful not to over‑coat, or you’ll end up with a bread‑like shell that masks the filling.
Creative Twists and Variations
This recipe is a playground. Here are some of my favorite ways to switch things up:
Spicy Jalapeño Popper Rings
Swap the cheddar for pepper jack and fold in finely diced jalapeños into the mac mixture. The heat pairs beautifully with the smoky bacon, creating a fiery bite that’ll wow any spice lover.
BBQ Pulled Pork Version
Replace the ground beef with shredded BBQ pork, add a spoonful of coleslaw inside, and use smoked gouda instead of cheddar. This Southern twist turns the rings into a handheld feast reminiscent of a backyard cookout.
Veggie‑Loaded Delight
Omit the meat and incorporate sautéed mushrooms, diced bell peppers, and a splash of soy sauce into the mac. Use nutritional yeast instead of cheese for a vegan-friendly, umami‑rich version.
Mediterranean Flair
Add crumbled feta, chopped olives, and a pinch of oregano to the filling, then drizzle with tzatziki after frying. The bright, tangy notes contrast the rich onion shell for a sophisticated bite.
Breakfast Bonanza
Swap the beef for breakfast sausage, fold in scrambled eggs and cheddar, and serve with a side of maple syrup for a sweet‑savory brunch treat.
Storing and Bringing It Back to Life
Fridge Storage
Place cooled rings in an airtight container lined with paper towels to absorb excess moisture. They’ll stay fresh for up to 3 days. When you’re ready to eat, reheat in a hot oven at 375°F for 8‑10 minutes, adding a splash of water to the pan to revive the crust.
Freezer Friendly
Freeze un‑fried, coated rings on a parchment sheet before transferring them to a zip‑top bag. They’ll keep for up to 2 months. Fry straight from frozen, adding an extra minute per side; the interior will heat through while the exterior crisps perfectly.
Best Reheating Method
For ultimate crunch, reheat in a preheated 400°F convection oven on a wire rack for 5‑7 minutes. Add a tiny splash of water to the bottom of the pan; the steam helps the cheese melt without drying out the onion.