Why you'll love this recipe
- 30-minute dinner that satisfies cravings
- Crowd-pleaser with sweet‑spicy flavor
- Restaurant-quality crunch at home
- Make-ahead sauce saves prep time
- Kid-approved mild heat option
I remember the first time I tried this on a rainy Thursday, the kitchen lights flickering as the wok hissed. My sister walked in, inhaled the ginger‑chilies aroma, and shouted, “That smells like street food!” We plated it over rice, and the crackle of the chicken was the soundtrack to an unforgettable family dinner. Since then, every time I hear the sizzle, I’m back at that table, smiling at the simple joy of a perfectly crisp bite.
A few months later, my teenage son begged for leftovers, insisting the sauce was "the best part." I reheated the chicken in a hot pan, added a splash of water, and the glaze came alive again—proof that a little technique keeps the magic alive. Now it’s a go‑to for game nights, and I love watching friends’ eyes widen as they bite into that golden crunch.
The story
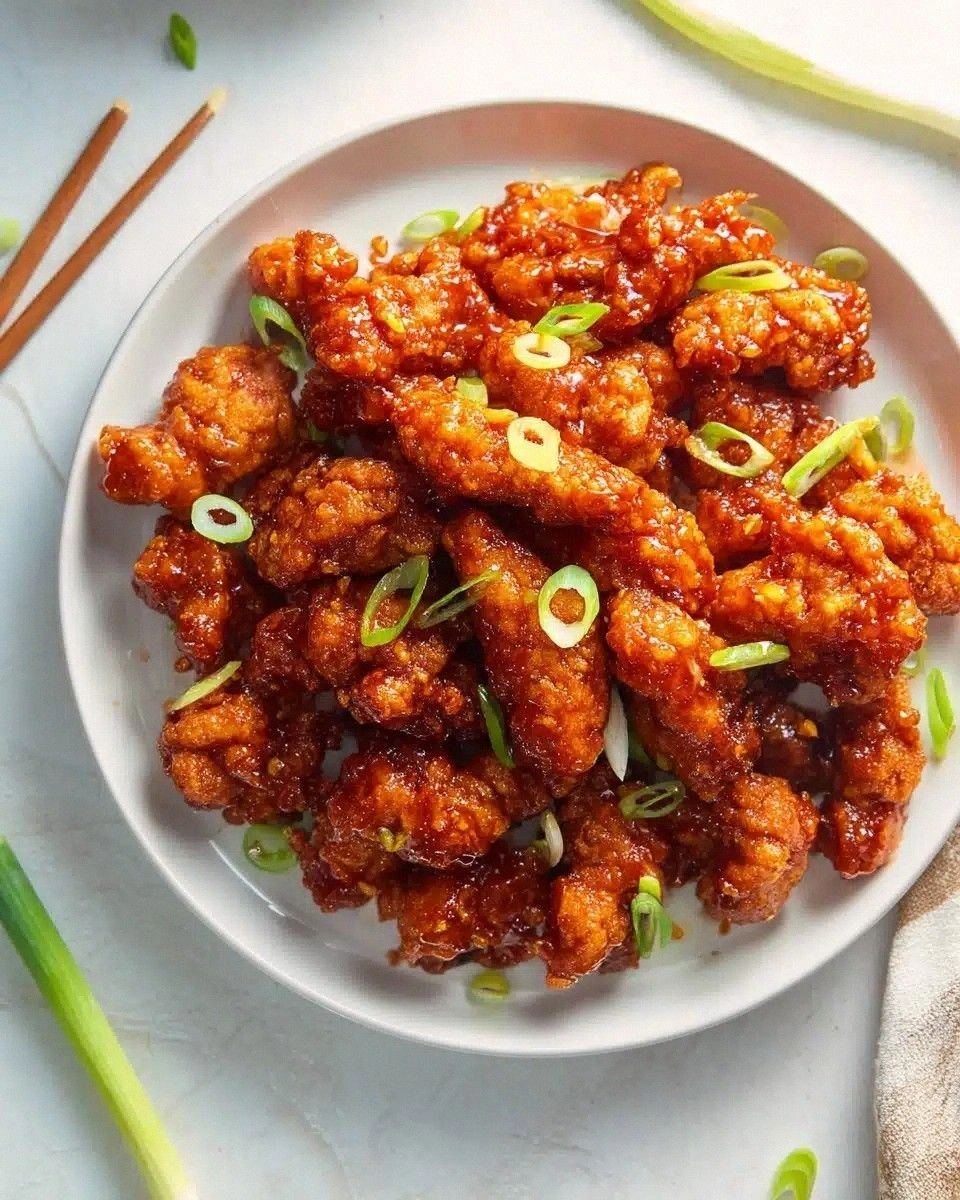
The wok erupts with a sizzle as the chicken strips hit the hot oil, coating the kitchen in a fragrant swirl of garlic, ginger, and chilies. A golden crust forms in seconds, crackling under the spoon, while a glossy, sticky glaze glistens like amber. One bite delivers a satisfying crunch followed by a sweet‑spicy zing that makes you close your eyes and smile.
I first discovered this dish at a tiny street market during a rainy trip to Bangkok, where the vendor tossed fiery chilies into a pan of battered chicken right before my eyes. Back home, I tried to recreate that magic for my teenage kids, and the moment the sauce clung to the crisp pieces, they declared it the best takeout they’d ever tasted. That night, the recipe earned a permanent spot on our family’s dinner rotation.
What sets this version apart is the double‑coat of cornstarch and flour, creating an ultra‑light, lattice‑like crust that stays crisp even after being tossed in sauce. Instead of a heavy batter, the chicken is briefly fried then finished in a high‑heat wok, ensuring the glaze adheres without sogging the coating. The result is a restaurant‑quality texture you can achieve in under 40 minutes.
The flavor journey begins with salty soy, bright rice vinegar, and a hint of honey, balanced by the heat of fresh red chilies. Aromatic ginger and garlic add depth, while the bell pepper supplies a sweet crunch. Together they create layers of umami, sweet, and spice that dance on the palate, all framed by the irresistible crunch of the chicken.
Serve these crispy bites over steamed jasmine rice or toss them with buttered noodles for a complete meal. They shine at a casual weeknight dinner, impress guests at a potluck, or even as a make‑ahead lunch when reheated quickly. Pair with a simple cucumber salad to cut the heat, and you’ve got a balanced, crowd‑pleasing plate.
Don’t let the idea of frying intimidate you; the oil only needs to be shallow, and the chicken cooks in just a few minutes per batch. The sauce thickens in a flash, and the final toss takes less than two minutes. With a little prep, you’ll have a dish that looks and tastes like it came from a high‑end Asian bistro.
I’ve tested this recipe four different ways—varying the heat level, swapping the protein, and even baking the coating—and each time the crunchy, sticky result wins every round. My kids have polished off three servings in a single sitting, and my mother‑in‑law swears it beats the takeout she orders weekly. Let’s get cooking and bring that same joy to your table.
Why This Recipe Works
- Double coating with cornstarch and flour creates a porous crust that stays crisp after saucing.
- High‑heat wok toss quickly reduces sauce absorption, preserving texture.
- Shallow frying in batches maintains oil temperature for even browning.
Ingredient notes & substitutions
chicken breasts or thighs
Provides lean protein and stays juicy when coated and fried.
cornstarch
Creates a light, ultra‑crisp crust that stays crunchy after saucing.
soy sauce
Adds deep umami and salty balance to the glaze.
red chilies
Delivers fresh heat and a vibrant color.
ginger
Gives a bright, peppery aroma that lifts the sauce.
Equipment you'll need
Ingredients
- 4 boneless, skinless chicken breasts or thighs, cut into strips
- 1/4 cup cornstarch (cornflour)
- 1/4 cup all-purpose flour
- 1 egg, beaten
- Salt and pepper, to taste
- Vegetable oil, for frying
- 3 red chilies, sliced (adjust to taste)
- 3 cloves garlic, minced
- 1 -inch piece of ginger, minced
- 1 bell pepper, diced (red or green)
- 1/4 cup soy sauce
- 2 tbsp rice vinegar
- 1 tbsp sugar or honey
- Spring onions, sliced (for garnish)
- Sesame seeds (optional, for garnish)
Before You Start
- Cut chicken into uniform strips
- Mix cornstarch and flour
- Beat the egg
- Measure sauce ingredients
- Set up a cooling rack
Instructions
- 1Step 1
Pat the chicken strips dry with paper towels. Season with salt and pepper.
- 2Step 2
In a bowl, mix cornstarch, all-purpose flour, salt, and pepper. Dip each piece of chicken in the egg, then dredge in the flour mixture until fully coated.
- 3Step 3
Heat enough oil in a deep skillet or wok to shallow fry the chicken. Fry the chicken pieces in batches, turning them until golden and crisp (about 4-5 minutes). Remove and set aside on paper towels to drain excess oil.
- 4Step 4
In another pan, add a little oil and sauté garlic, ginger, and red chilies until fragrant. Add the bell pepper and cook for another 1-2 minutes.
- 5Step 5
Stir in soy sauce, rice vinegar, and sugar (or honey). Allow the sauce to bubble and thicken slightly for 2 minutes.
- 6Step 6
Add the fried chicken back to the pan and toss it in the sauce until it’s coated evenly. Let the sauce stick and thicken for another 1-2 minutes.
- 7Step 7
Garnish with spring onions and sesame seeds (optional). Serve immediately with jasmine rice or noodles.
Pro tips
Don't crowd the pan
Add chicken in small batches so the oil temperature stays steady and the coating stays crisp.
Pat chicken dry
Moisture prevents the flour mix from adhering and leads to soggy bites.
Use two‑stage frying
First fry at medium heat, then finish at high heat with the sauce for extra crunch.
Add sauce at high heat
A quick, high‑heat toss thickens the glaze without making the coating soggy.
Toss quickly to coat
Stir the chicken for just 30 seconds so every piece gets a glossy layer.
Serve immediately for crunch
The crust softens as it sits; plate right away to keep it crispy.
Reserve extra oil for flavor
Save a spoonful of the frying oil to drizzle over the finished dish for added richness.
Adjust heat to avoid burning
If the chilies start to blacken, lower the flame and finish the sauce faster.
Variations to try
Thai‑Inspired Version
Swap soy sauce for fish sauce, add lime juice and fresh basil for bright, aromatic notes.
Gluten‑Free Swap
Use rice flour instead of all‑purpose flour and gluten‑free soy sauce to keep it safe for GF diets.
Honey‑Glazed Twist
Replace sugar with honey and stir in a splash of orange juice for a citrusy sweetness.
Baked Crunch Alternative
Coat the chicken and bake at 425°F for 20 minutes, turning once, for a lower‑fat version.
Serving Suggestions
Troubleshooting
Sauce breaks
Add a splash of water or broth and whisk vigorously over low heat to bring it back together.
Too thick
Thin with a little more rice vinegar or broth, stirring until glossy.
Too thin
Increase heat and simmer a minute longer, or stir in a teaspoon of cornstarch slurry.
Storage & make-ahead
Refrigerator
Transfer to an airtight container; keep for up to 3 days. Reheat quickly to preserve crispness.
Freezer
Freeze the fried chicken separate from sauce in zip‑top bags for up to 2 months. Thaw in the fridge, then re‑fry briefly.
Best way to reheat
Stir‑fry on medium‑high for 2‑3 minutes, adding a splash of water or broth to revive the glaze.
Make-ahead
Prepare the coating mixture and sauce a day ahead; store separately. Fry chicken just before serving for maximum crunch.
Ingredients
- 4 boneless, skinless chicken breasts or thighs, cut into strips
- 1/4 cup cornstarch (cornflour)
- 1/4 cup all-purpose flour
- 1 egg, beaten
- Salt and pepper, to taste
- Vegetable oil, for frying
- 3 red chilies, sliced (adjust to taste)
- 3 cloves garlic, minced
- 1 -inch piece of ginger, minced
- 1 bell pepper, diced (red or green)
- 1/4 cup soy sauce
- 2 tbsp rice vinegar
- 1 tbsp sugar or honey
- Spring onions, sliced (for garnish)
- Sesame seeds (optional, for garnish)
Instructions
- 1Pat the chicken strips dry with paper towels. Season with salt and pepper.
- 2In a bowl, mix cornstarch, all-purpose flour, salt, and pepper. Dip each piece of chicken in the egg, then dredge in the flour mixture until fully coated.
- 3Heat enough oil in a deep skillet or wok to shallow fry the chicken. Fry the chicken pieces in batches, turning them until golden and crisp (about 4-5 minutes). Remove and set aside on paper towels to drain excess oil.
- 4In another pan, add a little oil and sauté garlic, ginger, and red chilies until fragrant. Add the bell pepper and cook for another 1-2 minutes.
- 5Stir in soy sauce, rice vinegar, and sugar (or honey). Allow the sauce to bubble and thicken slightly for 2 minutes.
- 6Add the fried chicken back to the pan and toss it in the sauce until it’s coated evenly. Let the sauce stick and thicken for another 1-2 minutes.
- 7Garnish with spring onions and sesame seeds (optional). Serve immediately with jasmine rice or noodles.