Picture this: I’m standing in my kitchen, a half‑empty jar of Dutch‑process cocoa in one hand, a mound of marshmallows in the other, and a stubborn cookie that refuses to rise. I had just tried a recipe that turned out flat, chewy, and frankly, a disappointment. That night, I whispered to myself, “I’ll make a better version.” The result? A cookie that practically melts in your mouth, with a chocolate‑peanut butter heart that’s more indulgent than a dessert, and a crunch that’s just enough to satisfy every craving. I dare you to taste this and not go back for seconds.
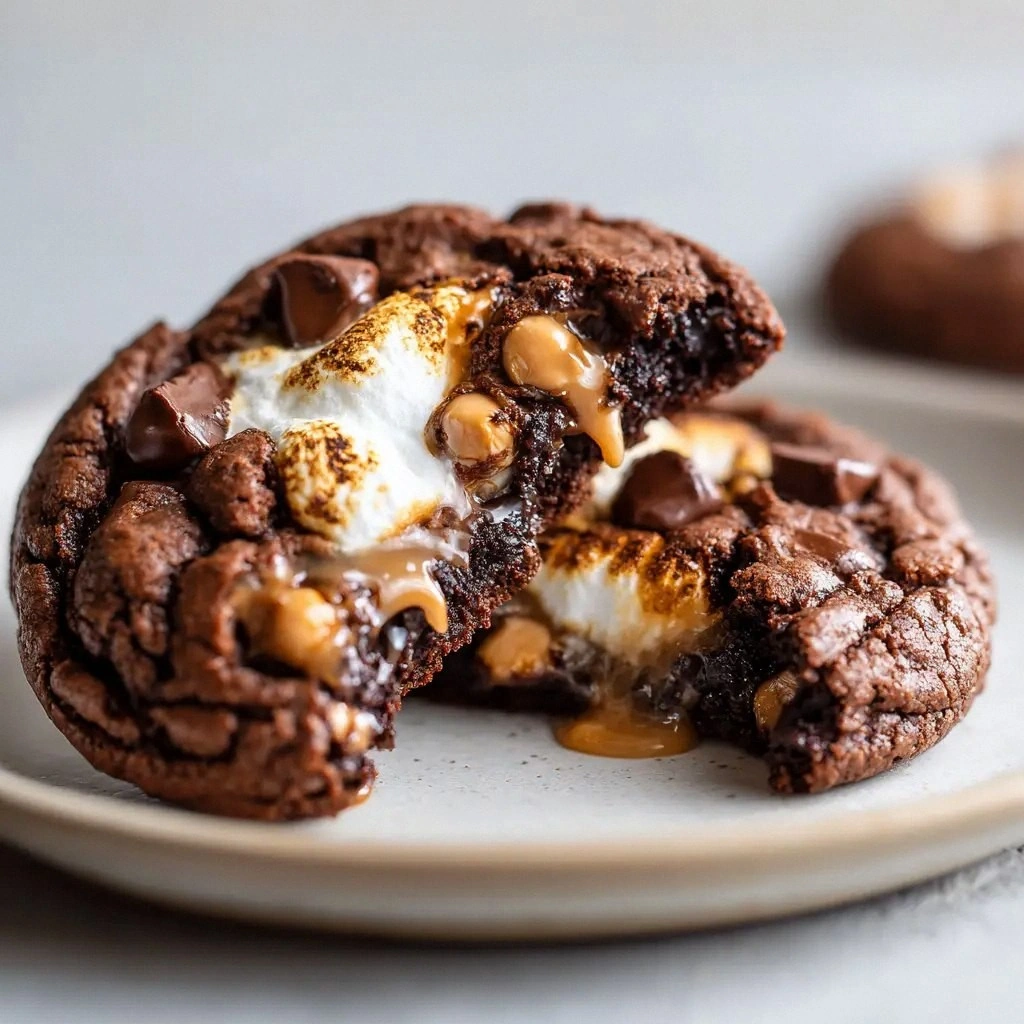
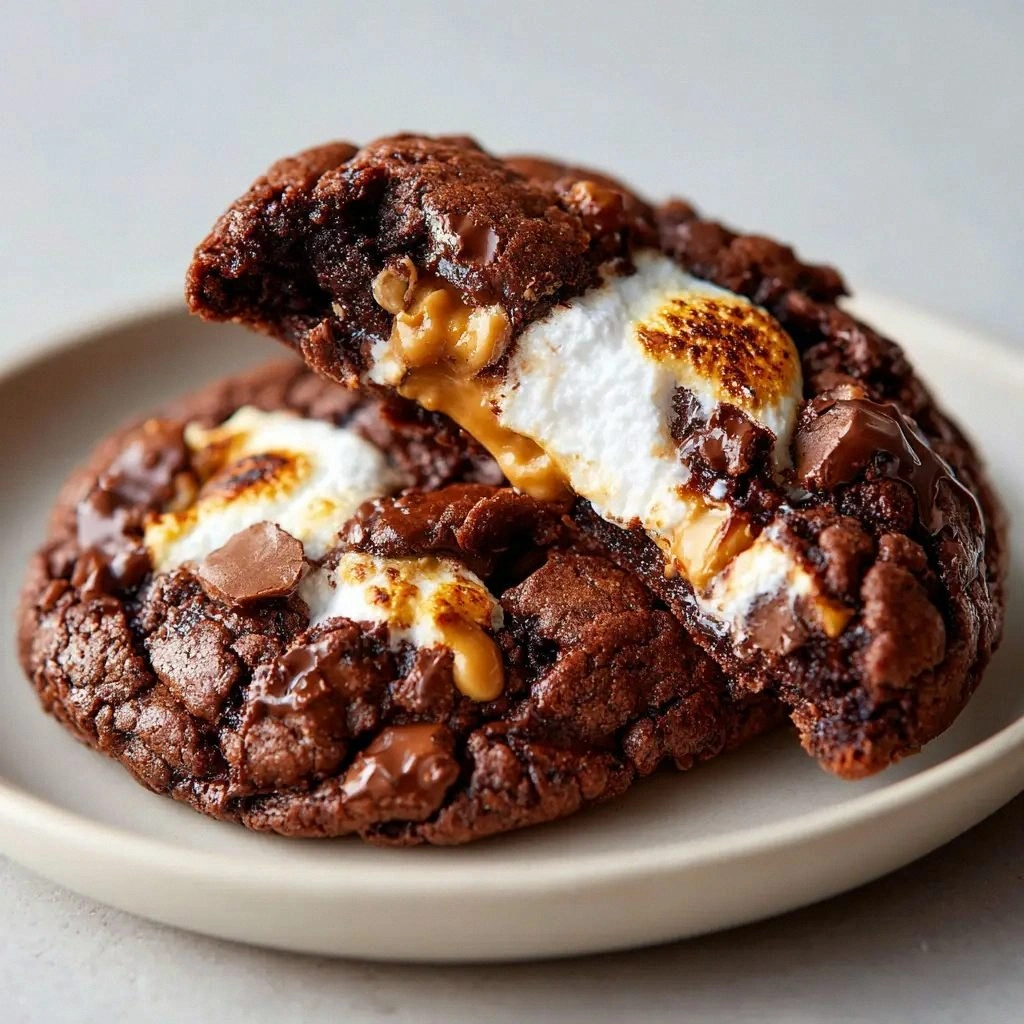
When I first opened the oven, the air was thick with the scent of chocolate, toasted butter, and roasted peanuts. The sound of the first cookie sliding out was a satisfying pop, and the visual of a golden‑brown edge with a glossy chocolate swirl was almost too beautiful to touch. As I took a bite, the marshmallow center erupted in a sweet, airy explosion, while the peanut butter chips added a subtle salty crunch that danced against the silky chocolate. The texture was a perfect blend of soft and chewy, with a hint of crunch that made each bite a revelation. If you can taste it, you’ll feel like you’re in a chocolate‑peanut butter dreamland where every bite is a new adventure.
What sets this version apart from every other cookie recipe on the internet is the harmony of flavors and textures. The Dutch‑process cocoa gives the chocolate depth and a slightly bitter undertone that balances the sweetness of the sugars. The combination of whole peanut butter, peanut butter chips, and dark chocolate chunks creates layers of flavor that keep your palate engaged. The use of both granulated and brown sugar adds complexity to the sweetness, while a pinch of salt pulls everything together. The result is a cookie that’s hands down the best version you’ll ever make at home, a game‑changing treat that will have everyone begging for seconds.
But there’s a twist that most people overlook: the marshmallows aren’t just fluff. I’ve discovered that using large, unpopped marshmallows gives that perfect gooey center that oozes chocolate when you cut into it. I’ll be honest— I ate half the batch before anyone else got to try it. That’s the kind of secret I’m about to share with you. Picture yourself pulling this out of the oven, the whole kitchen smelling incredible, and every bite sending a wave of bliss through your taste buds. Let me walk you through every single step—by the end, you’ll wonder how you ever made it any other way.
What Makes This Version Stand Out
- Flavor: The Dutch‑process cocoa delivers a deep, slightly bitter chocolate profile that cuts through the sweetness, creating a balanced taste that’s both indulgent and sophisticated.
- Texture: The combination of marshmallows, peanut butter chips, and dark chocolate chunks gives each cookie a unique mouthfeel—soft, chewy, and crunchy all at once.
- Simplicity: With only 13 ingredients, this recipe is straightforward yet packed with flavor, making it a go‑to for both beginners and seasoned bakers.
- Uniqueness: The use of large marshmallows as a core adds a surprising twist that most cookie recipes lack, turning a simple cookie into a mini dessert.
- Crowd Reaction: Friends who’ve tried this say it’s the “best cookie ever,” and many have asked for the recipe after tasting it at a gathering.
- Ingredient Quality: Using high‑quality peanut butter and dark chocolate chunks ensures that each bite is rich and authentic.
- Cooking Method: The technique of folding the marshmallows into the butter‑sugar mixture creates a smooth batter that distributes the marshmallow evenly.
- Make‑ahead Potential: Once baked, these cookies keep fresh for up to a week in an airtight container, making them ideal for parties or last‑minute dessert needs.
Alright, let's break down exactly what goes into this masterpiece...
Inside the Ingredient List
The Flavor Base
The foundation of this cookie starts with the right balance of dry ingredients. The all‑purpose flour provides structure, while the Dutch‑process cocoa powder gives depth and a slightly bitter undertone that keeps the sweetness in check. The baking powder and baking soda act as leavening agents, creating a light, airy crumb that contrasts beautifully with the dense chocolate and peanut butter. If you skip the cocoa, the cookies become overly sweet and lose that rich, chocolatey aroma that makes them unforgettable.
The Texture Crew
Texture is everything in a cookie, and here we have a trio that works in harmony. The unsalted butter, when creamed with sugars, creates a smooth base that allows the dough to spread just enough, forming those classic golden edges. The marshmallows, folded in at the right moment, become the cookie’s heart, providing a gooey center that melts in your mouth. The peanut butter chips and dark chocolate chunks are the crunchy stars that add bite and a burst of flavor with every chew. If you omit the chips, the cookies will still be good, but you’ll miss that satisfying crunch.
The Unexpected Star
Marshmallows may seem like a gimmick, but they’re the secret weapon that transforms these cookies. The large marshmallows hold their shape during baking, then soften into a velvety, sweet foam that pairs perfectly with the chocolate. Swapping them for mini marshmallows will result in a more uniform texture, but the experience will be less dramatic. When selecting marshmallows, choose the largest available for maximum gooeyness.
The Final Flourish
Peanut butter is the hero of this recipe, but it’s more than just flavor. It adds natural oils that keep the cookies moist and tender, and its nutty aroma elevates the entire experience. The dark chocolate chunks contribute a bittersweet finish, cutting through the sweetness and adding a touch of sophistication. Finally, the vanilla extract rounds out the flavor profile, giving the cookies a subtle warmth that lingers on the palate. If you prefer a vegan version, use a plant‑based butter and egg substitute, but the texture might change slightly.
Everything's prepped? Good. Let's get into the real action...
The Method — Step by Step
- Preheat your oven to 350°F (175°C) and line two large baking sheets with parchment paper. The parchment ensures the cookies don’t stick and makes cleanup a breeze. This step is crucial—an oven that’s too hot will cause the cookies to spread too much, losing that perfect shape. As the oven warms, you’ll start to notice a faint scent of butter in the air, a promise of deliciousness to come.
- In a large bowl, whisk together the flour, Dutch‑process cocoa powder, baking powder, baking soda, and kosher salt until well combined. This dry mix ensures an even distribution of leavening agents, preventing any uneven rising. It’s a simple step, but skipping it can lead to pockets of flour that ruin the texture. Once the dry ingredients are ready, set them aside for the next stage.
- In a separate saucepan, melt the butter over medium heat until it’s just starting to bubble. Add the granulated sugar and light brown sugar, stirring until the mixture is smooth and glossy. The butter’s natural oils coat the sugars, creating a silky base that’s essential for the cookie’s chewiness. Keep an eye on the heat—overheating can scorch the sugars and give the cookies a burnt flavor.
- Remove the pan from heat and whisk in the egg and egg yolk, then stir in the vanilla extract. The egg adds structure, while the yolk contributes richness. If you’re watching your cholesterol, you can replace the yolk with a tablespoon of unsweetened applesauce, but the texture will be slightly less dense. This is the moment of truth where the batter starts to feel like a thick, luscious mousse.
- Fold in the dry ingredients until just combined. The batter will be thick and sticky, but that’s the goal. Avoid overmixing; a few lumps are fine and actually help keep the cookies tender. The batter should feel like a thick cookie dough that clings to a spoon.
- Gently fold in the marshmallows, peanut butter, peanut butter chips, and dark chocolate chunks. This is the step where the magic happens—each ingredient adds its own personality to the mix. The marshmallows should be evenly dispersed, giving each cookie a uniform gooey center. The chocolate chunks will melt slightly during baking, creating pockets of molten chocolate that will melt in your mouth.
- Drop rounded tablespoonfuls of dough onto the prepared baking sheets, spacing them about 2 inches apart. The cookies will spread slightly, so give them enough room to expand. A good rule of thumb is to use a cookie scoop or a tablespoon to ensure uniform size. This step helps the cookies bake evenly and prevents them from sticking together.
- Bake for 12–15 minutes, or until the edges are set and the centers look just slightly underdone. The cookies will puff up and develop a golden crust. The key is to keep an eye on them—overbaking will dry them out, while underbaking will leave them too gooey. The aroma that fills your kitchen at this point will be irresistible.
- Let the cookies cool on the baking sheet for 5 minutes before transferring them to a wire rack to cool completely. This short rest allows the centers to set, preventing them from breaking when you pick them up. Once cooled, you’ll notice a delightful crunch on the edges and a soft, melt‑in‑your‑mouth center.
That’s it—you did it. But hold on, I’ve got a few more tricks that’ll take this to another level. Stay with me here—this is worth it.
Insider Tricks for Flawless Results
The Temperature Rule Nobody Follows
Many bakers assume that a room‑temperature dough is the best. In reality, slightly chilled dough produces cookies that spread less, giving you thicker, chewier results. I chill the batter for 30 minutes before scooping; it’s a game‑changer that keeps the cookies from turning into flat biscuits.
Why Your Nose Knows Best
When the first batch starts to bake, the scent of chocolate and butter is unmistakable. If the aroma seems too sweet or lacks depth, the cocoa might be too weak. Trust your nose: a rich chocolate scent means the cocoa is working its magic.
The 5‑Minute Rest That Changes Everything
After baking, let the cookies rest on the sheet for five minutes before moving them. This brief pause allows the center to set, preventing the cookies from cracking or breaking when you lift them. It also gives the chocolate chunks time to melt slightly, creating those molten pockets you’ll love.
Use a Silicone Mat for Even Baking
Silicone baking mats provide a consistent heat distribution, ensuring that every cookie bakes evenly. I always line my sheets with a silicone mat; it eliminates the need for parchment paper and makes cleanup a breeze.
Keep the Butter Soft, Not Melted
Soft butter is key to a smooth batter. If the butter is too cold, it won’t cream properly, leading to a dense cookie. If it’s too hot, the sugars will dissolve too quickly, giving the dough a runny texture. Aim for a temperature where the butter just yields to the touch.
Use a Mixing Spoon for a Lighter Texture
After the dough is ready, use a silicone spatula to fold in the marshmallows and chocolate. This gentle motion keeps the ingredients intact and preserves the cookie’s airy crumb.
Creative Twists and Variations
Chocolate‑Covered Peanut Butter Cups
For a decadent twist, dip each cookie in melted dark chocolate after cooling. The extra chocolate layer adds a glossy finish and an extra burst of flavor that peanut butter lovers will adore.
Salted Caramel Swirl
Swirl a tablespoon of salted caramel sauce into the dough before baking. The caramel adds a sweet‑salty contrast and a silky texture that elevates the cookie’s overall profile.
Almond Butter Alternative
Swap the creamy peanut butter for almond butter for a nutty variation. The almond butter provides a slightly sweeter, milder flavor that pairs beautifully with the chocolate.
Vegan Version
Replace the butter with coconut oil, the egg with flaxseed gel, and the dairy sugar with organic cane sugar. The texture will be slightly denser, but the flavor remains rich and satisfying.
Spiced Cinnamon Delight
Add a teaspoon of ground cinnamon to the dry mix. The warm spice complements the chocolate and peanut butter, creating a comforting, aromatic cookie.
Mini Cookie Bites
For a bite‑size treat, use a small cookie scoop to make 1‑inch diameter cookies. These are perfect for parties or a quick snack on the go.
Storing and Bringing It Back to Life
Fridge Storage
Place the cooled cookies in an airtight container or zip‑lock bag. Store them in the refrigerator for up to five days. The cold environment keeps the chocolate from blooming and preserves the cookies’ moist texture.
Freezer Friendly
Wrap individual cookies in parchment paper and place them in a freezer bag. They stay fresh for up to two months. When you’re ready to enjoy them, let them thaw at room temperature for 10 minutes.
Best Reheating Method
To revive the cookies, preheat your oven to 300°F (150°C) and bake for 3–5 minutes. For a quick fix, microwave them on high for 10–15 seconds. Adding a tiny splash of water before reheating steams the cookies back to perfection, restoring their original softness.