I still can’t forget the night I left a loaf of banana bread in the oven too long. The kitchen filled with a smoky chocolate aroma that made my mouth water before I even tasted the first bite. My friend, always up for a culinary dare, challenged me to turn that mishap into something extraordinary. I was halfway through my usual recipe, and the idea of adding a creamy chocolate filling seemed like a reckless gamble. That gamble turned into a culinary epiphany that I’m thrilled to share with you.
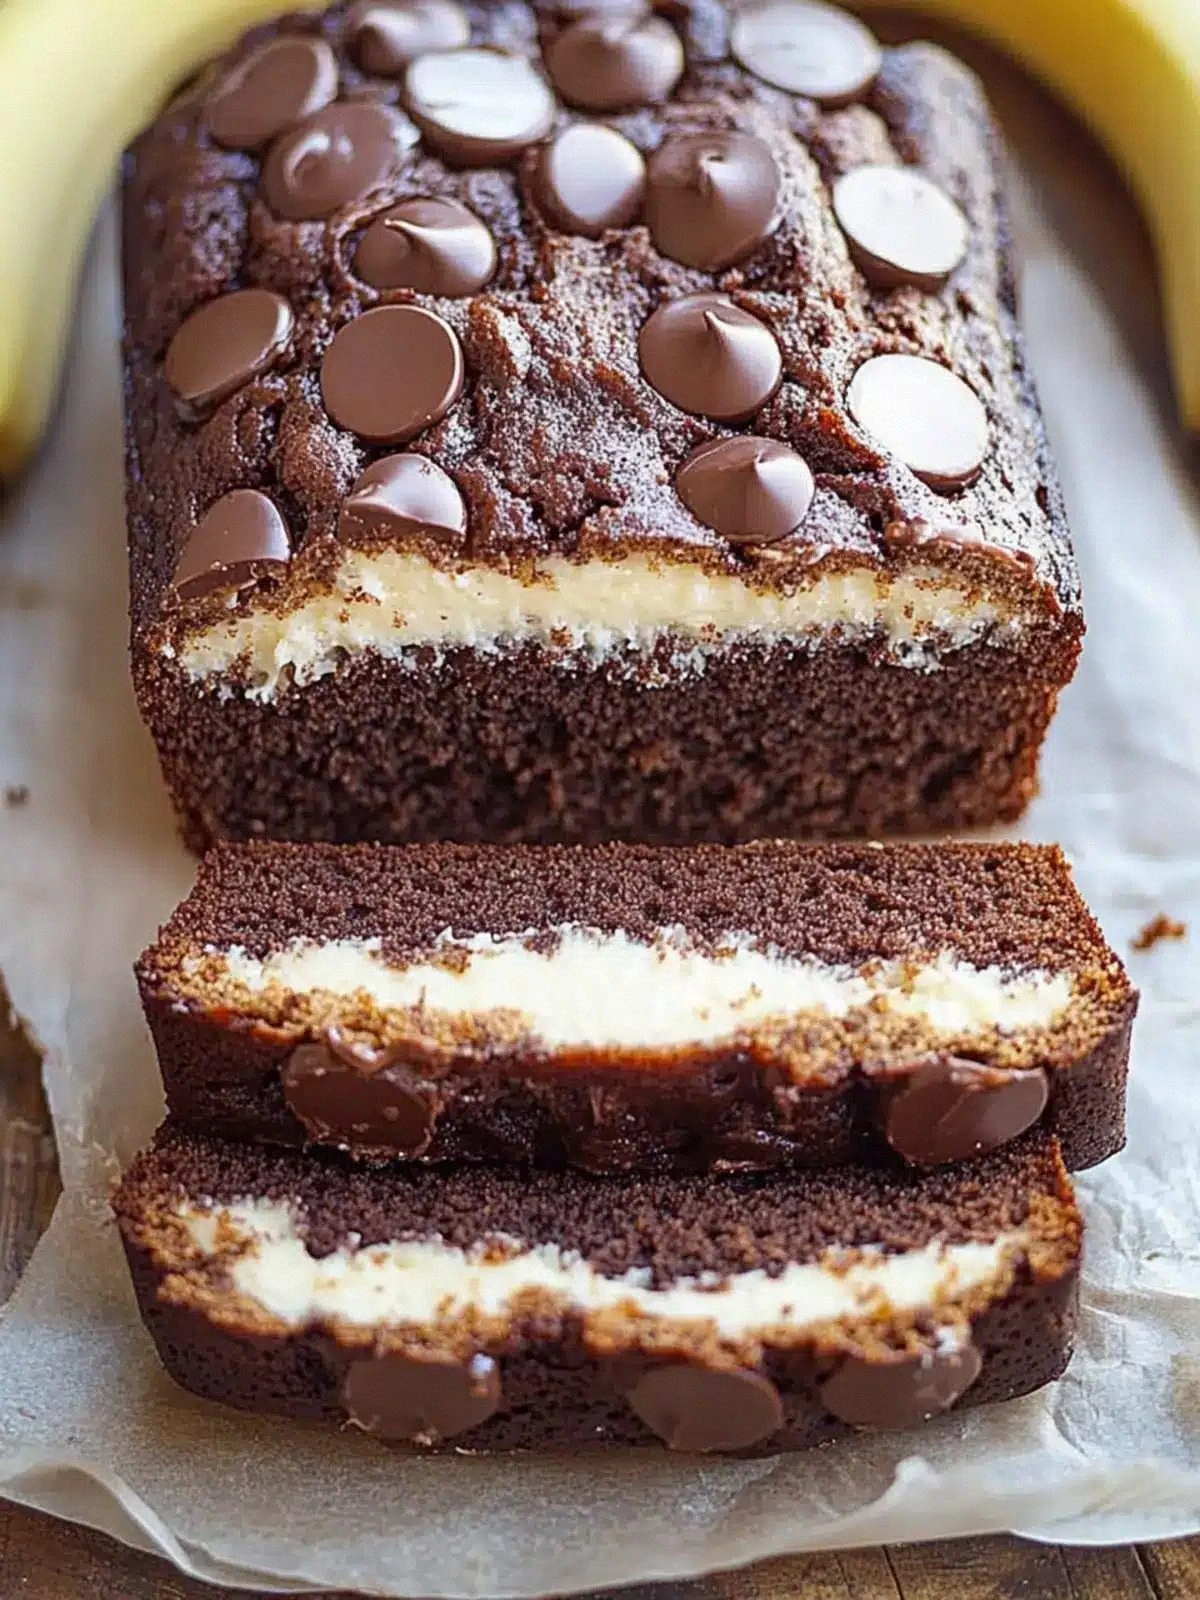
Picture this: the oven timer clicks off, the door opens, and a golden loaf sits on a cooling rack, its crust crackling like a soft applause. The scent of ripe bananas mingles with the deep, almost velvety notes of cocoa, creating a heady perfume that makes you want to pull the loaf out of the oven before it’s even finished baking. The first bite feels like a warm hug, with a moist interior that swirls around a decadent chocolate cream cheese center. The contrast between the airy bread and the rich filling is like a dance of textures—soft, chewy, and indulgently smooth. The moment your fork sinks into that center, the chocolate cream cheese melts, releasing a burst of sweet, tangy, and slightly nutty flavors that linger on the palate.
What makes this version stand out is that it’s not just a banana bread with a topping; it’s a full-on, flavor-packed experience that feels like a dessert you never knew you needed. The key is the chocolate cream cheese filling, which adds a silky, slightly tart contrast to the sweet banana crumb. The use of Dutch cocoa gives the bread a deep, slightly bitter undertone that balances the sweetness of the bananas and maple syrup. The addition of a splash of vinegar helps activate the baking soda, creating a lighter, airier crumb. And the final touch—optional chocolate chips that melt into pockets of gooey chocolate—makes every slice a little treasure hunt. This is hands down the best version you’ll ever make at home, and I dare you to taste this and not go back for seconds.
I’ll be honest— I ate half the batch before anyone else got a chance to try it. Most recipes get this completely wrong, treating banana bread like a basic loaf and missing the opportunity to elevate it with a luscious filling. But here, every element is carefully chosen to amplify the others, turning a simple comfort food into a showstopper. Picture yourself pulling this out of the oven, the whole kitchen smelling incredible, and knowing that this is the kind of dessert that will be talked about for weeks. Let me walk you through every single step—by the end, you’ll wonder how you ever made it any other way.
What Makes This Version Stand Out
- Taste: The chocolate cream cheese filling introduces a tangy, slightly salty dimension that cuts through the natural sweetness of bananas, creating a complex flavor profile that feels both comforting and adventurous.
- Texture: The bread’s crumb is moist yet airy, thanks to the balanced ratio of flour and liquid, while the filling provides a silky, melt-in-your-mouth contrast that keeps each bite interesting.
- Simplicity: Despite its indulgent feel, the recipe requires only a handful of ingredients, making it accessible for both novice bakers and seasoned chefs.
- Uniqueness: The combination of Dutch cocoa, vinegar, and a cream cheese center is a rare pairing that sets this loaf apart from traditional banana bread variations.
- Crowd Reaction: Guests rave about the unexpected chocolate pockets, and the loaf’s eye-catching appearance makes it a conversation starter at any gathering.
- Ingredient Quality: Using ripe bananas, pure vanilla, and high-quality cocoa powder ensures that every component shines without compromising the overall harmony.
- Cooking Method: The method blends classic baking with a quick, creamy filling that sets during the cooling phase, saving time and effort.
- Make-Ahead Potential: The loaf can be baked ahead, then chilled and filled later—ideal for busy mornings or last-minute dessert needs.
Alright, let’s break down exactly what goes into this masterpiece…
Inside the Ingredient List
The Flavor Base
Ripe bananas are the heart of this loaf; they bring natural sweetness, moisture, and a subtle earthiness that pairs beautifully with chocolate. Use bananas that are slightly overripe—those with brown spots—because they’re sweeter and mash more easily, reducing the need for extra sugar. If you’re short on bananas, you can replace them with 1 cup of unsweetened applesauce, but the flavor profile will shift toward a more fruity, less caramelized note.
The Texture Crew
The flour choice determines the crumb’s structure. Spelt flour gives a nutty flavor and a slightly denser crumb, while oat flour adds a mild sweetness and a softer texture. Mixing both can create a balanced mouthfeel. The 0.25 cups of oil or milk of choice keeps the loaf tender; substitute almond milk or oat milk for a dairy-free version. A splash of vinegar activates the baking soda, creating tiny air pockets that make the loaf rise and feel light.
The Unexpected Star
Dutch cocoa is a game-changer. Its alkalization removes bitterness, allowing the chocolate flavor to shine without overpowering the banana. If you don’t have Dutch cocoa, regular unsweetened cocoa works, but the loaf will have a slightly more pronounced cocoa bite. Adding 2 tbsp of regular cocoa powder boosts the chocolate depth, ensuring each bite is rich and satisfying.
The Final Flourish
The cream cheese filling is the pièce de résistance. Cream cheese adds a silky, slightly tangy element that contrasts the sweet banana crumb. The powdered sugar or erythritol balances the tartness, while the cornstarch thickens the mixture into a spreadable consistency. Optional chocolate chips melt into gooey pockets, creating a delightful surprise in every slice. If you’re vegan, substitute a dairy-free cream cheese and use maple syrup instead of honey.
Everything’s prepped? Good. Let’s get into the real action…
The Method — Step by Step
- Preheat your oven to 350 °F (175 °C) and line a 9×5-inch loaf pan with parchment paper. This step ensures even baking and a clean release later. I’ve found that a silicone pan works just as well if you’re avoiding parchment. Let the oven heat fully before placing the pan inside.
- In a large bowl, mash the ripe bananas with a fork until they’re a smooth, slightly lumpy paste. The texture should be thick enough to hold together but still have some small banana chunks for bite. Add the vanilla extract and vinegar, whisking until fully incorporated. The vanilla adds warmth, while the vinegar activates the leavening agents.
- Whisk the maple syrup, oil (or milk), and baking soda in a separate bowl. The oil keeps the loaf moist; if you’re dairy-free, a plant-based milk works perfectly. Stir until the mixture is glossy and the baking soda is dissolved, which will help the batter rise.
- Combine the dry ingredients—flour, Dutch cocoa, regular cocoa, baking powder, and salt—in a medium bowl. Sift the cocoa powders to eliminate clumps, ensuring an even distribution of chocolate flavor. Add the dry mix to the wet ingredients in two stages, folding gently after each addition to avoid overmixing.
- Pour the batter into the prepared loaf pan, smoothing the top with a spatula. Tap the pan gently on the counter to release any air pockets. The batter should fill the pan about three-quarters full to allow room for rising.
- Bake for 30–35 minutes, or until a toothpick inserted into the center comes out with a few moist crumbs. The loaf should develop a deep mahogany crust. If you’re using a glass pan, reduce the temperature by 25 °F to prevent over-browning.
- Remove the loaf from the oven and let it cool in the pan for 10 minutes, then transfer to a wire rack to cool completely. This step is crucial for the filling to set properly. While it cools, you’ll notice the aroma of banana and chocolate filling the air—pure bliss.
- While the loaf cools, prepare the chocolate cream cheese filling. In a medium bowl, beat the cream cheese until smooth. Gradually add powdered sugar (or erythritol) and a pinch of salt, mixing until the mixture is fluffy. Stir in the cornstarch to thicken the filling to a spreadable consistency.
- Once the loaf has cooled to room temperature, slice it horizontally into two equal layers. Spread the cream cheese filling evenly on the bottom half, then replace the top layer. If you prefer a more decadent experience, drizzle a little extra maple syrup over the top before slicing.
- Serve immediately, or chill the loaf in the refrigerator for 30 minutes to allow the filling to set further. The result is a moist, chocolatey banana bread with a luscious, tangy center that will have everyone asking for the recipe.
That’s it—you did it. But hold on, I’ve got a few more tricks that’ll take this to another level. These insider tips will help you avoid common pitfalls and elevate the flavor profile even further.
Insider Tricks for Flawless Results
The Temperature Rule Nobody Follows
Many bakers set the oven to 350 °F and forget to preheat. Preheating ensures that the batter starts rising immediately, preventing a dense crumb. Use an oven thermometer to verify the actual temperature, as many ovens run 25–50 °F higher than the dial indicates.
Why Your Nose Knows Best
The aroma of a banana loaf is a reliable indicator of doneness. When the smell becomes rich and chocolatey, the loaf is ready to come out. Trust your nose over the timer; it’s a seasoned baker’s secret.
The 5-Minute Rest That Changes Everything
Letting the loaf rest in the pan for 10 minutes before transferring to a rack allows the crumb to set and the filling to seal. Skipping this step can cause the filling to leak or the loaf to crumble when sliced.
The Cream Cheese Balance
If the filling is too thick, the loaf will feel heavy. Add a tablespoon of milk or cream to thin it to a spreadable consistency. Conversely, if it’s too runny, add a teaspoon of cornstarch or a bit more powdered sugar.
The Chocolate Chip Placement
For maximum chocolate impact, sprinkle a handful of chips on top of the batter before baking. They’ll melt into pockets that burst with flavor when you bite into the loaf.
The Final Glaze
A light drizzle of maple syrup or a dusting of powdered sugar after slicing adds a sweet finish. It also helps keep the loaf from drying out if you’re storing it for later.
Creative Twists and Variations
This recipe is a playground. Here are some of my favorite ways to switch things up:
Nutty Banana Crunch
Add ½ cup chopped walnuts or pecans to the batter for a crunchy texture. The nuts pair wonderfully with the chocolate filling, adding a caramelized depth.
Spiced Up
Stir in 1 tsp of cinnamon or a pinch of cayenne pepper for a warm, spicy kick that complements the banana’s natural sweetness.
Vegan Delight
Replace the cream cheese with a dairy-free alternative and use maple syrup instead of honey. Swap the eggs for a flaxseed mixture to maintain structure.
Coffee-Infused
Add 1 tbsp of instant espresso powder to the dry mix. The coffee enhances the chocolate flavor without making the loaf taste like a coffee shop.
Mini Muffins
Divide the batter into a 12-cup muffin tin and bake for 20–25 minutes. Fill each muffin with a dollop of cream cheese for a portable treat.
Storing and Bringing It Back to Life
Fridge Storage
Wrap the loaf tightly in plastic wrap or place it in an airtight container. It will stay fresh for up to 5 days. When you’re ready to eat, let it sit at room temperature for 15 minutes to restore moisture.
Freezer Friendly
Slice the loaf before freezing; this makes thawing easier. Store slices in a freezer bag and thaw overnight in the fridge. Reheat in a toaster oven at 300 °F for 5 minutes for a warm slice.
Best Reheating Method
Add a splash of water to the loaf before reheating; the steam will keep the crumb moist. Reheat in the microwave for 30 seconds or in a low oven until warmed through. This trick restores the bread’s original texture and aroma.