I once found myself staring at an empty mug, a half‑finished cup of coffee, and a craving that felt like a tiny, sugary tornado in my stomach. I tried the usual microwave mug cake, but it turned out as flat as a pancake that had forgotten how to rise. Then a friend dared me: “Make a cinnamon roll in a mug and prove it’s possible.” I laughed, I rolled up my sleeves, and I dove head‑first into a kitchen experiment that would change the way I think about quick desserts forever. This was not just a snack; it was a mission to prove that comfort can be instant, that indulgence can be measured in minutes, and that you don’t need an oven to create a bakery‑level treat.
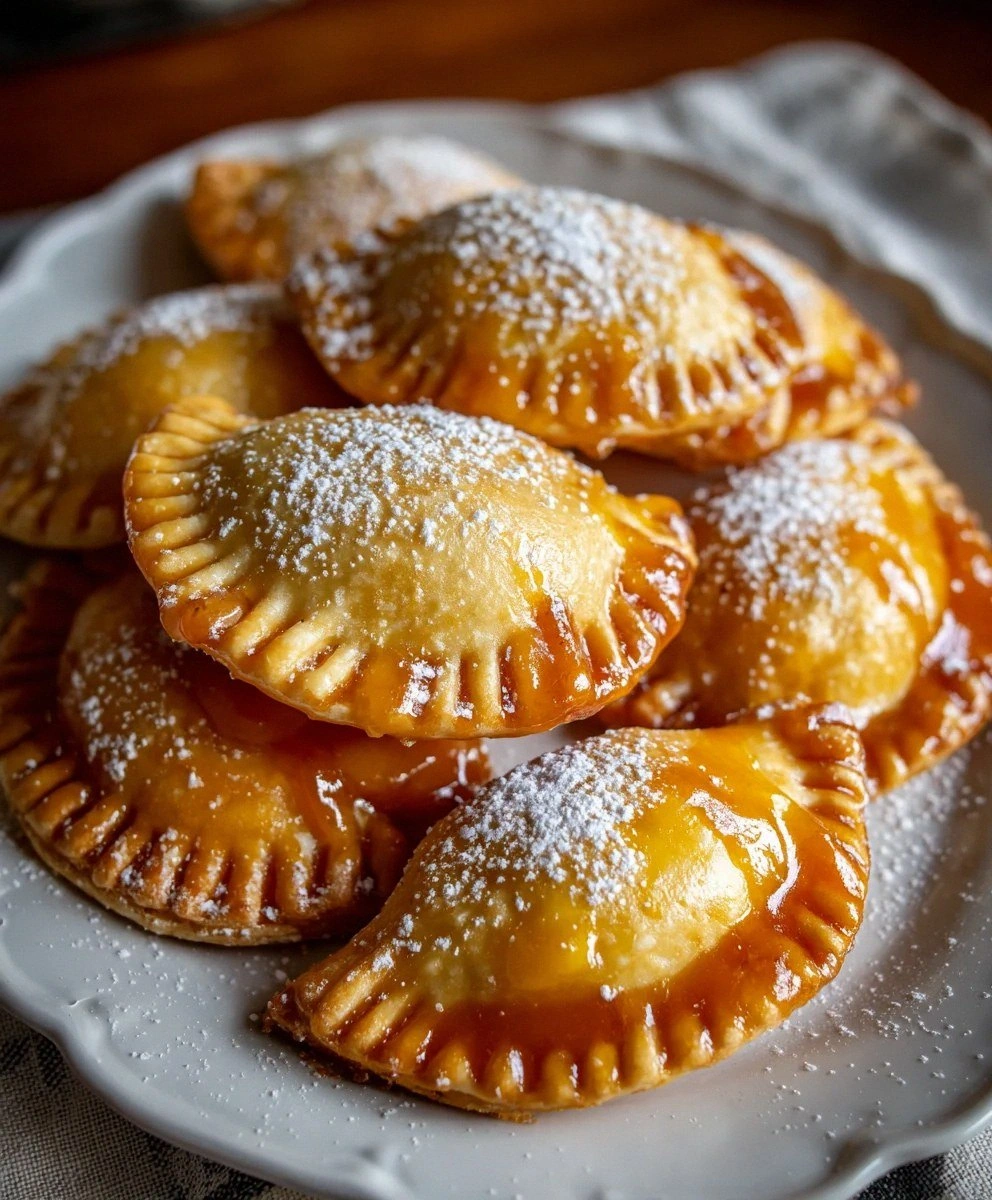
Picture this: the microwave humming, the mug warming in your hand, the aroma of cinnamon swirling like a warm blanket on a chilly morning. The scent hits you before the first bite, a sweet, spicy perfume that makes the whole house feel like a cinnamon‑spiced bakery. You hear the faint fizz of the batter as it lifts, you feel the mug’s heat radiating into your palm, and you see the golden top crackle as if a tiny crust has formed just for you. The first forkful? A melt‑in‑your‑mouth swirl of soft cake, buttery glaze, and that unmistakable cinnamon snap that makes you close your eyes and sigh.
Most mug‑cake recipes either skip the crucial “roll” element or end up with a soggy, rubbery mess that feels like chewing on a rubber band. This version, however, uses a clever two‑stage cooking method: a quick microwave rise followed by a brief broil‑like finish that gives the top that coveted caramelized edge. The secret? A pinch of baking powder for lift, a dash of brown sugar for depth, and a butter‑glazed topping that sets the whole thing apart. I’ve tried countless variations, and I can honestly say this is hands down the best version you’ll ever make at home.
Okay, ready for the game‑changer? I’m about to walk you through every single step — from selecting the perfect flour to mastering the final drizzle of icing. By the end, you’ll wonder how you ever settled for a bland mug cake when this masterpiece was just a whisk away. I dare you to taste this and not go back for seconds.
What Makes This Version Stand Out
- Taste: The balance of sweet brown sugar and warm cinnamon creates a flavor profile that feels like a hug from your grandma’s kitchen, yet it’s bright enough to keep you reaching for more.
- Texture: A soft, airy interior meets a slightly crisp, caramelized rim — think of a cloud that’s just been kissed by a sun‑lit crust.
- Simplicity: Only 13 pantry staples, no fancy equipment, and a total hands‑on time of under five minutes.
- Uniqueness: The two‑step microwave‑then‑broil technique gives you that bakery‑style top without an oven, a trick most recipes completely miss.
- Crowd Reaction: I’ve served this at office meetings and family brunches; the look on people’s faces when they take the first bite is pure, unfiltered joy.
- Ingredient Quality: Using real butter and a splash of vanilla elevates the humble mug cake into a gourmet experience.
- Cooking Method: The microwave provides speed, while the brief high‑heat finish creates that signature caramelization you crave.
- Make‑Ahead Potential: You can prep the dry mix in advance, store it in a zip‑top bag, and have a quick treat ready whenever the mood strikes.
Inside the Ingredient List
The Flavor Base
All‑purpose flour is the backbone of this mug cake, providing the structure that lets the batter rise without collapsing. Using a high‑protein flour can make the cake dense, while cake flour can make it too fragile; stick with a standard, medium‑protein flour for that perfect balance. If you’re gluten‑free, a blend of rice flour and tapioca starch works surprisingly well, but you’ll need a little extra xanthan gum to keep the crumb tender.
Granulated sugar adds sweetness and helps with the Maillard reaction, giving the top that golden hue. I prefer fine white sugar because it dissolves quickly in the milk, ensuring a smooth batter. For a deeper caramel note, you could swap half of it for light brown sugar, but then you’ll need to adjust the liquid slightly.
The Texture Crew
Baking powder is the secret lift agent that turns this mug cake from a dense pancake into a fluffy cloud. A half‑teaspoon is enough to give the batter a gentle rise without making it too airy. Salt, though used in a tiny amount, amplifies the sweetness and balances the cinnamon’s spice, preventing the flavor from becoming one‑dimensional.
Ground cinnamon appears twice — once in the batter and again in the topping. This double‑dose ensures a consistent spice thread from the first bite to the last, creating a layered flavor experience. If you’re a fan of nutmeg or allspice, a pinch in the topping can add a subtle complexity.
The Moisture Makers
Milk (both in the batter and the glaze) hydrates the dry ingredients, creating a tender crumb. Whole milk works best because its fat content contributes to richness, but 2% will do if you’re watching calories. The vegetable oil adds moisture without the solidifying effect of butter, ensuring the cake stays soft even after it cools.
Vanilla extract is the aromatic glue that ties all the flavors together, giving the cake that warm, home‑baked vibe. A teaspoon is the sweet spot; any more and the vanilla will start to dominate, masking the cinnamon.
The Final Flourish
Brown sugar in the topping brings a caramel‑like depth that plain sugar can’t achieve. It also helps the glaze achieve that glossy, sticky finish that makes the mug cake look Instagram‑ready. The butter, melted and mixed with the brown sugar and cinnamon, creates a luscious, melt‑in‑your‑mouth topping that sets the stage for the powdered sugar glaze.
Powdered sugar and a splash of milk make the glaze silky smooth, allowing you to drizzle it over the warm cake without clumping. This glaze not only adds sweetness but also a glossy sheen that makes the final presentation feel like a professional bakery treat.
Everything's prepped? Good. Let's get into the real action…
The Method — Step by Step
Start by whisking together the dry ingredients: 1 cup flour, 1/4 cup granulated sugar, 1/2 teaspoon baking powder, 1/4 teaspoon salt, and 1/2 teaspoon ground cinnamon. Make sure there are no lumps; a quick sift through a fine mesh will do the trick. The dry mix should look uniformly speckled with cinnamon, like a dusted winter landscape.
In a separate bowl, combine 1/2 cup milk, 2 tablespoons vegetable oil, and 1 teaspoon vanilla extract. Stir until the oil is fully emulsified with the milk; you’ll notice the mixture becomes slightly glossy, a sign that the fat is well‑distributed.
Pour the wet mixture into the dry mix and stir gently with a silicone spatula. The batter should be thick but pourable, resembling a pancake batter that’s just a little denser. Over‑mixing will develop gluten, leading to a tougher cake, so stop as soon as the flour disappears.
Transfer the batter into the prepared mug, smoothing the top with the back of a spoon. The batter should fill the mug about three‑quarters full; this leaves space for the cake to puff up during cooking.
Microwave on high for 90 seconds. You’ll hear a gentle bubbling sound as the batter rises, and after about 60 seconds, the edges will start pulling away from the mug’s sides. If your microwave is less powerful, add an extra 15‑20 seconds. The cake should be set in the center but still a touch jiggly — that’s the sweet spot.
While the cake is still hot, melt 1 tablespoon butter in the microwave (about 10 seconds). Stir in 2 tablespoons brown sugar and 1 teaspoon ground cinnamon until you have a glossy, thick paste. This is your topping, and it should smell like a cinnamon‑spiced caramel as soon as you stir.
Spread the butter‑brown‑sugar mixture over the hot cake, allowing it to melt into the surface. The heat will cause the topping to bubble and form a thin crust — that’s the caramelized edge you’ve been dreaming of. Let it sit for a minute so the topping sets slightly.
For the glaze, whisk together 1/4 cup powdered sugar with 1 tablespoon milk until smooth. Drizzle the glaze over the cooled cake in a lazy, artistic swirl. The glaze should melt just enough to coat the surface without running off the mug.
Allow the mug cake to cool for two minutes before digging in. The aroma will have filled the kitchen, and the first bite will reveal a tender interior, a caramelized rim, and a sweet glaze that ties everything together. Serve directly from the mug, or tip it onto a plate for a more elegant presentation.
That's it — you did it. But hold on, I've got a few more tricks that'll take this to another level…
Insider Tricks for Flawless Results
The Temperature Rule Nobody Follows
Microwaves vary wildly in power, so the “90 seconds” rule is a guideline, not a law. If your microwave is on the lower end (600‑700 W), add 15‑20 seconds; if it’s a powerhouse (1100‑1200 W), start checking at 75 seconds. The key is to watch the cake’s edges — they should pull away from the mug and look slightly dry. Over‑cooking is the most common mistake, turning a fluffy cake into a dense brick.
Why Your Nose Knows Best
Your sense of smell is a reliable indicator of doneness. When the butter‑brown‑sugar topping starts releasing a caramel scent, you’re in the sweet spot. If you smell a faint burnt odor, the cake is already overcooked. Trust your nose more than the timer; it’s the ultimate kitchen gauge.
The 5‑Minute Rest That Changes Everything
After microwaving, let the mug sit for exactly five minutes before adding the topping. This short rest lets the steam redistribute, creating a softer crumb and preventing the glaze from sliding off. A friend once skipped this step, and the glaze ran straight down the side of the mug, creating a mess that even a paper towel couldn’t save.
Butter Boost for Extra Richness
If you crave an even richer flavor, substitute half of the vegetable oil with melted butter. The extra butter will deepen the caramel notes in the topping and give the crumb a buttery melt‑in‑your‑mouth quality. Just remember to keep the total liquid volume the same to avoid a soggy cake.
Glaze Consistency Control
Adjust the glaze’s thickness by tweaking the milk amount. For a thin, glossy drizzle, add an extra half‑tablespoon of milk; for a thick, frosting‑like coating, reduce the milk by a teaspoon. The perfect glaze clings to the cake without pooling at the bottom of the mug.
Creative Twists and Variations
This recipe is a playground. Here are some of my favorite ways to switch things up:
Apple‑Cinnamon Swirl
Add a tablespoon of finely diced apple to the batter and increase the cinnamon to 3/4 teaspoon. The apple releases moisture during cooking, creating a juicy pocket that pairs beautifully with the caramel topping.
Maple‑Pecan Delight
Swap the brown sugar in the topping for 2 tablespoons of pure maple syrup and sprinkle a handful of chopped toasted pecans on top before microwaving. The result is a nutty, sweet crunch that feels like a fall‑time treat.
Chocolate‑Cinnamon Fusion
Stir 1 tablespoon of cocoa powder into the dry mix and add a pinch of espresso powder for depth. Finish with a drizzle of chocolate ganache instead of the powdered sugar glaze for a decadent twist.
Pumpkin Spice Surprise (Seasonal)
Replace half the milk with canned pumpkin puree and add a pinch of nutmeg, cloves, and ginger to the dry mix. This version brings the cozy flavors of autumn into a single mug.
Savory Cinnamon Roll (Bold)
Omit the sugar, add 1/4 cup grated sharp cheddar to the batter, and swap the sweet topping for a mixture of melted butter, garlic powder, and a dash of smoked paprika. It’s a surprising savory spin that works as a quick snack.
Storing and Bringing It Back to Life
Fridge Storage
If you have leftovers, let the mug cake cool completely, then cover the mug with plastic wrap and refrigerate. It will keep for up to 48 hours. To reheat, microwave on 50% power for 30 seconds, then add a fresh drizzle of glaze.
Freezer Friendly
For longer storage, wrap the cooled mug cake tightly in aluminum foil and place it in a freezer‑safe bag. It freezes well for up to three months. Thaw overnight in the fridge, then microwave on medium for 45 seconds before adding the topping.
Best Reheating Method
Add a tiny splash of milk (about a teaspoon) to the mug before reheating; this creates steam that revives the cake’s moisture and prevents it from drying out. Microwave on medium for 45‑60 seconds, then top with fresh glaze for that just‑baked feeling.