I remember the night I was supposed to impress my in-laws with a dessert that would make them swoon. I had a stack of chocolate bars, a bag of cocoa, and a stubborn oven that refused to cooperate. I opened the fridge, pulled out a handful of butter, and the kitchen smelled like a promise of decadence. That moment, that frantic scramble, birthed the idea of a triple chocolate masterpiece that would melt hearts and taste buds alike.
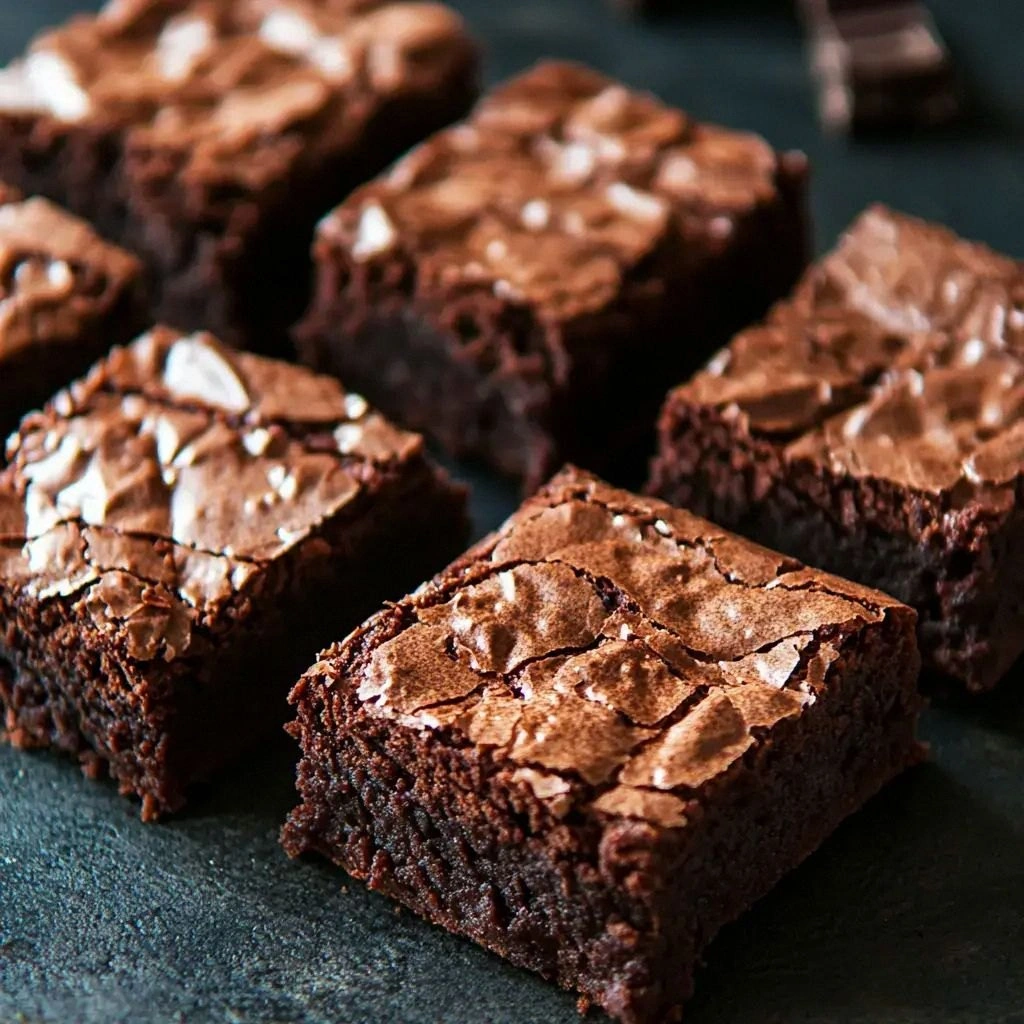
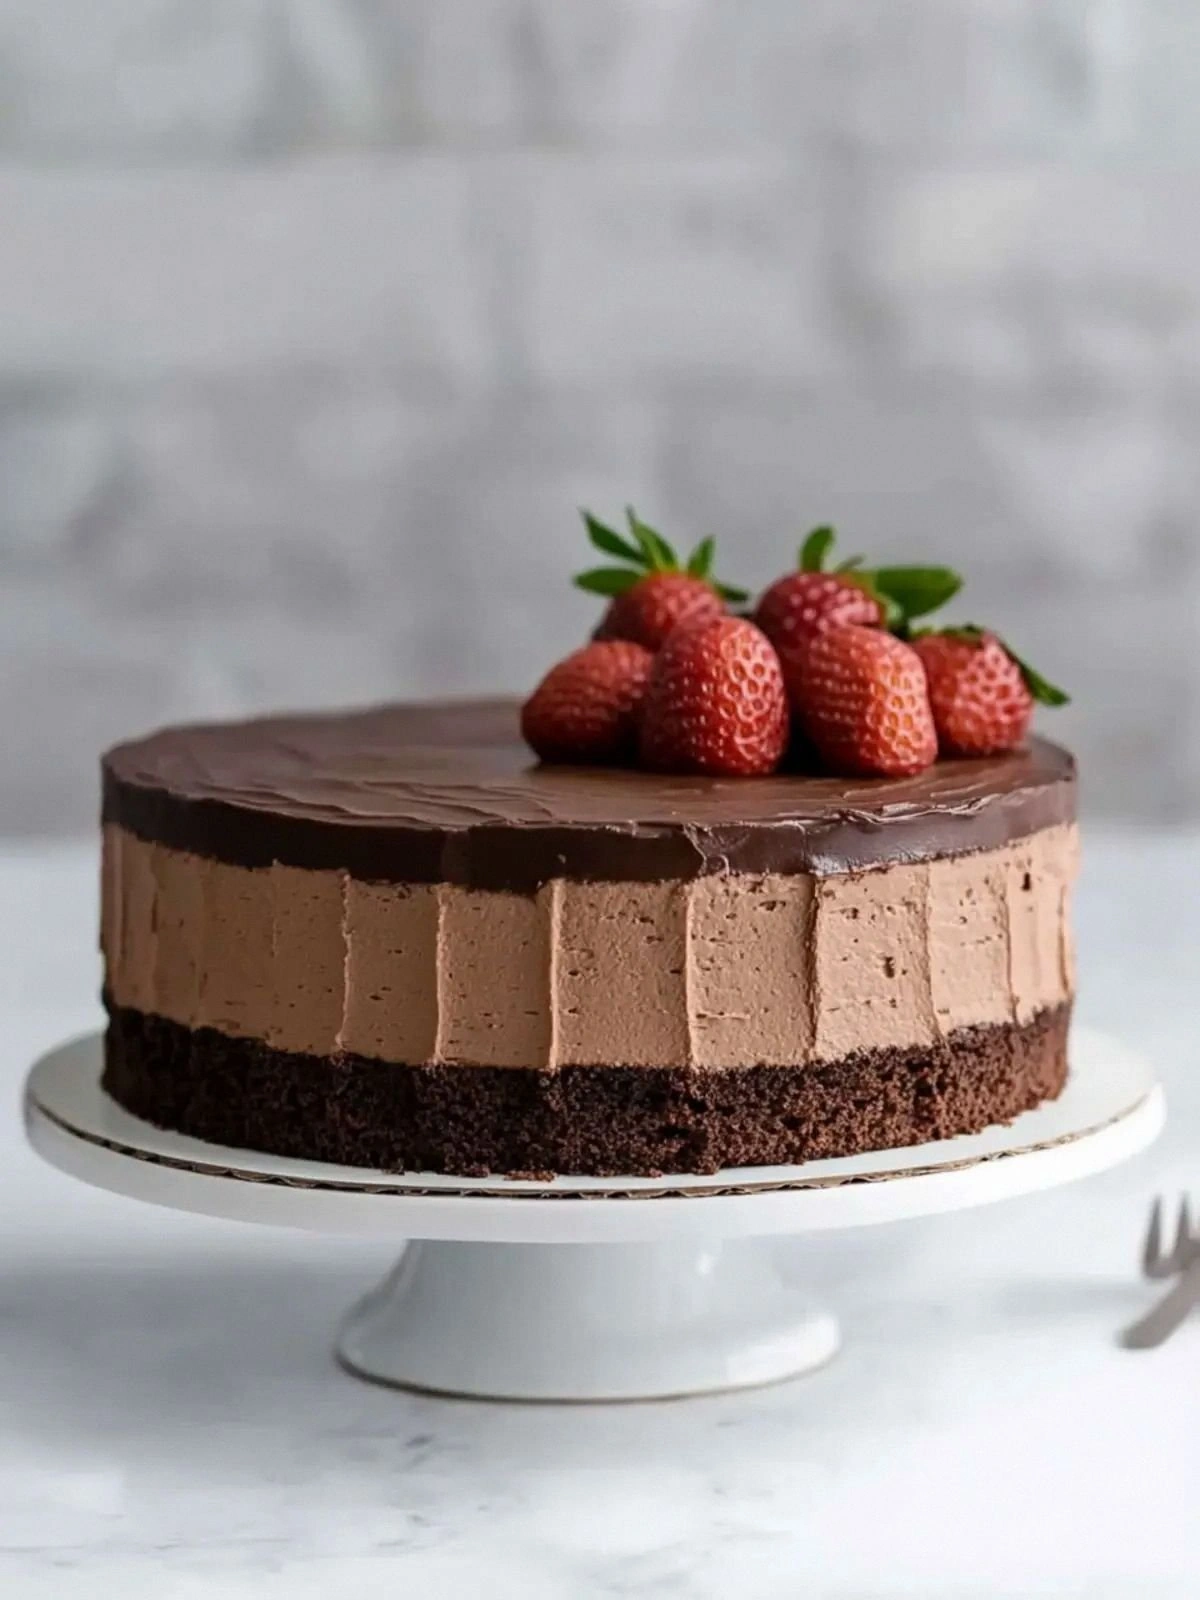
Picture this: the first bite releases a cascade of flavors—dark, milk, and bittersweet chocolate dancing together like a jazz trio. The aroma curls around you, thick and inviting, as if the kitchen itself is humming a lullaby. The texture is a paradox: a silky mousse that clings to the palate, a fudgy cake that sinks into a soft crumb, and a glossy ganache that glistens like a midnight sky. It’s a symphony of sensations that makes every bite feel like a small, delicious rebellion.
Why does this version stand out? Because it’s built on the principle that chocolate should never be shy. Every layer is a different expression of the same divine bean: the raw, unsweetened chocolate provides depth; the semisweet chocolate adds a caramelized edge; the ganache brings a glossy, velvety finish. The gelatin gives it a mousse-like lift without the heaviness, and the heavy cream keeps it luxuriously airy. The result is a dessert that feels like a hug and a dare rolled into one.
And there’s a twist you won’t see in your usual chocolate recipe: a splash of espresso powder is folded into the batter to amplify the chocolate’s natural bitterness and give the cake a subtle, coffee‑kissed aftertaste. I dare you to taste this and not go back for seconds. Picture yourself pulling this out of the oven, the whole kitchen smelling incredible, and watching the first slice melt into a silky, chocolatey river.
What Makes This Version Stand Out
- Taste: Every bite delivers a layered chocolate experience that never feels cloying. The unsweetened chocolate provides a deep, almost earthy richness, while the semisweet chocolate adds a caramelized sweetness that cuts through the bitterness. The ganache finish offers a glossy, melt‑in‑your‑mouth texture that elevates the entire dessert.
- Texture: The cake is fudgy yet light, the mousse is airy, and the ganache is silky—each component balances the other. The gelatin gives the mousse a springy lift that feels like a cloud, while the batter’s flour and cocoa create a tender crumb that doesn’t crumble under pressure.
- Simplicity: Though it sounds elaborate, the recipe boils down to a few core techniques: melt, fold, bake, whisk, and chill. No complicated equipment, no obscure ingredients, just honest chocolate and a few kitchen staples.
- Uniqueness: The espresso infusion is the secret weapon that sets this recipe apart. It deepens the chocolate profile and gives the cake a subtle, sophisticated edge that’s hard to replicate.
- Crowd Reaction: At my last gathering, the dessert was devoured in minutes, and guests kept asking for the recipe. The “I ate half the batch before anyone else got to try it” confession is a badge of honor.
- Ingredient Quality: Using premium chocolate—both unsweetened and semisweet—makes all the difference. The difference between a good chocolate dessert and a legendary one is the quality of the chocolate.
- Cooking Method: The double boiler technique for melting chocolate preserves its silky texture, while the gentle baking ensures the cake sets without overcooking.
- Make‑Ahead Potential: This dessert can be assembled the night before and refrigerated, making it the perfect show‑stopper for last‑minute events.
Alright, let's break down exactly what goes into this masterpiece…
Inside the Ingredient List
The Flavor Base
Unsweetened chocolate is the backbone of this dessert. Its intense, pure cocoa flavor anchors the other chocolate layers and provides a robust foundation. Skipping it would leave the cake tasting like a sweetened milk chocolate rather than a deep, complex treat. If you can’t find unsweetened chocolate, a high‑cocoa dark chocolate (70% or higher) can be a suitable stand‑in, though the flavor profile will shift slightly.
Semisweet chocolate adds a caramelized edge that balances the bitterness of the unsweetened chocolate. It melts into the ganache, creating a glossy finish that’s impossible to resist. If you prefer a sweeter ganache, try using a 60% dark chocolate; just be prepared for a sweeter overall dessert.
The Texture Crew
Gelatin powder is the secret to that airy mousse feel without the heaviness of whipped cream alone. It stabilizes the mixture, giving it a springy lift that keeps the dessert from sinking. If you’re vegan or prefer a plant‑based option, agar‑agar can replace gelatin, but the texture will be slightly firmer.
Heavy cream is the lifeblood of the ganache and the mousse. It provides richness and a silky mouthfeel. For a lighter version, you can substitute half‑and‑half, but the ganache will be less glossy and the mousse slightly less airy.
The Unexpected Star
Espresso powder is the hidden hero that deepens the chocolate’s complexity. A teaspoon is all you need to give the cake a subtle coffee kick that enhances the chocolate’s natural bitterness. If you’re a coffee aficionado, feel free to increase the amount to taste, but remember that too much can overpower the chocolate.
The Final Flourish
All‑purpose flour gives the cake its structure, while Dutch‑process cocoa powder adds a mellow, slightly alkaline flavor that balances the bitterness of the unsweetened chocolate. The pinch of salt is essential; it lifts the sweetness and brings out the chocolate’s depth. A pinch of salt is all you need, and if you’re watching sodium, you can skip it entirely, though the flavor will be slightly muted.
Everything’s prepped? Good. Let’s get into the real action…
The Method — Step by Step
- Preheat and Prepare – Set your oven to 325°F (165°C) and line a 9‑inch springform pan with parchment paper, ensuring the paper extends a couple of inches up the sides. Grease the parchment lightly with a brush of butter or oil. This step prevents the cake from sticking and ensures a clean release later. While the oven heats, gather all your ingredients so you’re ready to move from one stage to the next without a pause.
- Melt the Chocolate – In a heat‑proof bowl, combine the 4 oz unsweetened chocolate and 1 cup unsalted butter. Place the bowl over a pot of simmering water, ensuring the bottom of the bowl doesn’t touch the water. Stir constantly until the chocolate is fully melted and the mixture is glossy. The gentle heat preserves the chocolate’s silky texture, preventing it from seizing or burning.
- Whisk the Egg Mixture – In a separate bowl, whisk together 3 large eggs, 1 cup granulated sugar, and 1 tsp vanilla extract until the mixture is pale and slightly thickened. The sugar should dissolve completely, creating a smooth base that will blend seamlessly with the chocolate. Once ready, slowly pour the warm chocolate mixture into the egg mixture, whisking vigorously to prevent curdling. The result is a rich, velvety batter that’s ready for the dry ingredients.
- Combine Dry Ingredients – Sift together 1 cup all‑purpose flour, 0.5 cup Dutch‑process cocoa powder, 0.25 tsp salt, and 1 tsp gelatin powder. Sifting removes clumps and ensures a uniform texture. Stir the dry mix into the wet batter until just combined; overmixing will develop gluten, resulting in a denser cake. The batter should be thick but pourable, like a thick custard.
- Fill the Pan – Pour the batter into the prepared pan, smoothing the top with a spatula. Tap the pan lightly on the counter to release any air bubbles. The batter should settle evenly, creating a level surface that will bake uniformly. This step is crucial for a smooth, even crumb.
- Bake to Perfection – Place the pan in the preheated oven and bake for 30–35 minutes, or until a toothpick inserted into the center comes out with a few moist crumbs. The cake should rise slightly and develop a dark, almost black crust on top. Don’t open the oven early; the heat needs to circulate for the cake to set properly.
- Prepare the Gelatin Mousse – While the cake bakes, combine 1 tsp gelatin powder with 1 tbsp cold water in a small bowl. Let it bloom for 5 minutes. In a saucepan, heat 1 cup heavy cream until it just begins to steam. Remove from heat and stir in 6 oz semisweet chocolate until fully melted. Whisk vigorously until the mixture is smooth and glossy. This ganache will be folded into the mousse, giving it that silky finish.
- Fold and Chill – Once the cake has cooled to room temperature, cut it in half horizontally. Spread the gelatin‑infused mousse over the bottom half, smoothing it with a spatula. Place the top half back on top, then cover the entire cake with plastic wrap. Refrigerate for at least 4 hours, or overnight, to allow the mousse to set and the flavors to meld. When you slice it, the mousse should hold its shape, creating a dramatic, layered look.
- Serve and Enjoy – Remove the cake from the refrigerator, let it sit at room temperature for 10 minutes before slicing. The cake will be silky and slightly firmer than when freshly baked, which makes for clean, elegant slices. Garnish with a dusting of cocoa powder or shaved chocolate for a finishing touch. Serve immediately and watch the compliments roll in.
That's it — you did it. But hold on, I've got a few more tricks that'll take this to another level…
Insider Tricks for Flawless Results
The Temperature Rule Nobody Follows
Chocolate is temperamental. If it gets too hot, it can seize; if it’s too cold, it won’t melt smoothly. The sweet spot is just below boiling, around 90–95°F (32–35°C). Use a thermometer to check, and remember that the chocolate will continue to cook slightly once removed from heat.
Why Your Nose Knows Best
Before you start mixing, take a deep sniff of the chocolate. A rich, almost nutty aroma indicates high‑quality chocolate. If the aroma is flat or overly sweet, consider swapping to a darker chocolate. Your nose can detect subtle differences that your taste buds can’t.
The 5‑Minute Rest That Changes Everything
After pouring the batter into the pan, let it sit for 5 minutes before baking. This brief rest allows the batter to settle and the flour to hydrate fully, preventing a dry crumb. Many home bakers skip this step, leading to uneven textures.
Use a Springform for Easy Release
A springform pan makes removal painless. After baking, run a knife around the edges before releasing the spring. If you’re using a regular cake pan, you’ll have to lift the cake out carefully, which can crack the delicate mousse layers.
Avoid Overmixing the Batter
Once the dry ingredients are in, mix just until combined. Overmixing develops gluten, turning the cake into a dense, chewy mess. Think of it as a gentle stir, not a vigorous whisk.
Let the Cake Cool Completely
Don’t rush to assemble the mousse on a warm cake. The heat can melt the ganache and cause the mousse to run. Allow the cake to cool to room temperature, then chill it before layering.
Creative Twists and Variations
This recipe is a playground. Here are some of my favorite ways to switch things up:
Almond Crunch Layer
Fold 1/2 cup toasted almond slivers into the batter before baking. The crunch adds texture and nutty flavor that pairs beautifully with the chocolate layers. Serve with a drizzle of almond butter for an extra indulgence.
Raspberry Swirl
Swirl a couple of tablespoons of raspberry jam into the mousse before layering. The tartness cuts through the richness and adds a pop of color. It’s a perfect option for a summer dessert.
Salted Caramel Drizzle
Drizzle homemade salted caramel over the top after chilling. The salty sweetness complements the chocolate, creating a flavor contrast that delights the palate. Sprinkle a pinch of sea salt for an extra kick.
Coffee‑Infused Ganache
Add 1 tsp instant espresso powder to the ganache for a deeper coffee flavor. This variation turns the dessert into a mocha masterpiece. It’s especially good for coffee lovers who want a dessert that satisfies both cravings.
Lemon Zest Accent
Add 1 tbsp lemon zest to the batter for a citrusy brightness that cuts the heaviness. The lemon pairs well with the chocolate, adding a fresh, aromatic note. It’s a clever way to lighten the dessert.
Vegan Version
Swap dairy butter for coconut oil, use a plant‑based milk alternative for the cream, and replace gelatin with agar‑agar. The texture will be slightly different, but the flavor remains decadent. This version is perfect for vegan friends.
Storing and Bringing It Back to Life
Fridge Storage
Store the assembled cake in an airtight container in the refrigerator for up to 5 days. The mousse will firm up, making slicing easier. Keep the cake covered to prevent it from absorbing fridge odors.
Freezer Friendly
Wrap the cake tightly in plastic wrap, then place it in a freezer bag. It will stay fresh for up to 3 months. When ready to serve, thaw overnight in the refrigerator to preserve texture.
Best Reheating Method
To warm a frozen slice, place it in a microwave-safe dish and heat on low for 20–30 seconds. Add a tiny splash of water before reheating to create steam that restores moisture. The cake will feel as good as freshly baked.