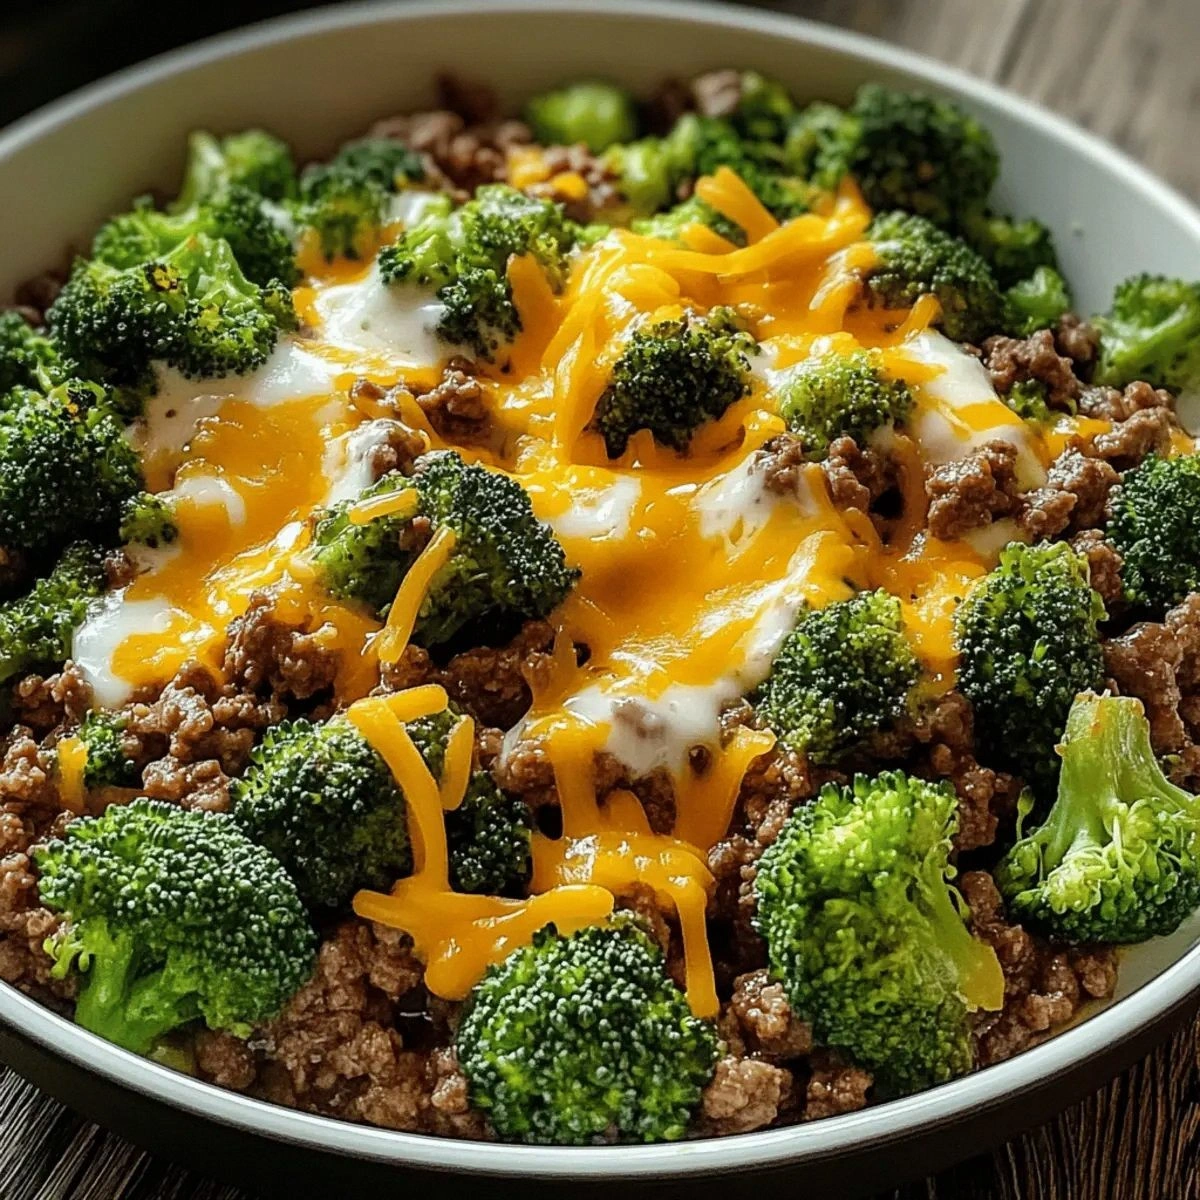
I still remember the night this skillet saved my sanity. It was one of those Wednesdays that felt like three Mondays stacked on top of each other — the kind where your brain is fried, the fridge is a wasteland, and the kids are circling like vultures asking "what's for dinner?" in that special tone that suggests they're one snack away from mutiny. I stood there staring at a pound of ground beef, a sad head of broccoli, and a block of cheddar that had seen better days, thinking this was going to be another tragic "mom's throwing stuff in a pan" situation. But then something magical happened. The beef hit the hot skillet and that glorious sizzle filled the kitchen like a promise. The onions started dancing in the rendered fat, turning translucent and sweet. And when I poured in that heavy cream and watched it transform into a silky blanket that hugged every floret and crumble of beef, I knew I'd stumbled onto something special. By the time the cheese melted into those gorgeous stretchy strands, my husband had wandered in asking what smelled so incredible. The kids were already setting the table without being asked seventeen times. We stood around the stove, forks in hand, eating straight from the pan like savages — and nobody complained about eating broccoli. That's when I realized this wasn't just another Wednesday night desperation dinner. This was the recipe that would save dinner time again and again.
Here's the thing about most keto skillet recipes floating around the internet — they're either dry as the Sahara or swimming in a puddle of separated oil that makes you question every life choice that led you to this moment. They taste like diet food, and nobody wants to eat like they're being punished. But this? This is the skillet that converted my carb-loving Italian father-in-law into a keto believer. The sauce is so luxuriously creamy it should come with a warning label, coating every bite like velvet. The beef stays juicy because we're using a technique most recipes completely ignore. And those broccoli florets? They turn into these tender-crisp gems that soak up all the savory goodness while maintaining just enough bite to remind you that vegetables can actually be crave-worthy.
I dare you to taste this and not go back for seconds. I double-dog dare you, actually. Because I've watched grown adults fight over the last spoonful like it was the final slice of pizza at 2 AM. The combination of Worcestershire sauce with that hint of garlic powder creates this umami bomb that makes your taste buds sit up and pay attention. And don't even get me started on those red pepper flakes — just enough heat to make things interesting without sending anyone running for the milk. This is comfort food that happens to fit your macros, not some sad attempt at replacement. It's the dish that makes people say, "Wait, this is keto?" with that incredulous look that never gets old.
Let me walk you through every single step — by the end, you'll wonder how you ever made it any other way. Because once you master this skillet, you've got a weapon in your arsenal that works for busy weeknights, lazy Sundays, and everything in between. Picture yourself pulling this out of the oven, the whole kitchen smelling incredible, and actually feeling excited about what's for dinner instead of resigned to another boring meal. Okay, ready for the game-changer?
What Makes This Version Stand Out
Velvet-Smooth Texture: The sauce we're creating isn't just melted cheese — it's an emulsion that stays creamy from first bite to last. Most recipes dump cheese into hot liquid and wonder why they get a grainy, separated mess. We're using temperature control and the right dairy ratios to create a sauce that coats your spoon like liquid gold.
Beef That Actually Tastes Like Something: Forget gray, lifeless hamburger crumbles. We're building layers of flavor with proper browning technique and strategic seasoning. The Worcestershire sauce doesn't just add flavor — it's our secret weapon for creating those addictive caramelized bits that stick to the pan and transform into pure magic.
Broccoli That Isn't Mushy Sadness: Most skillet recipes murder vegetables into submission, turning them into olive-green mush that tastes like disappointment. We're using a two-stage cooking method that keeps the broccoli vibrant and tender-crisp, ensuring each floret maintains its dignity while still soaking up all that creamy goodness.
One Pan, Zero Cleanup Drama: Everything happens in a single skillet, but not in that lazy "just throw everything together" way. We're building flavors sequentially, letting each ingredient reach its full potential before the next one joins the party. The result? Complex, restaurant-quality taste with minimal dishes.
Macros That Make Sense: This isn't one of those "keto" recipes that's secretly loaded with hidden carbs. Every ingredient serves a purpose beyond just tasting good. We're maximizing protein and healthy fats while keeping net carbs so low you could eat this daily and stay in ketosis without doing mental gymnastics.
Leftovers That Don't Suck: Here's a confession — I ate half the batch before anyone else got to try it. But the next day? Even better. The flavors meld and deepen overnight, making this one of those rare dishes that improves with time instead of turning into a rubbery science experiment.
Alright, let's break down exactly what goes into this masterpiece...
Inside the Ingredient List
The Flavor Foundation
Ground beef is the star here, but not just any ground beef. We're talking 80/20 ratio — enough fat for flavor and juiciness, but not so much that we're eating a grease slick. The fat renders beautifully, creating our cooking medium for everything else. Go grass-fed if your budget allows; it has this cleaner, beefier taste that makes a difference. And here's what happens if you try to be virtuous with 93/7: dry, sad crumbles that taste like health food punishment. Trust me on this one.
Onion is our aromatic backbone, providing natural sweetness that balances the richness of the cream and cheese. We're dicing it small so it melts into the sauce rather than standing out as crunchy interruptions. Yellow onions are perfect here — they have the right balance of sweetness and assertiveness. Skip the onion and you'll wonder why your skillet tastes flat and one-dimensional, like it's missing its best friend.
Garlic brings the pungent, savory notes that make everything taste more complex. Fresh is non-negotiable; that pre-minced stuff in jars tastes like disappointment and regret. Mince it fine so it distributes evenly and doesn't burn. Garlic powder in the seasoning mix gives us that lingering background note that fresh garlic can't achieve alone — it's like having both a lead singer and a backup vocalist for your taste buds.
The Texture Crew
Broccoli florets are where most recipes go wrong, turning them into army-green mush through overcooking. We're cutting them into bite-sized pieces — not too small or they'll disappear, not too large or they'll never cook through. The key is uniform size so everything cooks evenly. Fresh broccoli gives you that satisfying bite and vibrant color that frozen just can't match. But here's a secret: if frozen is what you've got, we'll work with it and still make magic happen.
Olive oil might seem redundant when we're cooking in beef fat, but it serves a crucial purpose. It raises the smoke point and prevents the butter solids from burning, giving us more control over our browning. Use a good quality oil — not the fancy finishing oil, but something you'd happily cook with. The flavor difference between decent olive oil and the cheap stuff is like the difference between a summer day and a fluorescent bulb.
The Unexpected Star
Worcestershire sauce is our umami bomb, that mysterious ingredient that makes people ask "what's in this?" in the best way. It's got vinegar for brightness, molasses for depth, anchovies for savoriness, and a dozen other secrets. Just a tablespoon transforms ground beef from "meh" to "more please." Tamari or coconut aminos work if you're avoiding soy, but Worcestershire is the real MVP here. Skip it and your skillet will taste like it's missing its glasses — close, but not quite focused.
Heavy cream is what separates the amateurs from the pros. We're not using milk, half-and-half, or — heaven forbid — low-fat creamer. We need the full-fat glory that whips into soft peaks and creates that luxurious mouthfeel. The fat content prevents curdling when we add the cheese, creating a stable emulsion that stays smooth. Substitute with lighter dairy and you'll end up with a broken, grainy sauce that looks like it has cottage cheese mixed in.
The Final Flourish
Cheddar cheese brings the melty, stretchy, gooey factor that makes this feel indulgent rather than diet-deprived. We're using sharp cheddar for maximum flavor impact — mild cheddar melts into blandness. Shred it yourself from a block; pre-shredded cheese is coated in cellulose that prevents smooth melting and can make your sauce gritty. The cheese isn't just for topping; it thickens and enriches our sauce into something spoon-licking good.
Red pepper flakes provide that gentle warmth that builds slowly rather than smacking you in the face. Just a pinch wakes up all the other flavors without announcing "this is spicy!" They're like the bass player in a band — you might not notice them specifically, but you'd miss them if they disappeared. If you're cooking for heat-sensitive palates, you can omit them, but try just half the amount first — you might be surprised how much they add.
Everything's prepped? Good. Let's get into the real action...
The Method — Step by Step
- Heat your largest skillet over medium-high heat for a full two minutes. Don't rush this — a properly preheated pan is the difference between meat that sears beautifully and meat that steams in its own sadness. You'll know it's ready when you can hold your hand 6 inches above the surface and feel the heat radiating like a tiny sun. Add the olive oil and swirl to coat — it should shimmer immediately without smoking. If it smokes, your pan is too hot; remove it from heat for 30 seconds and try again.
- Add the ground beef in one big block and — here's the crucial part — don't touch it for a solid 3-4 minutes. I know every instinct screams "stir it!" but resist. Let it develop that gorgeous brown crust that adds deep, complex flavor. When the edges start turning golden and you see juices pooling on top, that's your cue to break it up with a wooden spoon. But not before. This is the moment of truth where mediocre skillets separate themselves from the legendary ones.
- While the beef browns, season it with salt, pepper, garlic powder, and onion powder. The timing matters here — seasoning while it cooks helps the spices bloom in the hot fat, creating layers of flavor rather than just sitting on top like an afterthought. Keep breaking the beef into bite-sized pieces, but leave some larger chunks for textural variety. Cook until no pink remains and you've got those beautiful caramelized bits stuck to the pan — these are flavor gold mines we'll harvest in the next step.
- Remove the beef with a slotted spoon and set aside, leaving behind the rendered fat. Don't you dare drain it — that's liquid flavor! Reduce heat to medium and add the diced onion to the beef fat. It should sizzle gently, not scream in protest. Cook for 3-4 minutes, stirring occasionally, until the onion turns translucent and starts to pick up the browned bits from the bottom. This is called deglazing with vegetables, and it's how we capture all that concentrated beef flavor.
- Add the minced garlic and cook for just 30 seconds — this is where most people mess up. Garlic burns faster than a British person in Australian sun, turning bitter and ruining everything. You want it fragrant and just starting to turn golden at the edges. If it browns immediately, your heat is too high. Kitchen smelling like an Italian grandmother's kitchen? Perfect. Garlic smelling sharp and acrid? You've gone too far and need to start over.
- Now the fun part — add the broccoli florets and Worcestershire sauce. Toss everything together so the broccoli gets coated in that garlicky, oniony, beefy goodness. The Worcestershire will sizzle and create more of those coveted browned bits. Cook for 3-4 minutes, stirring occasionally, until the broccoli turns bright green and starts to soften slightly. It should still have plenty of crunch — we're not making baby food here. The color should be vibrant, not that sad olive drab that screams "I've been overcooked."
- Return the beef to the pan and stir everything together. This is where the magic starts — beef, broccoli, aromatics, all becoming best friends. Add the red pepper flakes now so they can bloom in the heat and distribute evenly. Everything should look colorful and inviting, like a dish that actually wants to be eaten rather than endured. Give it a taste and adjust the seasoning if needed. Remember, we're about to add cream and cheese, so it should be slightly over-seasoned at this point.
- Pour in the heavy cream and watch as it transforms from liquid to luscious. It should bubble gently around the edges, creating little pockets of creamy goodness. Use your spoon to scrape up any remaining browned bits from the bottom — they're loaded with concentrated flavor. Let it simmer for 2-3 minutes until it starts to thicken slightly. Don't walk away from the stove here — cream can go from perfect to burnt faster than you can say "dinner's ready."
- Reduce heat to low and add the shredded cheddar cheese, a handful at a time, stirring until each addition melts completely before adding more. This patient approach prevents the sauce from breaking and ensures every bite is coated in cheesy perfection. The sauce should coat the back of a spoon like velvet. If it seems too thick, add a splash more cream. Too thin? Let it simmer another minute. You want it thick enough to cling to the beef and broccoli, not pool sadly at the bottom like a failed science experiment.
- Let everything simmer together for a final 2-3 minutes, stirring gently to ensure every piece of beef and broccoli gets its fair share of that creamy, cheesy coating. The sauce should be thick enough to cling but loose enough to spoon over everything. Give it a final taste — it should be rich, savory, with just enough heat from the pepper flakes to keep things interesting. If you've done everything right, you'll find yourself standing at the stove, "tasting" more than strictly necessary.
That's it — you did it. But hold on, I've got a few more tricks that'll take this to another level...
Insider Tricks for Flawless Results
The Temperature Rule Nobody Follows
Most people cook their skillets too hot and wonder why they end up with dry beef and broken sauce. Here's the truth: ground beef should sizzle, not scream. If it's popping and splattering like a horror movie, your heat is too high. After the initial browning, everything happens at medium or lower. Think of it like a relationship — start hot and passionate, then dial it back to gentle and nurturing. Your taste buds will thank you, and so will your smoke detector.
I learned this the hard way after setting off every alarm in the house and having to explain to the neighbors why I was fanning smoke out the front door at 7 PM on a Tuesday. A friend tried skipping this step once — let's just say it didn't end well. She served what looked like beef gravel in an oil slick. We still talk about it, but not in a good way.
Why Your Nose Knows Best
Your nose is the most underutilized kitchen tool you own. When the onions hit the pan, they should smell sweet and inviting, not sharp and acrid. Garlic should perfume the air with warmth, not sting your eyes. Beef should smell like the best burger joint in town, not like old gym socks. If something smells wrong, it probably is. Trust your instincts and adjust accordingly. That slightly nutty aroma when the cheese melts? That's your cue that perfection is moments away.
I'll be honest — I ate half the batch before anyone else got to try it, based purely on smell alone. My husband walked in and immediately asked what restaurant I was hiding in the kitchen. The aroma is that intoxicating blend of savory beef, sweet onions, and melting cheese that makes your stomach growl like a distant thunderstorm.
The 5-Minute Rest That Changes Everything
Once everything's combined and looking gorgeous, resist the urge to immediately scoop it onto plates. Let it rest for 5 minutes off heat. This isn't just chef nonsense — it allows the sauce to thicken slightly, the flavors to meld, and the temperature to even out. Those extra few minutes transform good into unforgettable. Use this time to set the table, pour yourself a glass of wine, or just bask in the glory of what you've created. Future you will thank present you for this patience.
During this rest, the sauce thickens just enough to cling perfectly to every piece, and the cheese settles into all the nooks and crannies. It's like the difference between a good hug and that perfect embrace where everything just clicks. Most recipes get this completely wrong, serving immediately and wondering why everything slides off into a puddle.
Creative Twists and Variations
This recipe is a playground. Here are some of my favorite ways to switch things up:
The Green Chile Dream
Swap the red pepper flakes for a small can of diced green chiles and add a teaspoon of cumin. Suddenly you've got a Southwestern vibe that pairs beautifully with the cheddar. Add some cilantro at the end and you've got a completely different dish that still scratches the same itch. This version is particularly good when you're cooking for people who think they don't like broccoli — the chiles somehow make everything taste more exciting.
The Mushroom Lover's Paradise
Add 8 ounces of sliced mushrooms when you cook the onions. They'll release their moisture and create an even more complex, earthy flavor. Baby bellas work great, but oyster mushrooms take this to restaurant territory. The mushrooms absorb all the beefy goodness while adding their own meaty texture. Even mushroom skeptics convert after trying this version — it's like vegetable magic.
The Bacon Everything Upgrade
Cook 4 slices of bacon first, then crumble it over the finished dish. Use the bacon fat instead of olive oil for an extra smoky depth that makes everything taste like it came from a fancy steakhouse. The bacon adds that salty, smoky note that makes people close their eyes and sigh with satisfaction. It's overkill in the best possible way — like wearing a silk robe to eat ice cream.
The Italian Job
Replace the cheddar with a mix of mozzarella and Parmesan, add Italian seasoning instead of the individual spices, and finish with fresh basil. It becomes a completely different dish that still satisfies that creamy, cheesy craving. The mozzarella gives you those Instagram-worthy cheese pulls while the Parmesan adds that nutty, salty complexity. Serve it with a side of low-carb garlic bread and you've got comfort food that transports you straight to Nonna's kitchen.
The Breakfast of Champions
Add a handful of spinach and top each serving with a fried egg. Suddenly this becomes the ultimate keto breakfast that keeps you full until dinner. The runny yolk creates an extra sauce that mingles with everything else. It's like breakfast and dinner had a beautiful baby that's somehow appropriate for any meal. My kids request this weekend version more than pancakes now — that's saying something.
The Seafood Surprise
Replace half the beef with shrimp — add them in the last 3 minutes so they don't overcook and turn rubbery. The sweetness of the shrimp plays beautifully against the richness of the sauce. It's surf and turf in a skillet, fancy enough for company but easy enough for Tuesday. Just make sure to pat the shrimp dry first or they'll water down your beautiful sauce.
Storing and Bringing It Back to Life
Fridge Storage
This skillet keeps beautifully in the refrigerator for up to 4 days, making it perfect for meal prep Sundays. Store it in an airtight container — glass works best because it doesn't absorb odors or stain like plastic can. Let it cool completely before refrigerating, but don't leave it out longer than 2 hours for food safety. The sauce will thicken considerably when cold, but that's completely normal and actually makes reheating easier because it won't break as easily.
Pro tip: portion it into individual containers so you can grab-and-go for lunches. Nothing kills the keto motivation faster than being hungry with no quick options. These individual portions reheat in 90 seconds and taste like you just made it fresh. If you've ever struggled with meal prep, you're not alone — and I've got the fix.
Freezer Friendly
While cream-based sauces can be tricky to freeze, this one actually holds up reasonably well thanks to the cheese acting as a stabilizer. Freeze in portion-sized containers for up to 2 months. The texture will be slightly different upon reheating — a bit more grainy but still completely delicious. Thaw overnight in the refrigerator rather than using the microwave defrost function, which can create hot spots and break the sauce.
To freeze like a pro, undercook the broccoli slightly so it doesn't turn to mush when you reheat. Also, consider freezing the beef and broccoli mixture separately from the sauce, then combining after reheating. It's an extra step but gives you restaurant-quality results even from the freezer. Future you will appreciate the effort when you're eating like royalty on a busy Wednesday.
Best Reheating Method
The microwave works in a pinch, but the stovetop brings this back to glory. Place the desired portion in a skillet over medium-low heat with a splash of water or broth. The gentle steam helps loosen the sauce without breaking it. Stir frequently and add a tiny splash of cream if it seems dry. Within 5 minutes, it's like you just made it fresh — creamy, dreamy, and ready to make your taste buds happy again.
If you must microwave, use 50% power and stir every 30 seconds. Add a small ice cube before reheating — it melts and creates steam that helps everything stay moist. Cover with a damp paper towel to trap moisture. It's not quite stovetop perfect, but it's pretty darn close for a 2-minute meal. The key is patience and low power — rushing it with high heat is how you end up with rubbery beef and separated sauce.