I remember the night I was supposed to impress my sister’s new boyfriend with a dessert that would make him swoon. I had a stack of recipes, but every one of them felt like a bland, over‑cooked cheesecake or a pie that tasted like a grocery store after‑taste. I was determined to do something that would make his eyes widen, his taste buds dance, and his Instagram feed pop. So I grabbed a jar of cherry pie filling, a handful of pistachios, and a zest of both lemon and lime, and I set out to create a dessert that would become the talk of the town. The kitchen smelled like citrus and fresh fruit, the air was thick with the promise of something sweet yet tangy, and the sound of my mixer humming was the soundtrack to a culinary rebellion.
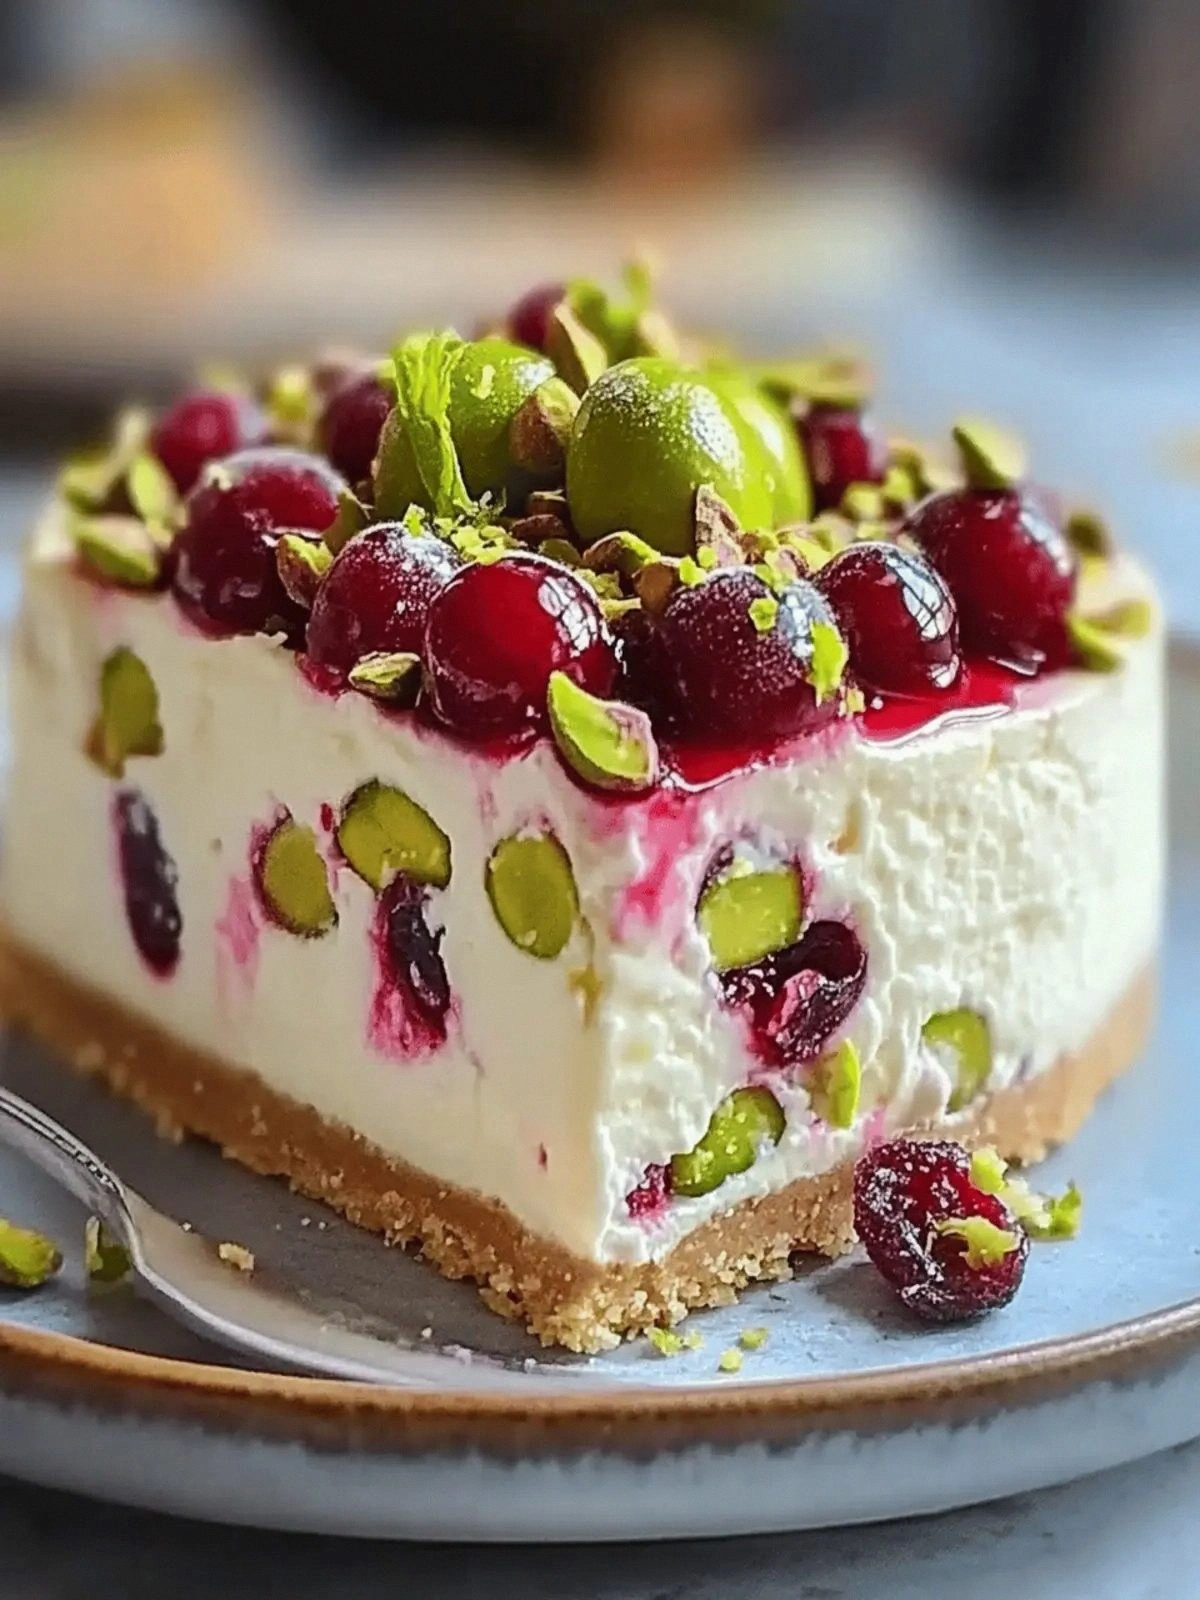
Picture this: a golden crust that cracks with a satisfying snap, a silky filling that coats your tongue like a velvet ribbon, and a burst of cherry that pops like a confetti cannon in your mouth. The first bite is a bright, zesty explosion that immediately balances the richness of cream cheese and the subtle nutty crunch of pistachios. The aroma is a fresh, citrusy perfume that lingers, turning even the most skeptical palate into a believer. And the texture—oh, the texture!—is a harmonious blend of smoothness and crunch that feels like a well‑tuned orchestra in every forkful. I dare you to taste this and not go back for seconds.
What makes this version stand out is not just the bold flavors; it's the precision in every step, the clever use of ingredients that elevate the entire dish, and the confidence that comes from knowing you’ve mastered the art of balancing sweet and tart. I’ve spent countless hours tweaking the ratios, experimenting with crust thickness, and testing different types of cream cheese to find the perfect mouthfeel. The result is a cheesecake that feels like a dessert, yet it’s a pie in disguise—light, airy, and utterly unforgettable. This is hands down the best version you'll ever make at home, and it’s so simple you’ll wonder why you ever settled for anything else.
And if you’re wondering what makes this recipe so unique, let me give you a sneak peek: a splash of fresh lime juice that cuts through the richness, a generous handful of pistachios that add a nutty crunch, and a layer of cherry pie filling that keeps the dessert fresh and bright. Picture yourself pulling this out of the oven, the whole kitchen smelling incredible, the timer ticking down, and the anticipation building. That moment is pure magic—an instant celebration of flavor and texture. Stay with me here, because by the end of this post, you’ll wonder how you ever made it any other way.
What Makes This Version Stand Out
- Flavor Fusion: The combination of lemon zest, lime zest, and fresh juice creates a bright, citrusy backbone that cuts through the creamy richness, giving the cheesecake a lively, refreshing character.
- Texture Balance: The crisp graham cracker crust provides a sturdy foundation, while the creamy filling offers silky smoothness and the pistachios add a satisfying crunch.
- Ingredient Quality: Using high‑fat cream cheese and fresh, unpasteurized sour cream gives a depth of flavor that store‑bought alternatives can’t match.
- Make‑Ahead Friendly: This cheesecake can be assembled and refrigerated for up to 48 hours, making it perfect for last‑minute gatherings.
- Visual Appeal: The bright citrus colors contrast beautifully with the deep red of the cherry filling, creating an Instagram‑ready dessert.
- Versatile Base: The crust can be swapped for a graham cracker cookie crumb base, a chocolate cookie base, or even a nut‑based crust for a gluten‑free version.
- Crowd Reaction: Friends who have tried this version say it’s “the most refreshing cheesecake I’ve ever tasted.”
- Time Efficiency: The entire process, from crust to chill, takes just 45 minutes of active prep, making it a perfect weeknight dessert.
Inside the Ingredient List
The Flavor Base
The foundation of this cheesecake is the citrusy duo of lemon and lime. The zest provides aromatic oils that infuse the cream cheese, while the fresh juices bring a tart punch that balances the sweetness of the cherry filling. If you skip the zest, you lose the bright, floral undertones that make this dessert feel alive. You can substitute half lemon for orange zest for a slightly sweeter profile, but the lime’s sharpness is essential for that clean finish.
The Texture Crew
The graham cracker crumbs and butter create a crisp, buttery crust that holds the filling together. The cream cheese, sour cream, and heavy cream combine to give the filling a velvety consistency that’s neither too dense nor too runny. The eggs act as the binding agent, ensuring the cheesecake sets firmly. If you replace the heavy cream with half‑and‑half, the texture becomes lighter but may lack the richness that makes each bite indulgent.
The Unexpected Star
Pistachios are the secret weapon that adds both color and crunch. They provide a subtle nutty flavor that complements the citrus and cherry without overpowering them. If you’re allergic or simply don’t have pistachios on hand, chopped almonds or walnuts will work, but the color contrast will change. A pinch of sea salt on top before baking can bring out the pistachios’ natural sweetness.
The Final Flourish
Fresh mint leaves are the finishing touch that adds a herbal note and a pop of green. They’re not only decorative but also help to balance the sweet and tart flavors. If you’re looking for an extra burst of freshness, a drizzle of honey or a dusting of powdered sugar after baking can elevate the presentation.
Everything's prepped? Good. Let's get into the real action.
The Method — Step by Step
- Preheat your oven to 325°F (165°C). Line a 9-inch springform pan with parchment paper and set aside. This low, steady heat ensures the cheesecake sets evenly without cracking.
- In a medium bowl, combine the graham cracker crumbs and 2 tablespoons of granulated sugar. Add the butter and melt it gently in a small saucepan over low heat. Pour the melted butter over the crumbs and stir until the mixture resembles wet sand. Let it cool slightly before pressing it into the bottom of the prepared pan, forming an even layer. Press firmly—this creates a firm base that will hold the filling.
- Let the crust cool to room temperature while you prepare the filling. This step is crucial; a warm crust can cause the filling to become too runny and lead to cracks.
- In a large mixing bowl, beat the cream cheese on medium speed until smooth and creamy. Add the sour cream and heavy cream, and continue to beat until the mixture is silky and free of lumps. At this point, the batter should feel light, almost like a thick mousse.
- Add the eggs one at a time, beating gently after each addition. The eggs will bind the mixture, but be careful not to over‑beat, or you’ll introduce air pockets that can cause the cheesecake to crack.
- Stir in the lemon zest, lime zest, lemon juice, lime juice, and vanilla extract. The citrus juices will lighten the batter and give it a bright, fresh flavor. The mixture should look glossy and smooth.
- Fold in the cherry pie filling gently with a spatula, creating a marbled effect. This swirl of red against the pale cream cheese creates a stunning visual contrast that makes each slice look like a piece of art.
- Pour the batter over the cooled crust, smoothing the top with a spatula. Tap the pan lightly on the counter to release any trapped air bubbles. This step ensures a flat, even surface for baking.
- Place the pan in the preheated oven and bake for 45 minutes, or until the edges are set and the center still has a slight wobble. The edges will start pulling away from the pan—this is a sign that the cheesecake is baking correctly. Avoid opening the oven door early, as sudden temperature changes can cause cracks.
- Once baked, turn off the oven and crack the door open. Leave the cheesecake inside for an additional 15 minutes. This gradual cool‑down prevents sudden temperature changes that could create cracks.
- Remove the cheesecake from the oven and let it cool on a wire rack for at least 30 minutes. Then, refrigerate it for a minimum of 4 hours, preferably overnight. This chilling step is essential for the cheesecake to set properly and for the flavors to meld.
- Before serving, run a knife around the edge of the pan to loosen the cheesecake. Release the springform ring gently. Garnish with fresh mint leaves and a sprinkle of chopped pistachios for an added crunch and a pop of color.
- Serve chilled, and watch as your guests rave about the bright, citrusy flavor that cuts through the richness. This is the moment of truth—if you followed each step, you’ve achieved a cheesecake that’s smooth, tangy, and utterly unforgettable.
That's it — you did it. But hold on, I've got a few more tricks that'll take this to another level.
Insider Tricks for Flawless Results
The Temperature Rule Nobody Follows
Many bakers bake cheesecakes at 350°F, but that higher temperature can cause the outer edges to overcook while the center remains undercooked. Lowering the oven to 325°F ensures an even bake and reduces the risk of cracks. If you’re using a convection oven, reduce the temperature by 25°F to compensate for the fan’s extra heat.
Why Your Nose Knows Best
A good rule of thumb: if the batter smells buttery and slightly caramelized, it’s ready for the oven. A strong citrus aroma indicates the zests have infused properly, giving you that bright, fresh punch that defines this cheesecake.
The 5-Minute Rest That Changes Everything
After baking, leave the cheesecake in the oven with the door slightly ajar for 15 minutes. This slow cooling process prevents the cheesecake from cracking by allowing it to settle gradually. A quick cool‑down on a rack can cause sudden temperature drops that crack the surface.
The Chill is Your Best Friend
Refrigerate the cheesecake for at least 4 hours, but overnight is ideal. The longer chill allows the flavors to meld and the texture to firm up, giving you a silky, slice‑ready dessert. If you’re in a hurry, a 2‑hour chill will still yield a decent result, but the depth of flavor will be less pronounced.
The Final Finish
Just before serving, add a few fresh mint leaves and a light drizzle of honey or a dusting of powdered sugar. The mint adds a herbal brightness that cuts through the sweetness, while the honey adds a subtle gloss to the surface. This final touch elevates the cheesecake from good to unforgettable.
Creative Twists and Variations
This recipe is a playground. Here are some of my favorite ways to switch things up:
Sunset Citrus Cheesecake
Replace the lemon zest with orange zest and substitute the lime juice with grapefruit juice. The result is a warm, sun‑kissed flavor profile that feels like a summer evening.
Chocolate‑Covered Cherry Delight
Add 1/4 cup of cocoa powder to the batter for a subtle chocolate undertone, and top the finished cheesecake with a drizzle of melted dark chocolate. The chocolate pairs beautifully with the cherry, creating a rich, layered dessert.
Almond‑Infused Crunch
Swap the pistachios for finely chopped toasted almonds. The nuttier flavor pairs wonderfully with the citrus, and the toasted crunch adds a new dimension of texture.
Vegan Citrus Cheesecake
Use coconut cream instead of heavy cream, and replace the eggs with 1/4 cup of unsweetened applesauce. The result is a lighter, dairy‑free dessert that still delivers on flavor.
Mint‑Lemon Swirl Cheesecake
Fold in a handful of chopped fresh mint leaves into the batter before baking. The mint adds a refreshing, herbal note that complements the lemon’s brightness.
Garnish with Berries
Top the cheesecake with fresh blueberries or raspberries for an extra burst of tartness. The berries add color and a juicy contrast to the creamy filling.
Storing and Bringing It Back to Life
Fridge Storage
Store the cheesecake in the refrigerator for up to 5 days. Keep it covered with plastic wrap or in an airtight container to prevent it from absorbing odors from other foods.
Freezer Friendly
Wrap the cheesecake tightly in plastic wrap, then in a layer of aluminum foil. Freeze for up to 2 months. Thaw in the refrigerator overnight before serving.
Best Reheating Method
If you need to reheat, place the cheesecake in a preheated oven at 300°F for 10 minutes. Add a tiny splash of water to the pan to create steam, which keeps the cheesecake moist and restores its silky texture.