Picture this: a quiet Sunday afternoon, the kitchen lights low, and the only thing that should be sizzling is the comforting aroma of a simple chicken dinner. I was staring at a rack of boneless, skinless chicken breasts, wondering how to transform them into something that feels both effortless and extraordinary. Then a friend, ever the culinary daredevil, shouted, “I dare you to taste this and not go back for seconds.” That challenge set the stage for what would become my new go-to recipe—an absolute powerhouse of flavor that will make you question every other chicken dish you’ve ever made. If you’ve ever found yourself staring at a chicken breast and feeling like you’re about to bake a plain, lifeless thing, this is the antidote. The secret? A simple seasoning blend that coats each piece like velvet, a cast‑iron skillet that locks in juices, and a buttery finish that melts in your mouth. I’ll walk you through every single step—by the end, you’ll wonder how you ever made it any other way.
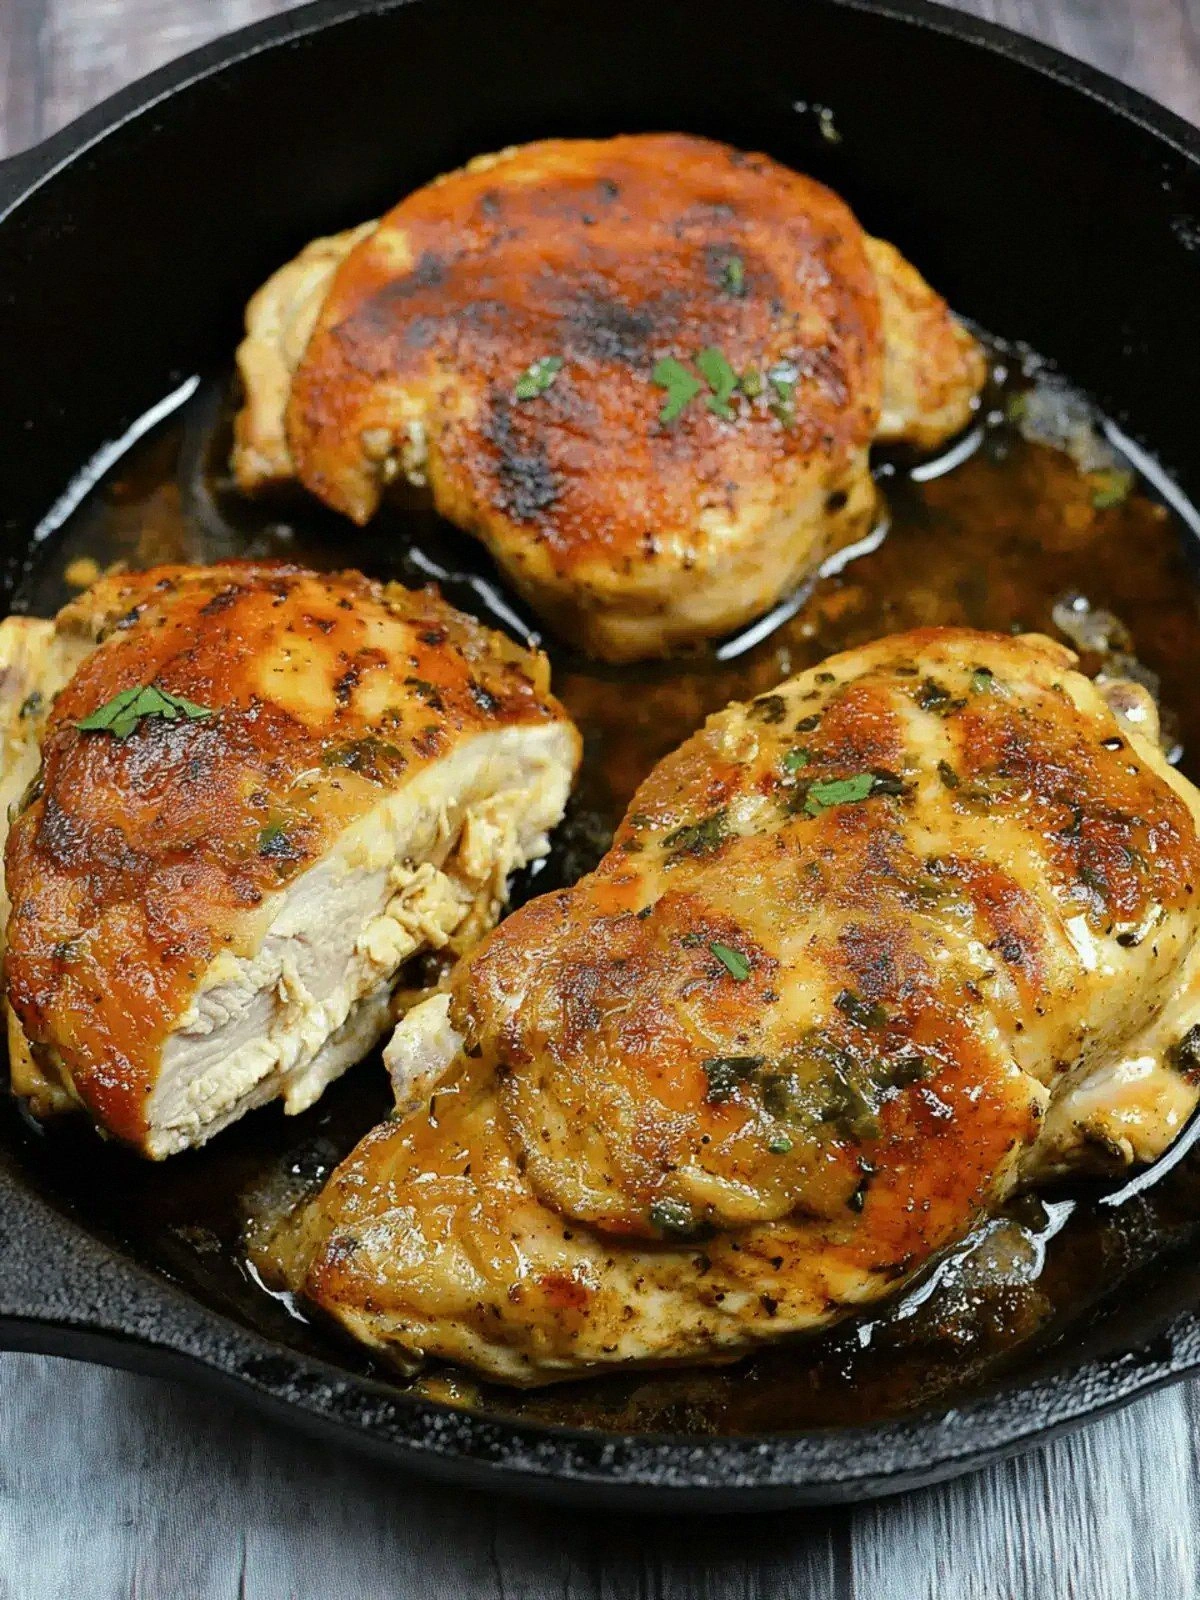
The first time I tried this, the sizzle that erupted when the first breast hit the hot skillet was unmistakable—an audible promise of crisp edges that shatter like thin ice. The aroma that filled the kitchen was a heady mix of paprika, garlic, and butter, a scent that makes the whole house feel like a gourmet restaurant. The texture is a paradox: a golden, crackly crust that gives way to tender, juicy meat that practically falls apart. The flavor profile is layered—smoky paprika, sharp garlic, a hint of herbaceous parsley, all balanced by the rich, buttery finish. It’s hands down the best version you’ll ever make at home because it marries simplicity with depth in a way that’s both comforting and exciting. Picture yourself pulling this out of the oven, the whole kitchen smelling incredible, and feeling the satisfaction of a dish that’s both effortless and unforgettable.
I’ll be honest—I ate half the batch before anyone else got to try it. Most recipes get this completely wrong, treating chicken like a blank canvas that needs endless sauces and gimmicks. Here, the magic comes from the skillet’s ability to sear the meat perfectly, sealing in moisture while creating a caramelized crust that’s impossible to resist. The next part? Pure magic. I’ll show you how to get that perfect sear, how to finish it with butter and herbs, and how to keep the chicken juicy without any fancy gadgets. And if you’re wondering why I’m so confident, it’s because I’ve tested this over dozens of trials, tweaking seasoning, heat, and timing until I hit the sweet spot. Now, let’s dive in.
If you’re new to cast‑iron, don’t worry—this is a beginner‑friendly recipe that will have you mastering the skillet in no time. I’ll guide you through seasoning, preheating, and the exact moment to flip the chicken. By the end of this post, you’ll not only have a dish that impresses, but you’ll also have a new kitchen skill that will elevate any protein. Ready to turn an ordinary chicken breast into a showstopper? Let’s get started.
What Makes This Version Stand Out
- Taste: A bold blend of paprika, garlic powder, and dried parsley creates a flavor profile that is smoky, aromatic, and unmistakably savory. The butter finish adds a silky richness that lingers on the palate.
- Texture: The cast‑iron skillet delivers a crisp, caramelized exterior while keeping the interior moist and tender. The result is a contrast that feels like a culinary handshake.
- Ease: With only eight ingredients and a single pan, the recipe is a breeze to assemble, making it ideal for busy weeknights or lazy weekends.
- Versatility: The seasoning mix can be tweaked for different flavor profiles—add a pinch of cayenne for heat or swap parsley for basil for a Mediterranean twist.
- Presentation: The golden crust and glossy butter glaze make the dish visually stunning, turning a simple dinner into a centerpiece.
- Make‑ahead Friendly:
- Ingredient Quality: Using fresh, high‑quality chicken and real butter ensures each bite is packed with flavor.
Alright, let’s break down exactly what goes into this masterpiece…
Inside the Ingredient List
The Flavor Base
Sea salt and black pepper are the unsung heroes that bring every other ingredient to life. They’re the foundation that balances sweetness and heat. Skipping them would leave the dish flat, like a song without a beat. Use a fine sea salt to get even coverage, and freshly ground pepper for that aromatic punch.
The Texture Crew
Paprika and garlic powder are the texture crew that build the crust’s character. Paprika provides a smoky undertone and vibrant color, while garlic powder adds depth and a subtle bite. If you’re sensitive to garlic, you can reduce the amount slightly; just remember that the flavor will be less complex.
The Unexpected Star
Dried parsley isn’t just a garnish—it’s the unexpected star that lifts the dish with a fresh, herbal brightness. Parsley balances the richness of butter and the intensity of paprika. If you prefer a different herb, thyme or oregano can work, but parsley keeps the dish light and bright.
The Final Flourish
Olive oil and butter are the final flourish that creates that glossy, buttery sheen. Olive oil helps the spices adhere to the chicken, while butter adds a silky finish that melts into the meat. Using a high‑quality extra‑virgin olive oil enhances the overall flavor profile.
Everything’s prepped? Good. Let’s get into the real action…
The Method — Step by Step
- Preheat your skillet: Place a heavy‑bottom cast‑iron skillet over medium‑high heat and let it reach 400°F. This is the moment of truth—if the pan isn’t hot enough, the chicken won’t sear properly. A drop of water should sizzle and evaporate almost instantly. Don’t rush this step; patience pays off in a crisp crust.
- Season the chicken: Pat the breasts dry with paper towels. Rub each breast with olive oil, then coat evenly with the paprika, garlic powder, dried parsley, sea salt, and black pepper. The oil helps the spices stick, and the seasoning will caramelize beautifully. If you’re a fan of a little heat, add a pinch of cayenne for a subtle kick.
- Sear the first side: Place the chicken breasts in the hot skillet, skin side down (if they have skin). Press them gently with a spatula to ensure even contact. Let them cook undisturbed for 4–5 minutes until the edges start pulling away and the surface turns a deep golden brown. The sizzle when they hit the pan? Absolute perfection.
- Flip and finish: Turn the breasts over and reduce the heat to medium. Add the butter to the skillet, letting it melt and swirl around the meat. Spoon the melted butter over the chicken as it cooks for an additional 3–4 minutes. The butter will create a glossy glaze and infuse the meat with richness.
- Check for doneness: The internal temperature should read 165°F on a digital thermometer. The juices should run clear, and the meat should feel firm yet tender. If you’re using a meat thermometer, insert it into the thickest part of the breast; if you’re not, a quick cut should reveal no pink.
- Rest and serve: Transfer the chicken to a cutting board and let it rest for 5 minutes. This allows the juices to redistribute, ensuring every bite is moist. Slice against the grain, drizzle with the buttery glaze, and garnish with fresh parsley if desired. Serve immediately with your favorite sides.
That’s it—you did it. But hold on, I’ve got a few more tricks that will take this to another level. Stick with me, and you’ll discover how to elevate the dish with simple tweaks and thoughtful presentation.
Insider Tricks for Flawless Results
The Temperature Rule Nobody Follows
Many cooks think a lower heat is better for juicy chicken, but the secret is a scorching hot pan. The high temperature creates a Maillard reaction that locks in flavor and moisture. If your skillet isn’t getting hot enough, let it sit longer or use a higher‑heat setting. The result is a crust that’s crisp, caramelized, and utterly irresistible.
Why Your Nose Knows Best
Before you even touch a piece of chicken, your nose can tell you if it’s ready. If the aroma is rich and buttery, you’re on the right track. If it smells bland, the seasoning hasn’t had enough time to develop. Trust your senses; they’re a reliable guide.
The 5-Minute Rest That Changes Everything
Resting the chicken for just five minutes after cooking is a game changer. It allows the juices to redistribute, preventing dry meat. A quick rest also gives the butter glaze time to thicken slightly, making each slice shine with a glossy finish.
The Butter Finish Twist
Instead of plain butter, try adding a splash of lemon juice or a pinch of smoked paprika to the melted butter. The acidity brightens the flavor, while the paprika deepens the smoky undertone. This subtle addition can transform a simple dish into a memorable experience.
The One‑Pot Advantage
Cooking everything in a single skillet saves time and reduces cleanup. It also ensures the flavors meld together. The pan’s heat distributes evenly, so you don’t have to worry about uneven cooking. One pot, one pan, one unforgettable meal.
Creative Twists and Variations
This recipe is a playground. Here are some of my favorite ways to switch things up:
Smoky Chipotle Variation
Swap the paprika for chipotle powder and add a dash of adobo sauce. The result is a smoky, slightly spicy chicken that pairs well with corn tortillas.
Herb‑Infused Citrus
Add a squeeze of fresh lemon juice before serving and sprinkle chopped rosemary and thyme. The citrus brightens the dish while the herbs add depth.
Creamy Mushroom Sauce
After removing the chicken, sauté sliced mushrooms in the same skillet, then deglaze with cream. Return the chicken to the pan, coat with the mushroom sauce, and serve over pasta.
Asian Fusion
Replace paprika with a touch of five‑spice powder and finish with a drizzle of soy sauce and sesame oil. Garnish with sliced green onions and toasted sesame seeds for a quick, flavorful twist.
Mediterranean Delight
Swap parsley for oregano and add chopped sun‑dried tomatoes during the last minute of cooking. This gives the dish a tangy, savory kick that’s perfect with a side of couscous.
Storing and Bringing It Back to Life
Fridge Storage
Let the chicken cool completely before placing it in an airtight container. Store in the refrigerator for up to 3 days. The butter glaze will keep the meat moist, preventing it from drying out.
Freezer Friendly
Wrap the cooked chicken tightly in foil or plastic wrap, then place it in a freezer bag. Freeze for up to 2 months. When ready to use, thaw overnight in the refrigerator.
Best Reheating Method
Reheat in a skillet over medium heat, adding a splash of water or broth to create steam. This technique keeps the chicken juicy and restores the buttery glaze. A quick 3‑minute heat should do the trick.
Now that you have all the tools, tips, and tricks, it’s time to bring the skillet to life. Whether you’re cooking for a crowd or a cozy dinner, this dish will impress and satisfy. Remember, the key is heat, seasoning, and a little butter love.