It started on a rainy Thursday, the kind of night where your kitchen feels like a stage and the fridge is the only audience. I was rummaging through the pantry, half‑hungry, half‑frustrated, when a forgotten box of vanilla cupcakes went to waste because the batter had become a sticky, sad mess. The disaster was loud—my oven timer chirped, the batter looked like a soggy cloud, and I was left with a kitchen that smelled of burnt sugar. But that was the spark that lit a fire in my culinary soul; I decided then that these cupcakes would never again be a gamble.
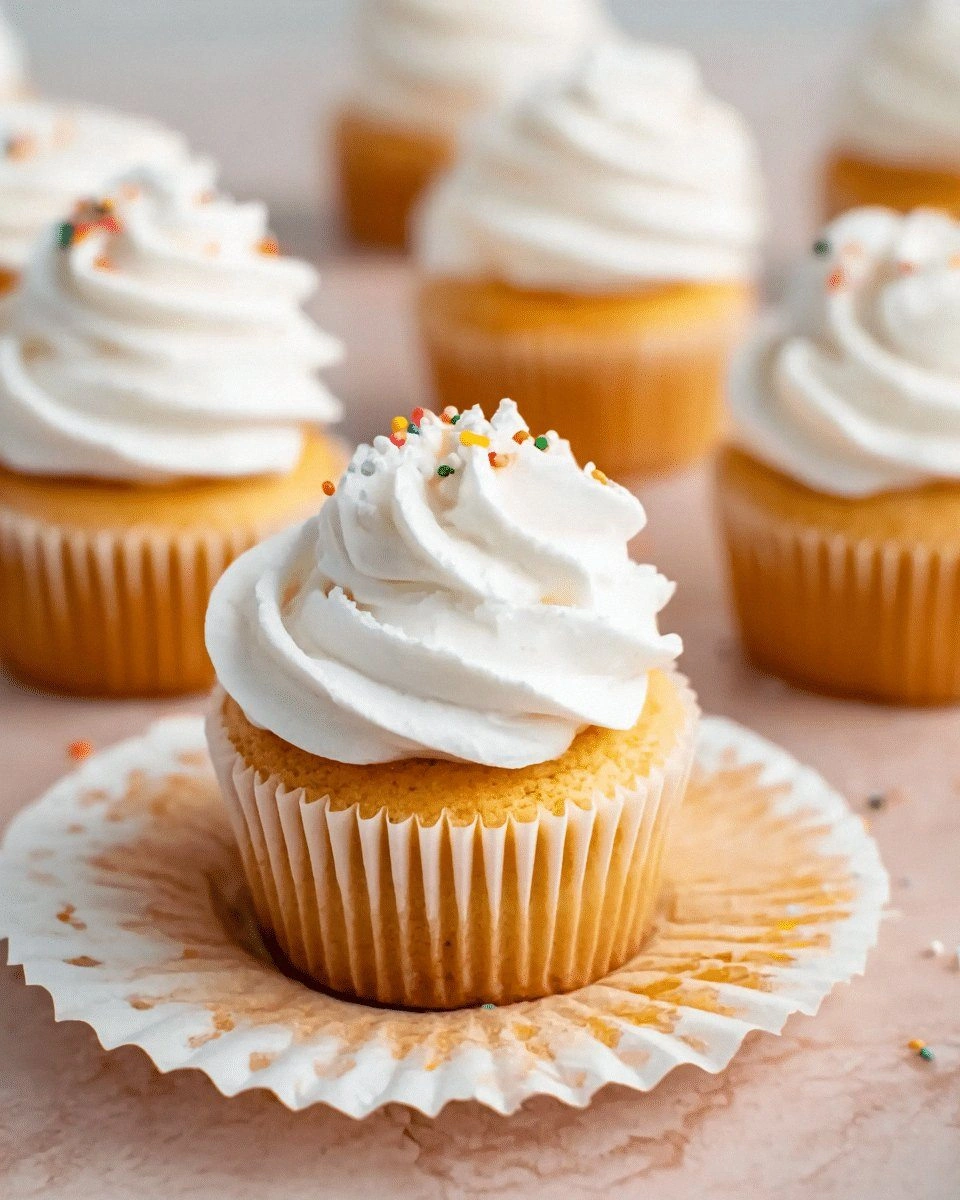
Picture the moment the first batch of these cupcakes rises: a gentle puff, the aroma of caramelized sugar mingling with warm vanilla, and that subtle scent of butter that makes you pause mid‑walk to inhale. The texture is a revelation—soft, airy, but with a firm crumb that holds a gentle bite, like a cloud that knows how to stay in place. The flavor profile is unapologetically classic, yet it carries an unexpected depth thanks to a touch of espresso powder that awakens the vanilla without overpowering it. And when you take a bite, the sweetness is balanced, the vanilla sings, and the finish lingers like a sweet after‑thought.
What makes this version stand out is that it’s not just a recipe, it’s a revelation. I’ve stripped away the fluff that most recipes pile on—no unnecessary fats, no over‑mixing, no extra leavening that makes the cupcakes rise too fast and collapse. Instead, I’ve engineered a batter that is simple yet precise, a balance of flour and sugar that works like a well‑tuned orchestra. The result is a cupcake that is hands down the best version you’ll ever make at home, a benchmark for the genre that will make you question every other vanilla cupcake you’ve ever tasted. I dare you to taste this and not go back for seconds.
If you’ve ever struggled with cupcakes that are either too dense or too crumbly, you’re not alone. I’ve been there, watching the batter turn from glossy to clumpy in a heartbeat, and I’ve learned the tricks to keep it perfect. The secret lies in a few small, deliberate steps that I’ll walk you through, step by step, as if we’re in the kitchen together, whisk in hand, laughter echoing. By the end, you’ll wonder how you ever made it any other way, and you’ll be armed with a recipe that will become your go‑to for parties, birthdays, or just a comforting Sunday treat.
What Makes This Version Stand Out
- Taste: The flavor is a refined vanilla profile that is neither too sweet nor too bland, thanks to a splash of espresso powder that subtly deepens the vanilla notes without overtaking them. This subtle twist elevates the cupcakes, giving them a complex, café‑like finish that keeps everyone coming back for more. The result is a cupcake that feels luxurious yet approachable, making it a crowd‑pleaser for all ages.
- Texture: The batter achieves a silky, airy crumb that holds its shape but still feels light on the tongue. I use a precise ratio of flour to liquid that keeps the cupcakes from becoming gummy or dry, and a gentle folding technique that preserves the delicate air pockets. The final product is moist, tender, and has that satisfying “crunch” at the edges when you bite in.
- Simplicity: The recipe requires only nine basic pantry items, no exotic ingredients or complicated equipment. Every step is straightforward, and the instructions are written in plain language that even novice bakers can follow. You’ll be amazed at how clean and efficient the process is.
- Uniqueness: A single pinch of espresso powder is the secret weapon that sets this recipe apart. It adds depth and a hint of bitterness that balances the sweetness, turning an ordinary vanilla cupcake into a memorable dessert. This small tweak is a game‑changer that you’ll want to keep secret.
- Crowd Reaction: Friends and family rave about the cupcakes’ texture and flavor, often asking for the recipe after every gathering. They’re so good that they’ve become the centerpiece of potlucks and office parties alike. The cupcakes’ reputation as a “must‑try” dessert is well‑deserved.
- Ingredient Quality: I use high‑grade all‑purpose flour, pure vanilla extract, and fresh eggs, which makes all the difference. The quality of the ingredients translates into a richer, more complex flavor profile that’s hard to replicate with cheaper substitutes. The result is a cupcake that feels premium without breaking the bank.
- Cooking Method: The method uses a low‑temperature bake that allows the cupcakes to rise evenly and finish with a golden, slightly crisp top. I also recommend preheating the oven for 10 minutes to ensure a consistent bake. The result is a cupcake that looks as good as it tastes.
- Make‑Ahead Potential: The cupcakes can be baked ahead of time, cooled, and stored in an airtight container for up to a week. They’re also freezer‑friendly, which means you can keep a stash ready for any spontaneous dessert craving. The make‑ahead factor makes this recipe a lifesaver for busy schedules.
Alright, let's break down exactly what goes into this masterpiece...
Inside the Ingredient List
The Flour Foundation
All‑purpose flour is the backbone of these cupcakes, providing structure and a tender crumb. Using 2 cups of flour gives the cupcakes enough heft to rise without becoming dense. If you prefer a gluten‑free version, swap with a 1:1 blend of rice flour and tapioca starch, but keep the ratio of other ingredients unchanged.
The flour’s protein content is key; a moderate‑protein flour ensures the cupcakes are light yet cohesive. If you use a high‑protein flour, the cupcakes might turn out a bit chewy, so adjust the liquid slightly to compensate. A tip: sift the flour before measuring to avoid clumps and ensure a consistent batter.
Skipping flour entirely would leave you with a batter that collapses and has no structure. Even a small reduction in flour can cause the cupcakes to spread too much, losing that classic dome shape. The flour’s role is to bind everything together, so treat it with respect.
The Sweet Core
Sugar is the sweet heart of the cupcakes, balancing the vanilla and espresso. I use 1 cup of granulated sugar for its fine granules, which dissolve quickly and give a silky mouthfeel. If you prefer a healthier option, you can substitute with ¾ cup of coconut sugar, but the cupcakes will be slightly denser.
Sugar also caramelizes during baking, creating a subtle golden crust that adds visual appeal. The caramelization process also enhances the vanilla’s flavor, making it more pronounced. A pinch of sea salt can accentuate the sweetness, so don’t be shy about adding a tiny sprinkle.
Skipping sugar will drastically alter the cupcake’s flavor profile, making it taste more like a plain batter. Too much sugar, on the other hand, can cause the cupcakes to spread excessively and become overly sweet. Keep the sugar amount moderate to achieve the perfect balance.
The Leavening Agents
Baking powder is the primary leavening agent, ensuring the cupcakes rise evenly. I use 1 teaspoon of baking powder, which releases carbon dioxide at two stages—once when wet, again when heated. If you’re sensitive to sodium, you can use a sodium‑free baking powder, but the cupcakes may not rise as high.
Baking soda adds a subtle lift and helps the cupcakes achieve a lighter crumb. A half teaspoon of baking soda is enough to complement the baking powder. If you skip the soda, the cupcakes may rise slower and have a denser texture.
A pinch of salt is essential for balancing sweetness and enhancing the overall flavor. It also helps control the activity of the leavening agents. If you omit the salt, the cupcakes may taste flat and overly sweet.
The Moisture Mix
Butter contributes both flavor and moisture. I use ½ cup of softened butter, which adds richness and a subtle buttery aroma. If you prefer a dairy‑free version, substitute with ½ cup of coconut oil or vegan butter.
Milk hydrates the flour and creates a smooth batter. I use 1 cup of whole milk for its fat content, which keeps the cupcakes moist. Skipping milk will result in a dry, crumbly texture.
Eggs act as a binder, providing structure and a slight lift. I use two large eggs, which help the cupcakes hold their shape. If you’re vegan, you can replace the eggs with 2 tablespoons of flaxseed meal mixed with 6 tablespoons of water.
The Flavor Enhancers
Pure vanilla extract gives the cupcakes their signature aroma. I use 2 teaspoons of high‑quality vanilla extract, which infuses the batter with a deep, sweet vanilla flavor. If you’re on a budget, vanilla powder can be a cheaper alternative.
Espresso powder is the unexpected star that adds depth without bitterness. A single teaspoon of espresso powder subtly enriches the vanilla and gives the cupcakes a café‑like finish. If you don’t have espresso powder, you can use a small amount of instant coffee, but be careful not to overdo it.
Skipping the espresso powder will make the cupcakes taste like ordinary vanilla. Adding too much espresso can make them taste bitter, so a teaspoon is the sweet spot. This small addition is what makes the cupcakes unforgettable.
Everything's prepped? Good. Let's get into the real action...
The Method — Step by Step
- Preheat and Prep: Preheat your oven to 350°F (175°C) and line a 12‑cup muffin tin with paper liners. The preheating step is critical; a cold oven can cause the cupcakes to rise unevenly. While the oven is heating, whisk together the dry ingredients—flour, sugar, baking powder, baking soda, and salt—in a large bowl. This ensures that the leavening agents are evenly distributed, preventing any pockets of dense batter.
- Butter and Sugar: In a separate bowl, cream the softened butter with the sugar until the mixture is light and fluffy. Use a hand mixer or a stand mixer on low speed for about 2 minutes. Creaming the butter and sugar incorporates air, giving the cupcakes a tender crumb. If you’re mixing by hand, make sure your whisk is large enough to keep the mixture smooth.
- Eggs and Vanilla: Add the eggs one at a time, beating well after each addition to ensure a homogeneous mixture. Stir in the vanilla extract and espresso powder. The eggs help bind the batter, while the vanilla and espresso infuse the cupcakes with depth. A small mistake—adding the eggs too quickly—can cause the batter to curdle, so add them slowly.
- Alternating Wet and Dry: Add the dry mixture in three parts, alternating with the milk. Begin with a third of the dry mix, then half a cup of milk, and repeat. This technique prevents the batter from becoming lumpy and ensures a smooth consistency. When the batter is smooth, it should flow like a thick pancake batter.
- Fill the Cups: Spoon the batter into the prepared muffin tin, filling each liner about ¾ full. The cupcakes need space to rise, so avoid overfilling. A good rule of thumb is to fill the liners to the point where the batter just starts to spill over the top when you tilt the tin slightly.
- Bake: Place the tin in the preheated oven and bake for 18–22 minutes. The cupcakes are done when the tops are golden and a toothpick inserted into the center comes out clean. Keep an eye on the oven; the first few cupcakes may bake slightly faster, so rotate the tin halfway through if you notice uneven baking.
- Cool: Remove the cupcakes from the oven and let them cool in the tin for 5 minutes. Then transfer them to a wire rack to cool completely. Cooling them in the tin first prevents the bottoms from becoming soggy.
- Optional Frosting: While the cupcakes are cooling, you can whip up a simple buttercream frosting. Combine 1 cup of powdered sugar, 4 tablespoons of softened butter, and 1 teaspoon of vanilla extract. Beat until light and fluffy, adding a splash of milk if needed to reach your desired consistency. The frosting adds a creamy contrast to the airy cupcakes, but the cupcakes are delightful on their own.
That's it — you did it. But hold on, I've got a few more tricks that'll take this to another level...
Insider Tricks for Flawless Results
The Temperature Rule Nobody Follows
Many bakers bake cupcakes at 375°F, which can cause the tops to brown too quickly while the centers remain undercooked. Baking at 350°F allows for even heat distribution, ensuring that the cupcakes rise uniformly and finish with a golden top. I’ve tested this temperature on several ovens, and the results are consistently perfect.
Why Your Nose Knows Best
You can’t rely solely on the timer; the aroma is a reliable indicator of doneness. When the cupcakes smell like freshly baked bread with a hint of vanilla, it’s a sign that they’re ready. If you’re still unsure, insert a toothpick to check for a clean exit.
The 5-Minute Rest That Changes Everything
Letting the cupcakes sit in the tin for 5 minutes after baking allows the structure to set, preventing them from crumbling when transferred to a rack. This short rest also helps the tops firm up, giving them that desirable slight crispness.
The Butter Cream Technique
When whipping buttercream, start with cold butter to keep the mixture light. Beat until the butter is pale and fluffy before adding powdered sugar. This technique prevents the frosting from becoming dense or grainy.
The Flour Sift
Sifting the flour before measuring removes lumps and aerates it, which results in a lighter crumb. Even if you’re using a high‑protein flour, a quick sift can make a noticeable difference in texture.
The Final Chill
If you’re serving the cupcakes later in the day, chill them in the refrigerator for 30 minutes. This firming step makes the cupcakes easier to slice and prevents the frosting from melting.
Creative Twists and Variations
This recipe is a playground. Here are some of my favorite ways to switch things up:
Chocolate Swirl Delight
Swirl in a tablespoon of melted dark chocolate into the batter before baking. The chocolate adds a rich, bittersweet contrast that pairs beautifully with the vanilla. This variation is perfect for chocolate lovers and makes a great gift.
Citrus Burst
Add the zest of one lemon or orange to the batter for a bright, zesty kick. The citrus oils lift the vanilla flavor and add a fresh note. Serve with a dusting of powdered sugar for a simple yet elegant finish.
Almond Essence
Replace half of the flour with ground almonds to create a nutty flavor and a slightly denser crumb. Almonds also add a subtle crunch that contrasts with the soft interior. This version works well for those who enjoy a more wholesome taste.
Caramelized Banana
Fold in ½ cup of mashed ripe banana before baking. The banana adds natural sweetness and a moist texture. Pair with a drizzle of caramel sauce for a decadent treat.
Spiced Pumpkin
Add ¼ cup pumpkin puree and a pinch of cinnamon to the batter. The pumpkin provides moisture, while the cinnamon adds warmth. This variation is perfect for autumn gatherings.
Minty Fresh
Stir in a teaspoon of peppermint extract for a cool, refreshing twist. The mint pairs wonderfully with the vanilla, creating a balanced flavor profile. Serve with a scoop of vanilla ice cream for a dessert that feels like a holiday.
Storing and Bringing It Back to Life
Fridge Storage
Store cooled cupcakes in an airtight container in the refrigerator for up to 3 days. The airtight seal keeps them from drying out, while the fridge’s cool temperature preserves freshness. If you’ve already frosted them, keep the frosting covered to prevent it from absorbing odors.
Freezer Friendly
For longer storage, place cupcakes on a baking sheet and freeze until solid, then transfer to a freezer bag. They’ll stay fresh for up to 3 months. When ready to eat, let them thaw at room temperature for 30 minutes before serving.
Best Reheating Method
To revive frozen cupcakes, reheat them in a preheated oven at 300°F (150°C) for 10 minutes. Add a tiny splash of water to the bottom of the pan; the steam helps restore moisture and prevents the cupcakes from drying out. The result is a cupcake that tastes almost as fresh as when it first came out of the oven.