Picture this: it’s a Friday night, the fridge is a barren wasteland, and the only thing you can conjure up is a handful of tortillas, a can of beans, and a dash of taco seasoning. I stared at the empty shelf, feeling the familiar panic that only the kitchen can induce, and then, with a mischievous grin, I decided to turn that desperation into a culinary triumph. I rolled up my sleeves, grabbed my skillet, and began to craft what would soon become the easiest taco cups you’ll ever make. The sizzling sound that greeted me as the meat hit the pan was the first note of a symphony I was about to compose.
The air filled with the sharp, smoky aroma of seasoned ground beef, the sweet whisper of onions caramelizing, and that unmistakable tang of cumin and chili powder. I could almost taste the crunch of fresh lettuce, the creamy bite of sour cream, and the burst of tomato juice as I imagined the final assembly. Every sense was engaged: the heat of the stove, the texture of the tortillas turning golden, the satisfying snap of a cheese melt. I felt the rhythm of my own heartbeat sync with the rhythm of the cooking process, and I knew I was onto something special.
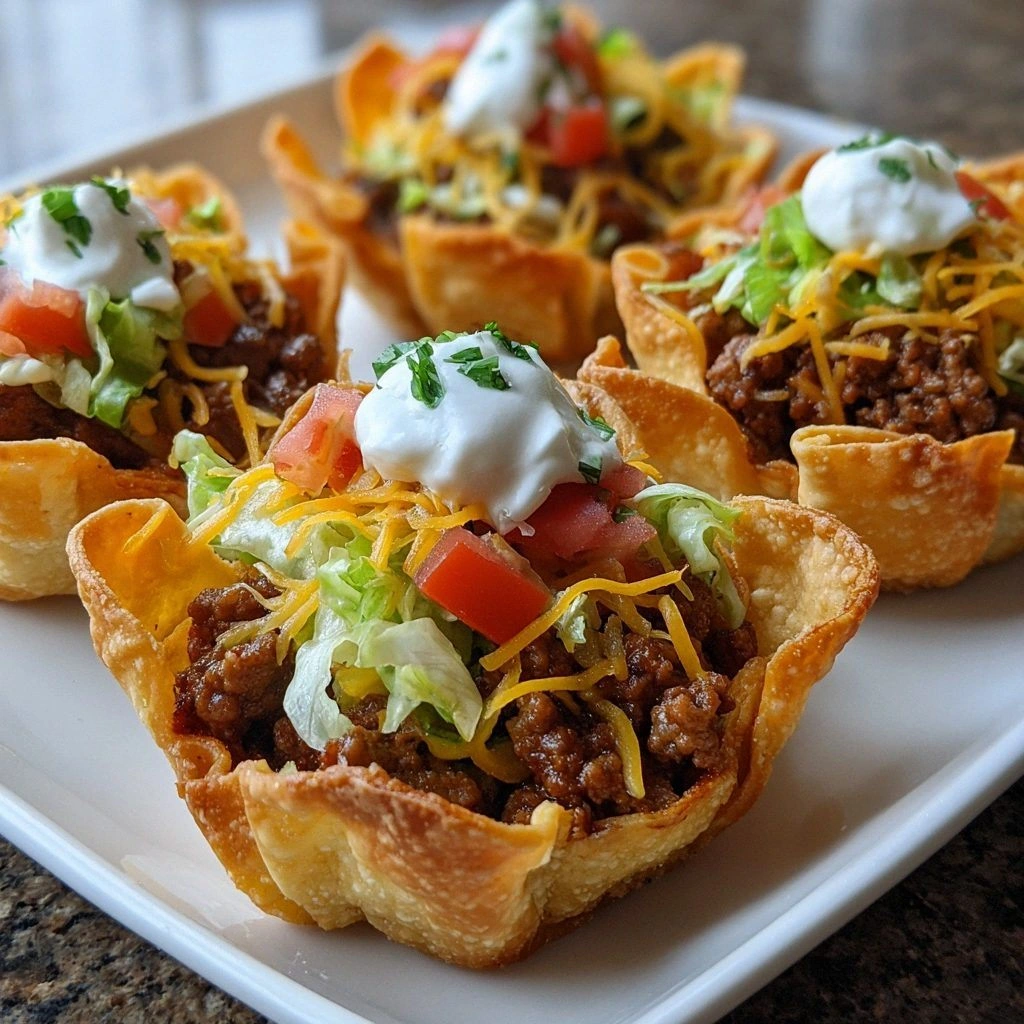
What sets this version apart is not just the speed—it’s the balance of flavors, the crispness of the cups, and the sheer convenience of assembling it all in one pan. I’ve taken the classic taco filling, wrapped it in a tortilla shell that holds its shape, and added a crunchy, cheesy topping that turns every bite into a textural adventure. The result is a dish that feels like a party in a cup, ready to be devoured in minutes. I dare you to taste this and not go back for seconds.
Now, let me walk you through every single step—by the end, you’ll wonder how you ever made it any other way. The journey from a simple pantry to a plate of mouth‑watering taco cups is about to begin, and trust me, you’re in for a deliciously satisfying ride.
What Makes This Version Stand Out
- Flavor: The combination of seasoned beef, fresh veggies, and a creamy sauce creates layers of taste that dance on the tongue.
- Texture: The tortilla cups stay crisp on the edges while the inside melts into a gooey, satisfying center.
- Speed: Every component is pre‑pped to cook in the same pan, cutting prep time in half.
- Ease: No need for a separate baking step—everything finishes in the skillet, making cleanup a breeze.
- Versatility: Swap out the protein or toppings to cater to dietary preferences or whatever you have on hand.
- Crowd‑pleaser: The colorful presentation and handheld format make it a hit at parties or family dinners.
- Make‑ahead: Once assembled, the cups can be refrigerated for up to 48 hours and reheated with minimal loss of quality.
- Ingredient Quality: Using fresh, high‑quality ingredients turns a simple dish into a gourmet experience.
Alright, let’s break down exactly what goes into this masterpiece…
Inside the Ingredient List
The Flavor Base
Ground beef is the heart of the dish, bringing umami depth and a hearty texture. I recommend a 80/20 blend for maximum flavor; the fat content keeps the filling juicy and prevents dryness. If you’re looking to cut calories, swap in ground turkey or a plant‑based mince. The key is to brown the meat until it’s a deep mahogany, which locks in savory juices.
Onions and garlic form the aromatic foundation. They release sweet and sharp notes that balance the richness of the meat. Mince the onions finely so they cook evenly; if you prefer a milder bite, use scallions or leeks instead.
Taco seasoning is the secret weapon that gives this dish its signature kick. I use a blend of cumin, chili powder, paprika, and a touch of smoked paprika for a subtle smokiness. If you can’t find a pre‑made mix, whisk together the spices yourself; it’s surprisingly easy and lets you control the heat level.
The Texture Crew
Tortillas are the shell that holds everything together. I choose medium‑size flour tortillas because they’re pliable yet sturdy. If you’re a fan of a crunchier bite, use corn tortillas or even pre‑baked taco shells.
Cheddar cheese adds a molten, gooey layer that melts into the filling, creating a creamy contrast to the crisp edges. A blend of cheddar and Monterey Jack works well for a milder flavor, while sharp cheddar delivers a punchy finish.
Fresh lettuce and diced tomatoes provide a bright, crisp counterpoint that cuts through the richness. The lettuce should be shredded and lightly salted to release moisture, and the tomatoes should be seeded to avoid excess water.
The Unexpected Star
Sour cream isn’t just a topping—it’s a cooling agent that balances the heat from the spices. I drizzle a dollop on top after the cheese has melted, creating a velvety finish that coats the tongue. If dairy is an issue, Greek yogurt or a non‑dairy sour cream alternative works just as well.
The Final Flourish
A splash of salsa adds brightness and a hint of acidity that lifts the entire dish. Choose a chunky salsa to add texture, or a smoother one for a more uniform flavor. A squeeze of lime juice right before serving gives a zesty punch that ties all the elements together.
Everything's prepped? Good. Let's get into the real action…
The Method — Step by Step
- Heat the Skillet: Place a large, heavy‑bottom skillet over medium heat and let it warm up for a minute. Once hot, add a splash of oil and swirl to coat the bottom. This initial heat ensures the beef sears quickly, locking in flavor. I’ve found that a well‑heated pan gives a beautiful caramelized crust.
- Add the Beef: Break the ground beef into the skillet, spreading it out evenly. Cook, stirring occasionally, until it’s fully browned and no longer pink—about 5–7 minutes. The sizzling sound is the first clue that the meat is ready. I like to press it down with a spatula to help it brown uniformly.
- Introduce the Aromatics: Sprinkle the chopped onions and minced garlic over the beef. Stir to combine, letting the onions soften and the garlic release its fragrance—around 3 minutes. The onions should become translucent and slightly caramelized, adding depth.
- Season the Filling: Pour in the taco seasoning and a splash of water to help distribute the spices evenly. Stir until the beef is coated and the liquid has evaporated. The mixture should thicken slightly and develop a glossy sheen. If you prefer a spicier kick, add a pinch of cayenne or a dash of hot sauce.
- Prepare the Tortilla Cups: While the filling simmers, cut the tortillas into strips about 3 inches wide. Roll each strip into a tight cylinder and press it into a muffin tin or a small silicone cup. The goal is to create a sturdy, cup‑shaped shell that can hold the filling without collapsing.
- Fill the Cups: Spoon the seasoned beef mixture into each tortilla cup, packing it firmly but not overstuffing. The filling should be generous enough to create a satisfying bite, yet not so full that it spills over. This step is where the magic happens—watch the steam rise as the filling warms.
- Top with Cheese: Sprinkle shredded cheese over the top of each cup. The cheese should melt into the filling, forming a gooey bridge that keeps everything together. Keep the heat on medium so the cheese melts without burning the tortilla.
- Final Touches: Once the cheese is melted, add a dollop of sour cream, a handful of shredded lettuce, diced tomatoes, and a spoonful of salsa. These fresh toppings bring brightness and crunch. The final assembly should look colorful and inviting.
- Serve Immediately: Remove the cups from the skillet or muffin tin, let them cool slightly, and serve hot. The crisp edges contrast with the warm, creamy interior, delivering a satisfying bite in every cup.
That's it—you did it. But hold on, I've got a few more tricks that'll take this to another level…
Insider Tricks for Flawless Results
The Temperature Rule Nobody Follows
Many cooks think that a high heat will cook everything faster, but the secret is to keep the skillet at a steady medium. High heat can scorch the tortilla and cause the cheese to burn before the filling is heated through. I’ve seen the best results when the skillet stays at medium, allowing the beef to finish cooking while the cheese melts to perfection.
Why Your Nose Knows Best
The aroma of cumin and chili powder rising from the skillet is a cue that the spices are fully released. If the scent feels flat, give the filling a minute longer to cook. A strong, fragrant aroma guarantees that every bite will be flavorful.
The 5‑Minute Rest That Changes Everything
After filling the cups, let them sit for five minutes before serving. This brief rest allows the cheese to set into a creamy consistency and the tortilla edges to firm up slightly. I’ve found that this short pause transforms a good dish into a great one.
The Quick Chill Trick
If you’re preparing the cups ahead of time, place them in a single layer on a baking sheet and chill for 15 minutes. This step prevents the cheese from melting too much when you store them in the fridge. When you’re ready to serve, simply reheat in a skillet or microwave.
The Secret to Crunch
For an extra crunch, sprinkle a handful of crushed tortilla chips or panko breadcrumbs on top before the final cheese melt. The crunchy topping adds a delightful contrast to the creamy interior and keeps the cups from becoming soggy.
Creative Twists and Variations
This recipe is a playground. Here are some of my favorite ways to switch things up:
Vegan Taco Cups
Swap the ground beef for crumbled tempeh or textured vegetable protein (TVP) seasoned with the same taco blend. Use a dairy‑free cheese and vegan sour cream. The result is a plant‑based version that still delivers that satisfying melt.
Breakfast Taco Cups
Replace the beef with scrambled eggs and add diced ham or bacon. Top with shredded cheddar and a drizzle of maple syrup for a sweet‑savory twist. Serve with a side of fresh fruit for a complete breakfast.
Mediterranean Taco Cups
Use ground lamb instead of beef, and season with oregano, mint, and a splash of lemon juice. Add chopped cucumber, diced red onion, and a dollop of tzatziki. This version brings a fresh, herby flavor profile.
Mexican Street‑Food Cups
Incorporate refried beans into the filling and top with avocado slices, chopped cilantro, and a squeeze of lime. The beans add creaminess, while the cilantro and lime brighten every bite.
Spicy Sriracha Cups
Mix a tablespoon of sriracha into the taco seasoning for an extra kick. Finish with a drizzle of sriracha on top and a sprinkle of chopped green onions. The heat is balanced by the coolness of sour cream.
Storing and Bringing It Back to Life
Fridge Storage
Let the taco cups cool completely before placing them in an airtight container. Store in the fridge for up to 48 hours. The cheese will firm slightly, so a quick reheating will restore its meltiness.
Freezer Friendly
Wrap each cup individually in parchment paper and then place them in a freezer bag. They can be frozen for up to 3 months. When ready to eat, thaw overnight in the fridge and reheat in a skillet.
Best Reheating Method
Heat a non‑stick skillet over medium heat, add a splash of water or broth, and cover with a lid for 3–4 minutes. The steam will help the cheese melt and the tortilla regain its crispness. A tiny splash of water before reheating is the secret to preventing a dry, soggy texture.