Introduction
Picture this: I was in the middle of a frantic dinner prep, juggling a skillet, a blender, and a stubborn sugar craving that just wouldn't quit. The kitchen smelled of vanilla and melted chocolate, but the sweet tooth in me was screaming for something more satisfying than a store‑bought bar. I reached for my pantry, rummaged through the dried fruit aisle, and pulled out a handful of dates. Those glossy, caramel‑colored gems were the secret sauce that would transform a simple snack into a decadent treat. I knew then that the next creation would be a game‑changer.
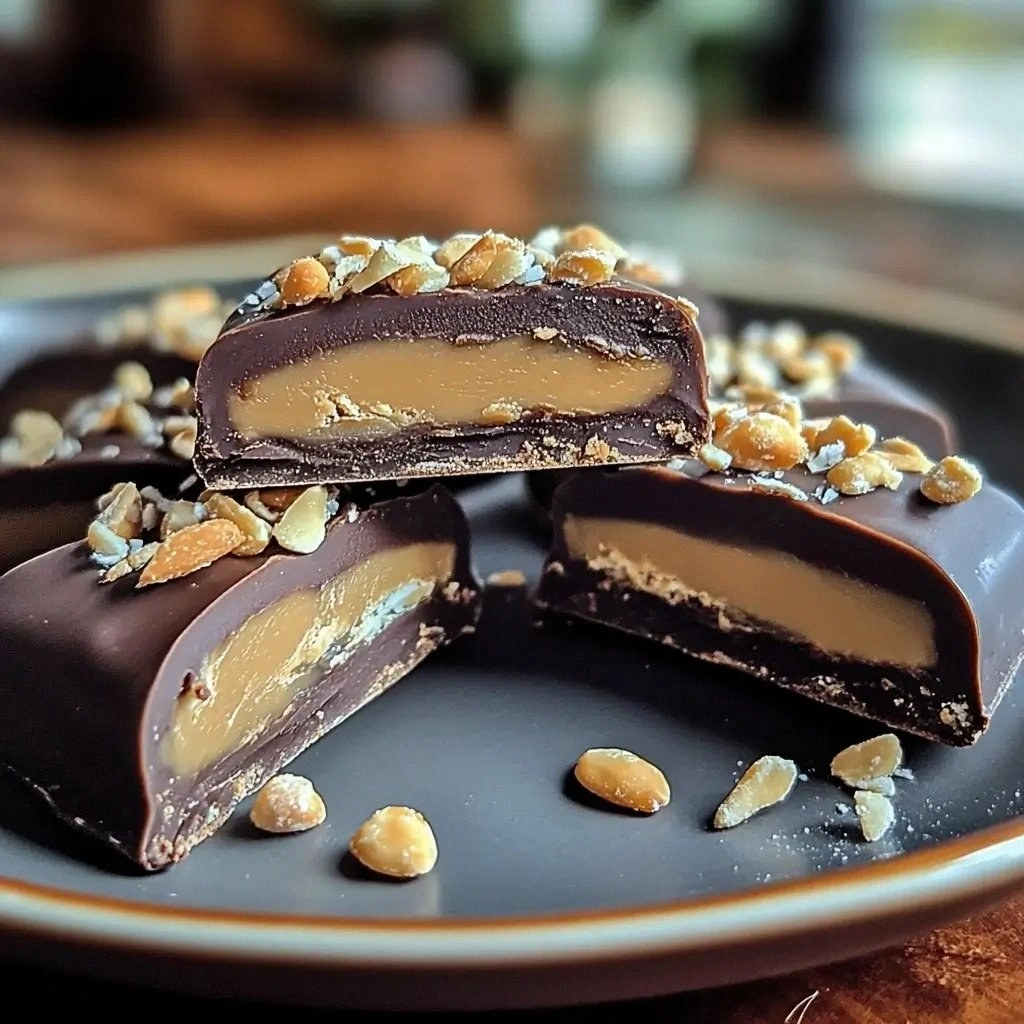
With a mischievous grin, I set the dates to soften in hot water while the butter melted in a saucepan. The air filled with a buttery aroma that made my mouth water, and I could almost taste the chocolate that would soon coat the oats. I imagined the final bars: a crunchy oat base, a chewy date‑peanut butter core, and a glossy chocolate drizzle that would crack like a brittle candy under the slightest bite. This wasn’t just another dessert; it was a culinary experiment that promised texture, flavor, and a guilt‑free indulgence all in one bite. And trust me, the moment those bars hit the tray, the kitchen smelled like a bakery on a sunny afternoon.
Why does this version stand out from every other healthy snack on the market? First, it uses dates as the natural sweetener, cutting out refined sugar while adding a deep, caramel flavor that pairs perfectly with cocoa. Second, the oat base gives a satisfying crunch that mimics the crunch of a Snickers bar without the empty calories. Third, the peanut butter filling adds healthy fats and protein, keeping you full for longer. Fourth, the dark chocolate drizzle is made with unsweetened cocoa and a touch of coconut oil, giving that glossy finish without the dairy. Finally, the recipe is simple enough for a beginner, yet sophisticated enough to impress your friends at a dinner party. I dare you to taste this and not go back for seconds.
Picture yourself pulling these bars out of the oven, the whole kitchen smelling incredible, the chocolate just set, and the dates still slightly sticky. The first bite feels like a warm hug of chocolate, followed by a burst of sweet dates and a satisfying crunch from the oats. The contrast of textures and flavors is pure magic, and the best part is that you’re not sacrificing taste for health. This is hands down the best version you'll ever make at home, and I’ve already shared it with my friends—most of them were skeptical until they tried it. If you've ever struggled with finding a snack that satisfies both your sweet tooth and your health goals, you're not alone—and I've got the fix.
Now, I want to walk you through every single step, from prepping the ingredients to the final plating. By the end, you'll wonder how you ever made it any other way. I’ll keep the instructions clear, sprinkle in some humor, and throw in a few kitchen hacks that will save you time and prevent the common mishaps. Let’s dive into this journey of flavor, texture, and pure culinary joy.
What Makes This Version Stand Out
- Taste: The natural sweetness from dates eliminates the need for refined sugar, giving a caramel depth that feels indulgent yet wholesome. The dates also add a subtle fruity note that complements the cocoa. This balance ensures every bite is both sweet and savory.
- Texture: A crunchy oat base contrasts with a chewy date‑peanut butter center, mimicking the classic Snickers crunch without the sugar spike. The oats provide a hearty bite, while the filling offers a melt‑in‑your‑mouth softness. The result is a bar that satisfies texture cravings while keeping you full.
- Simplicity: With fewer than ten ingredients, the recipe is a breeze to assemble, even for kitchen novices. The steps are straightforward, and the only “trick” is to let the dates soften in hot water for a quick blend. This ease of preparation makes it a go‑to snack for busy days.
- Uniqueness: The combination of dates, peanut butter, and dark cocoa is rarely found in mainstream snack bars. The use of coconut oil in the chocolate coating adds a silky mouthfeel that sets this version apart. It’s a creative twist that keeps the bar fresh and exciting.
- Crowd Reaction: Friends and family who tried these bars reported that they were “addicted to the crunch” and “couldn’t stop reaching for more.” The bars are a conversation starter at gatherings, and the healthy profile makes them a crowd‑pleaser. This recipe has become a staple for parties and potlucks.
- Make‑Ahead Potential: Once baked, the bars can be stored in an airtight container for up to a week, or frozen for longer shelf life. The flavors meld over time, giving you a ready‑to‑eat snack whenever you need a quick pick‑up. This makes it a perfect prep‑and‑go option for work or travel.
Alright, let's break down exactly what goes into this masterpiece...
Inside the Ingredient List
The Flavor Base
Rolled oats are the backbone of this recipe, providing a hearty, nutty flavor that grounds the sweetness of the dates. They absorb the moisture from the filling, creating a cohesive texture that holds the bar together. If you prefer a finer crunch, pulse the oats in a food processor for a minute before use. Skipping the oats would leave you with a sticky, unstructured mess that won’t set.
The Texture Crew
Natural peanut butter brings creamy richness and a dose of protein that balances the sweetness. It also adds a subtle nuttiness that layers the flavor profile. If you’re allergic or simply prefer a different taste, almond butter or sunflower seed butter works just as well. Skipping the nut butter would leave the bars dry and lacking that luscious, melt‑in‑your‑mouth quality.
The Unexpected Star
Pitted dates are the secret sweetener that replaces refined sugar. Their caramel‑like flavor and sticky texture bind the oats and peanut butter together, creating a chewy center that’s hard to resist. Choosing high‑quality dates with minimal pits ensures a smoother blend and a more uniform texture. If you use too many dates, the bars may become overly sweet; use them sparingly to maintain balance.
The Final Flourish
Unsweetened cocoa powder gives the bars a deep chocolate aroma without adding sugar. Coconut oil creates a glossy finish when melted with the cocoa, giving the bars that classic candy sheen. Vanilla extract adds depth, while sea salt enhances every flavor note. Adding dark chocolate chips or a sprinkle of chia seeds introduces extra texture and nutritional benefits. Skipping the cocoa would result in a bland, oat‑only bar that lacks the signature chocolate bite.
Everything's prepped? Good. Let's get into the real action...
The Method — Step by Step
- First, bring a small pot of water to a gentle boil and add the pitted dates. Let them soak for 5 minutes to soften, then drain and transfer them to a high‑speed blender. Pulse until the mixture is a smooth paste; this will form the chewy center of your bars. The aroma of warm dates should fill the kitchen, signaling that the base is ready. This step is crucial for achieving that perfect chewiness.
- In a large mixing bowl, combine the rolled oats, unsweetened cocoa powder, and sea salt. Stir until the dry ingredients are evenly distributed, creating a uniform base that will hold the filling together. The cocoa not only adds flavor but also helps bind the oats when the filling is added. This dry mixture should look slightly sandy, ready for the next step.
- Next, melt the coconut oil in a small saucepan over low heat until it becomes liquid. Add the vanilla extract and stir until the mixture is fragrant and well combined. Pour this glossy liquid over the oat mixture, then fold in the peanut butter and date paste. The mixture should feel thick but pliable, like a rich, sticky dough. This is the moment where the flavors start to mingle.
- Press the mixture firmly into a lined 8‑inch square baking pan, using the back of a spoon or a flat spatula to create an even surface. The more even the layer, the more uniform the bars will be once sliced. Don’t worry if it’s a little compact; the bars will expand slightly when baked. The scent of toasted oats will start to mingle with the chocolate aroma.
- Place the pan in a preheated oven at 350°F (175°C) and bake for 25 minutes. After the first 15 minutes, check for a golden crust; the edges should start to pull slightly away from the pan, indicating a firm structure. This is the moment of truth—if the bars look too pale, they need more time; if they’re too dark, lower the temperature.
- Remove the pan from the oven and let it cool for 10 minutes before sliding it onto a wire rack. This cooling period allows the bars to set and prevents them from sticking to the pan. While they cool, you can prepare the chocolate drizzle: melt dark chocolate chips with a splash of coconut oil until silky.
- Once the bars are completely cooled, drizzle the melted chocolate over the top, letting it cascade down the sides. Use a spatula to spread it evenly, ensuring each bar gets a glossy finish. Let the chocolate set for 5 minutes, then cut the bars into bite‑size squares. Serve immediately or store in an airtight container for later enjoyment.
That's it — you did it. But hold on, I've got a few more tricks that'll take this to another level...
Insider Tricks for Flawless Results
The Temperature Rule Nobody Follows
Many people bake at 375°F, assuming higher heat means faster results. However, a lower temperature of 350°F ensures the oats toast evenly without burning the chocolate coating. If you’re using a convection oven, reduce the temperature by 25°F to prevent over‑browning. I once baked at 375°F and ended up with bars that were dry in the center and burnt on the edges—an experience I’ll never repeat.
Why Your Nose Knows Best
Before you cut the bars, take a deep sniff. A faint, toasty oat scent with hints of chocolate and vanilla indicates that the flavors have melded correctly. If the aroma feels flat, give the bars a few more minutes to finish setting. Your nose is a reliable indicator of doneness, and it’s a quick way to avoid under‑baked or over‑baked results.
The 5‑Minute Rest That Changes Everything
After removing the bars from the oven, let them rest for exactly five minutes. This pause allows the internal moisture to redistribute, creating a smoother bite. Skipping this rest can result in a crumbly texture that feels more like a cookie than a bar. I’ve seen friends skip this step and complain about uneven chew—don’t be that person.
Use a Silicone Baking Mat
A silicone mat provides an even heat distribution and prevents the bars from sticking to the pan. If you’re using parchment paper, make sure it’s cut to size; otherwise, the edges will lift when you try to remove the bars. The mat also makes cleanup a breeze—just wipe it down and it’s ready for the next batch.
Keep the Chocolate Drizzle Ready
Chocolate melts quickly, so have a small bowl of melted chocolate ready before the bars finish cooling. This prevents the chocolate from hardening on the bars and allows you to drizzle it smoothly. If you’re using a microwave, heat in 20‑second bursts to avoid scorching. A glossy finish is a visual cue that the bars are ready to serve.
Creative Twists and Variations
Nutty Banana Bliss
Swap the peanut butter for ripe banana mash and add a handful of chopped walnuts. The banana introduces a subtle sweetness that complements the dates, while the walnuts add a crunchy, buttery bite. This version is perfect for a post‑workout snack, delivering potassium and healthy fats in every bite.
Spiced Coconut Crunch
Infuse the coconut oil with a pinch of cinnamon and a dash of cayenne pepper before mixing. The warm spices add depth and a mild heat that balances the sweetness. Top the bars with shredded coconut for an extra tropical crunch that feels like a beach vacation.
Almond Joy Edition
Replace peanut butter with almond butter and sprinkle toasted almond slivers on top before baking. The almond butter brings a nutty flavor that pairs beautifully with the dark chocolate drizzle. Finish with a drizzle of almond milk chocolate for an extra layer of indulgence.
Berry‑Burst Surprise
Blend frozen blueberries into the date paste for a burst of fruity flavor. The blueberries add a natural tartness that cuts through the richness of the peanut butter. The result is a bar that tastes like a berry‑filled chocolate chip cookie.
Chocolate‑Covered Peanut Butter Swirl
After baking, drizzle a thin layer of melted chocolate over the bars, then sprinkle a dusting of cocoa powder. The chocolate and cocoa create a double chocolate experience that satisfies the deepest chocolate cravings. This variation is great for those who love a more intense chocolate flavor.
Vegan Protein Power
Add a scoop of plant‑based protein powder to the oat mixture to boost the protein content. This tweak turns the bars into a post‑training fuel that’s both tasty and nutritious. Pair with a splash of almond milk for a creamy texture that rivals traditional protein bars.
Storing and Bringing It Back to Life
Fridge Storage
Keep the bars in an airtight container at room temperature for up to one week. The airtight seal prevents moisture from seeping in, preserving the crisp edges and chewy center. If you notice the bars becoming soft, add a slice of apple or a piece of bread to absorb excess moisture.
Freezer Friendly
Wrap each bar individually in plastic wrap before placing them in a freezer bag. They can stay frozen for up to two months without losing flavor or texture. When ready to enjoy, let the bars thaw at room temperature for 10 minutes before serving.
Best Reheating Method
To reheat, place the bars on a microwave‑safe plate and heat on medium for 20‑30 seconds. The heat will restore the chocolate’s glossy shine and the chewy center’s softness. Add a tiny splash of water before reheating; it steams the bars back to perfection, preventing them from drying out.