Picture this: I’m standing in my kitchen at midnight, the fridge humming like a lazy cat, and a sudden craving for something buttery, silky, and just sweet enough to make the rest of the day feel like a cheat‑day. I grabbed the first thing I could find—some leftover caramel from a failed attempt at fudge—and thought, “What if I could turn this into a melt‑in‑your‑mouth candy that actually lives up to the hype?” The result? A batch of vanilla‑cream caramels so decadently soft they practically dissolve on your tongue, leaving a lingering whisper of vanilla that haunts your palate for hours. I dare you to taste this and not go back for seconds; that’s a promise I’m willing to put my reputation on the line for.
The moment the sugar and corn syrup hit the pan, the kitchen fills with a caramel‑kissed aroma that feels like a warm hug from a long‑lost aunt who always knew exactly what you needed. You can hear the gentle bubbling, see the amber liquid swirl like a sunrise in a saucepan, and feel the heat radiating through the metal, reminding you that you’re about to create something truly magical. I’ll be honest — I ate half the batch before anyone else got to try it, and that was the best mistake I ever made because it gave me a chance to perfect the texture before the final pour.
Most caramel recipes get this completely wrong: they either turn into a hard, brittle brick or a gooey mess that sticks to the spoon like a bad hair day. Here’s what actually works: a precise balance of sugar, corn syrup, and a generous splash of heavy cream that creates a custard‑like body, plus butter for that glossy finish and vanilla for a perfume‑like finish. The secret technique? A gentle, controlled temperature that lets the proteins in the cream melt into the sugar matrix without scorching, resulting in a caramel that’s as smooth as satin and as airy as a cloud.
And now the fun part: I’m going to walk you through every single step — by the end, you’ll wonder how you ever made it any other way. Okay, ready for the game‑changer? Let’s dive into the science, the art, and the downright deliciousness of these homemade vanilla cream caramels.
What Makes This Version Stand Out
- Texture: The caramel is soft enough to melt on contact, yet firm enough to hold its shape when sliced, thanks to the perfect cream‑to‑sugar ratio.
- Flavor Depth: Pure vanilla extract infuses every bite with a fragrant, buttery note that lingers long after the caramel disappears.
- Simplicity: Only six pantry staples are needed, no fancy equipment, no temperature‑controlled candy thermometer (though it helps).
- Uniqueness: The addition of heavy cream creates a custard‑like interior that most caramel recipes simply can’t achieve.
- Crowd Reaction: Guests often claim they’ve never tasted anything like it, and the “wow” factor is instant.
- Ingredient Quality: Using real butter and high‑quality vanilla makes the difference between “good” and “legendary.”
- Cooking Method: A low‑and‑slow simmer prevents scorching, giving you a glossy finish without a burnt aftertaste.
- Make‑Ahead Potential: These caramels keep for weeks, making them perfect for gifting or a ready‑to‑grab treat.
Inside the Ingredient List
The Flavor Base
Granulated sugar is the backbone of any caramel, providing the sweet foundation and the caramelization that gives that deep amber color. If you skimp on sugar or use a low‑grade brand, you’ll end up with a pale, under‑flavored result that tastes more like boiled syrup than caramel. A good tip is to use a fine, white sugar that dissolves evenly, ensuring a smooth texture without gritty crystals. If you’re feeling adventurous, you can swap half the sugar for demerara for a subtle molasses note, but be prepared for a darker hue.
The Texture Crew
Light corn syrup is the unsung hero that prevents crystallization, keeping the caramel silky and glossy. It’s essentially a blend of glucose and maltose that interferes with sugar crystals forming, which is why your caramel stays smooth instead of turning grainy. Should you run out, honey or agave nectar can work in a pinch, but they’ll add their own flavors and may affect the final color. Heavy cream is the star that transforms a typical caramel into a creamy dream; its fat content coats the sugar crystals, creating that melt‑in‑your‑mouth feel. Using a cream with at least 35% butterfat is crucial—any lower and you’ll notice a watery finish.
The Unexpected Star
Butter adds richness and a glossy sheen, but more importantly, it mellows the caramel’s edge, preventing that dreaded burnt aftertaste. Opt for unsalted, high‑quality butter; the flavor is cleaner and you can control the salt level yourself. If you’re dairy‑free, a good quality coconut oil can substitute, but expect a faint coconut aroma that may clash with vanilla.
The Final Flourish
Pure vanilla extract is the perfume that elevates the caramel from good to unforgettable. A cheap imitation will taste flat and can introduce off‑notes; always reach for a bottle that lists “vanilla beans” as an ingredient. A pinch of salt is the secret that balances the sweetness, brightening the flavors like a splash of lemon in a rich sauce. Don’t underestimate it—without the salt, the caramel can feel cloyingly sweet.
Everything's prepped? Good. Let’s get into the real action…
The Method — Step by Step
Gather all ingredients and equipment: a heavy‑bottomed saucepan (preferably copper or stainless steel), a silicone spatula, a candy thermometer (optional but helpful), and an 8×8 inch baking pan lined with parchment. I like to measure everything beforehand because once the sugar starts bubbling, you’ll be in a race against time. The kitchen smells like a bakery as you set the stage, and that sizzle when the sugar meets the pan? Absolute perfection.
Combine the granulated sugar and light corn syrup in the saucepan over medium‑low heat. Stir gently with the silicone spatula until the mixture becomes a uniform amber pool; you’ll hear a faint hissing that signals the sugar is dissolving. This is the moment of truth—don’t rush it, or you’ll get a scorched bottom. Watch out for crystallization by wiping down the sides of the pan with a wet pastry brush.
Once the mixture reaches a deep amber color (about 320°F if you’re using a thermometer), slowly drizzle in the heavy cream while whisking continuously. The mixture will bubble up dramatically—think volcanic eruption in your pot, but it’s exactly what you want. This step is pure magic; the cream cools the sugar just enough to keep it from hardening too fast, creating that creamy texture we’re after.
Stir in the butter, one tablespoon at a time, allowing each piece to melt completely before adding the next. You’ll notice the caramel turning glossy and thickening—this is the butter coating the sugar crystals, preventing them from forming a gritty texture. Keep the heat low; if you see the edges of the pan darkening too fast, reduce the flame immediately.
Add the pure vanilla extract and the pinch of salt, giving the mixture a final swirl. The vanilla’s aroma will fill the kitchen, making you feel like you’re in a high‑end patisserie. Taste a tiny spoonful (be careful—it’s hot!) and you should sense a buttery sweetness with a whisper of salt that balances everything out.
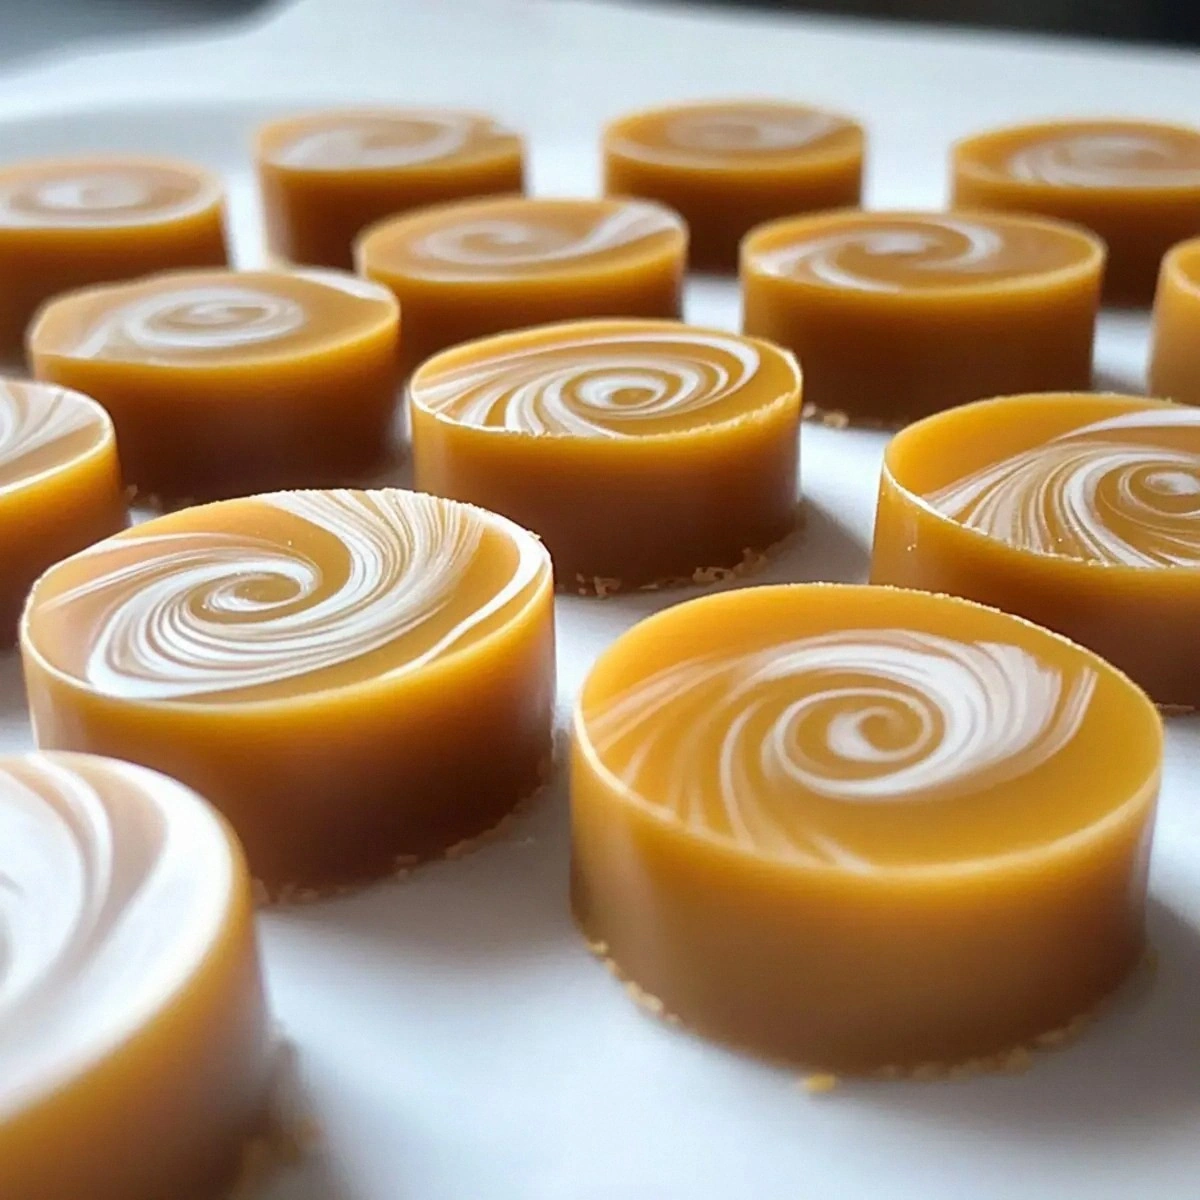
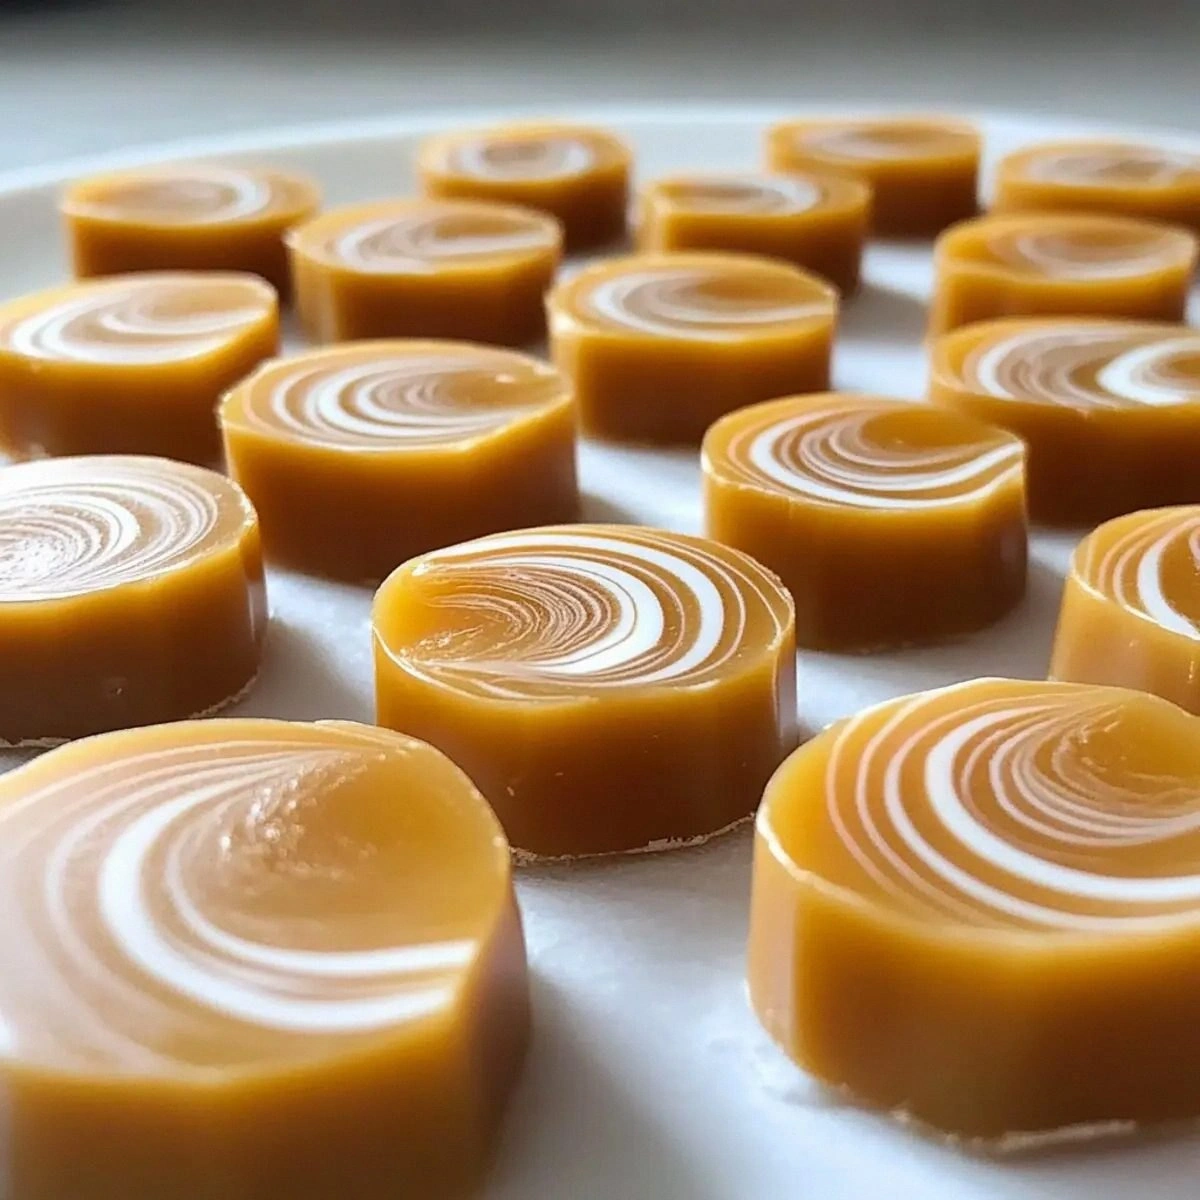
Now, pour the caramel into the prepared baking pan, spreading it evenly with the spatula. The surface should be smooth, with no bubbles or streaks—if you see any, tap the pan gently on the counter to release them. Let the caramel sit at room temperature for about 10 minutes, then transfer it to the refrigerator for a solid 30 minutes. This cooling period is crucial; it allows the caramel to set without cracking.
After the caramel has chilled and firmed up, lift the parchment paper and place the slab on a cutting board. Using a sharp, heated knife (dip the blade in hot water and wipe dry), cut the caramel into bite‑sized squares—about 1‑inch squares work best. The heat helps the knife glide through without dragging the caramel, ensuring clean edges.
Finally, wrap each caramel individually in wax paper or store them in an airtight container lined with parchment. This prevents them from sticking together and keeps the texture perfect. Picture yourself pulling these out of the fridge later, the whole kitchen smelling incredible, and the first bite melting like a dream. That’s the payoff for all the careful steps you just followed.
That's it — you did it. But hold on, I've got a few more tricks that'll take this to another level…
Insider Tricks for Flawless Results
The Temperature Rule Nobody Follows
Most home cooks think “just watch the color” is enough, but the real secret is to keep the mixture between 310°F and 320°F after the cream is added. Below 310°F you risk a runny caramel; above 320°F and you’ll get a hard, brittle texture. I keep a candy thermometer on standby, and if you don’t have one, look for the “thin ribbon” test: dip a spoon into the caramel and lift; if the ribbon falls back into the pot in a slow, fluid motion, you’re in the sweet spot.
Why Your Nose Knows Best
The aroma is a reliable indicator of doneness. When the caramel starts to smell like toasted marshmallows with a hint of buttery vanilla, you’re practically there. Trust your nose more than the clock—if the scent turns slightly burnt, pull the pan off the heat immediately. I once let it go a second too long and ended up with a caramel that tasted more like burnt sugar than sweet bliss.
The 5‑Minute Rest That Changes Everything
After you pour the caramel into the pan, let it sit untouched for exactly five minutes before moving it to the fridge. This brief pause lets the mixture stabilize, preventing the formation of tiny air pockets that can later become cracks. It’s a tiny step that makes a massive difference in the final texture.
Silicone vs. Metal Spatula
Using a silicone spatula instead of a metal one prevents the delicate bubbles from popping, preserving that airy, melt‑in‑your‑mouth feel. Metal can also scratch the bottom of your pan, leading to hot spots and uneven cooking. I once used a metal whisk and ended up with a caramel that had a gritty texture—lesson learned.
Cold Water Dip for the Knife
When cutting, dip your knife in hot water and wipe it dry between cuts. This simple hack ensures the blade slides cleanly through the set caramel, giving you perfect squares without dragging. A friend tried cutting with a cold knife and ended up with ragged edges that looked like they’d been through a shredder.
Creative Twists and Variations
This recipe is a playground. Here are some of my favorite ways to switch things up:
Sea Salt Caramel Crunch
Swap the pinch of regular salt for a sprinkle of flaky sea salt on top of each square right after cutting. The salty crunch contrasts beautifully with the sweet, creamy interior, creating a sophisticated flavor profile perfect for a dinner party.
Espresso Infusion
Replace half the vanilla extract with a tablespoon of strong espresso. The coffee notes deepen the caramel’s richness, turning it into a mocha‑like treat that pairs wonderfully with a cup of black coffee.
Spiced Autumn
Add a pinch of ground cinnamon and a dash of nutmeg to the sugar‑corn syrup mixture before heating. The warm spices give the caramel a cozy, fall‑time vibe—ideal for holiday gifting.
Chocolate Swirl
After pouring the caramel into the pan, drizzle melted dark chocolate over the top and use a skewer to create a marbled effect. The bittersweet chocolate adds a luxurious layer that elevates the caramel to a dessert worthy of a five‑star menu.
Nutty Delight
Fold in a handful of toasted chopped pecans or almonds just before the caramel sets. The nuts add a satisfying crunch and a nutty aroma that complements the vanilla beautifully.
Fruit‑Infused
Stir in a tablespoon of orange zest or a splash of raspberry puree after the butter has melted. The fruit adds a bright, tangy contrast that cuts through the sweetness, making each bite feel fresh.
Storing and Bringing It Back to Life
Fridge Storage
Place the wrapped caramels in an airtight container and store them in the refrigerator for up to two weeks. The cool environment keeps the texture firm while preserving the buttery flavor. If you notice the caramels getting a bit firm, let them sit at room temperature for 10 minutes before serving.
Freezer Friendly
These caramels freeze wonderfully. Layer them between parchment sheets in a zip‑top bag and store for up to three months. When you’re ready to enjoy, move them to the fridge to thaw for an hour, then let them sit at room temperature for a few minutes.
Best Reheating Method
To restore that melt‑in‑your‑mouth softness, place a caramel on a microwave‑safe plate, add a tiny splash (about a teaspoon) of water, and microwave for 5‑7 seconds. The steam generated revives the creamy interior without melting the edges. Avoid microwaving for too long, or you’ll end up with a sticky mess.