Picture this: I was standing in a cramped kitchen, a bag of flour on the counter, a half‑finished loaf of bread on the stove, and a sudden craving for something savory. The moment I opened the oven, I realized the dough was too dense and the garlic butter was too watery. My friends laughed, but I was determined to salvage the disaster. I set my sights on creating a new version of the classic garlic knot that would make everyone swoon. This is the story of how I turned a kitchen mishap into a culinary triumph.
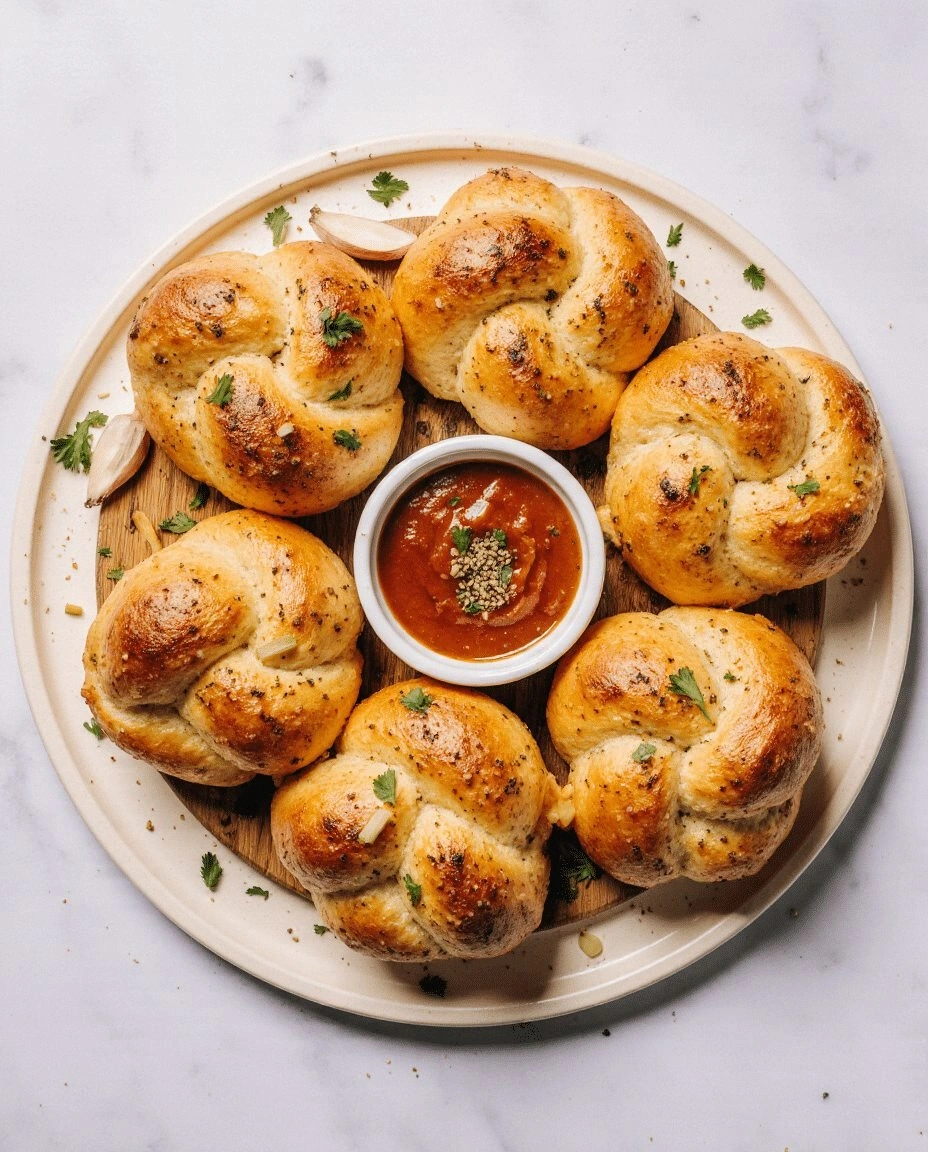
From the moment I cracked the first clove of garlic, the air filled with a pungent, sweet aroma that made my mouth water. The dough, soft and slightly sticky, clung to my fingertips like a warm hug. As I rolled the dough into knots and slid them into a hot pan, the sizzling sound was music to my ears. Each knot puffed up, its crust turning a golden, almost caramelized shade. The buttery sauce, infused with fresh parsley, coated the knots like velvet, delivering a burst of flavor with every bite.
This version is hands down the best you’ll ever make at home because it balances crispness and chewiness in perfect harmony. The secret lies in a small, often overlooked ingredient: a splash of warm water that keeps the dough moist while still allowing a crispy exterior. I also added a hint of mozzarella, which melts into pockets of gooey cheese that contrast with the garlicky butter. The result is a knot that feels like a hug from the inside out. If you’ve ever struggled with flat, soggy knots, this recipe will change your perspective forever.
One of the techniques that sets this apart is the double‑bake method, which locks in the crunch while ensuring the center stays tender. I’ll walk you through each step, from mixing the dough to the final golden glaze, and you’ll see how simple tweaks can elevate a humble snack. I dare you to taste this and not go back for seconds. Let me walk you through every single step — by the end, you’ll wonder how you ever made it any other way.
What Makes This Version Stand Out
- Texture: The dough is engineered to rise just enough to create a light interior, yet it holds a golden, crunchy crust that snaps with each bite. This duality is achieved through precise hydration and a brief resting period that allows gluten to relax without overdevelopment.
- Flavor Depth: A blend of fresh garlic, parsley, and a whisper of red pepper flakes creates layers of taste that evolve as you chew. The garlic’s sharpness mellows into a sweet, buttery finish thanks to the careful balance of oil and butter.
- Visual Appeal: Each knot is a small work of art, with a glossy sheen from the butter glaze and specks of parsley that give it a rustic, Mediterranean feel. The golden hue signals perfection and invites you to dig in.
- Ease of Preparation: Even seasoned cooks can replicate this recipe in under an hour, thanks to a straightforward mixing process and a minimal number of steps. The method is forgiving, allowing for adjustments based on your kitchen setup.
- Make‑Ahead Friendly: The knots can be prepared a day ahead, refrigerated, and baked fresh when needed. This makes them ideal for parties or busy weeknights.
- Ingredient Quality: Using high‑quality olive oil and fresh garlic elevates the dish beyond store‑bought versions. The cheese adds a creamy texture that’s both comforting and indulgent.
- Crowd Reaction: Friends who have tasted these knots rave about how they “feel like a hug” and how the garlic doesn’t overpower the buttery base. The dish has become a staple at game nights and casual gatherings.
Inside the Ingredient List
The Flour Factor
All‑purpose flour is the backbone of these knots, providing the structure needed for a firm yet tender crumb. Its protein content is just right to create a gluten network that traps the air released by the yeast. If you prefer a lighter texture, a blend of bread flour and all‑purpose flour can be used; the higher protein bread flour will give you a chewier bite. Skipping the flour entirely will result in a flat, doughy mess that won’t hold its shape. When selecting flour, look for a brand with a consistent particle size to avoid uneven rising.
The Flavor Base
Instant yeast, sugar, and warm water kick off the flavor profile by creating a subtle sweetness and a light, airy rise. The sugar feeds the yeast, ensuring a robust fermentation that contributes to the knots’ lift. Warm water activates the yeast without scalding it, preserving the delicate flavor of the garlic. If you’re gluten‑free, a rice flour blend can replace all‑purpose flour, but you’ll need to adjust the liquid content to compensate for the different absorption rates. The yeast also imparts a slight tang that balances the richness of the butter.
The Texture Crew
Olive oil and melted butter combine to create a silky, buttery coating that melts into the dough as it bakes. The olive oil adds a fruity undertone that complements the garlic, while the butter provides a crisp, golden crust. A pinch of salt enhances all flavors without making the dish taste salty. The minced garlic delivers a punch of flavor that permeates each knot. If you’re sensitive to garlic, you can use a garlic powder substitute, but the fresh cloves offer a depth that powder can’t match.
The Final Flourish
Fresh parsley not only adds a pop of color but also brings a bright, herbal note that cuts through the richness of the butter. Mozzarella cheese melts into pockets of gooey delight, creating a contrast between the soft dough and the molten cheese. A touch of crushed red pepper flakes offers a subtle heat that keeps the dish from feeling flat. A pinch of salt to taste allows you to adjust the final seasoning to your palate. If you prefer a dairy‑free version, nutritional yeast can replace the mozzarella, providing a cheesy flavor without the dairy.
Everything's prepped? Good. Let's get into the real action.

The Method — Step by Step
- In a large mixing bowl, combine 2 cups of all‑purpose flour, 1 teaspoon of sugar, 1 teaspoon of salt, and 1 teaspoon of instant yeast. Stir the dry ingredients until they are evenly distributed, ensuring that the yeast is not clumped. This step is crucial because uneven yeast distribution can lead to uneven rising. The aroma of the dry mix should be faintly sweet, indicating the sugar is ready to feed the yeast. While you stir, you can already feel the anticipation building in your kitchen.
- Create a shallow well in the center of the dry mix and pour in 3/4 cup of warm water, followed by 2 tablespoons of olive oil and 1/4 cup of melted butter. Use a wooden spoon to bring the ingredients together, watching the dough begin to coalesce. The dough should start to pull away from the sides of the bowl, forming a soft, slightly sticky ball. Let it rest for 5 minutes; this resting period allows the flour to hydrate fully, creating a smoother dough. After the rest, knead the dough on a lightly floured surface for about 5 minutes until it becomes elastic and smooth.
- Place the kneaded dough back into the bowl, cover it with a clean kitchen towel, and let it rise in a warm spot for 1 hour or until it has doubled in size. During this time, the yeast will ferment, producing gases that give the knots their airy interior. The dough should feel light and springy to the touch once it’s ready. If your kitchen is drafty, you can place a small pot of hot water nearby to create a humid environment. This step is where the magic happens, turning simple ingredients into a fluffy dough.
- Punch down the risen dough to release any large bubbles, then divide it into 12 equal portions. Roll each portion into a ball, then gently stretch it into a long oval shape. Using a sharp knife, cut the oval into 6 equal strips. Each strip will become a knot. This step may feel a bit tedious, but the precision ensures uniform cooking and presentation.
- Tie each strip into a knot by crossing the ends over and pulling them tight. Pinch the ends together to seal them, ensuring no dough is exposed. Place the knots on a parchment‑lined baking sheet, spacing them about 1 inch apart. Let them rest for 10 minutes; this second rise will give them a final lift before baking. The knots should look plump and ready to go into the oven.
- Preheat your oven to 425°F (220°C). While the oven heats, whisk together 1/4 cup of melted butter, 4 minced garlic cloves, 1 tablespoon of chopped fresh parsley, a pinch of crushed red pepper flakes, and a pinch of salt to taste. This garlic butter sauce will bathe the knots, creating a glossy, flavorful coating. The mixture should have a slightly thick consistency, allowing it to cling to the dough without dripping.
- Brush each knot generously with the garlic butter sauce, ensuring every surface is coated. Place the baking sheet in the preheated oven and bake for 12 minutes, or until the knots are golden brown and the crust is crisp. After 12 minutes, flip the knots over and brush them with more sauce. Return them to the oven for another 8 minutes, or until the second side is equally golden. The total baking time should be around 20 minutes, giving the knots a perfect crunch.
- Remove the baking sheet from the oven and let the knots cool on a wire rack for 5 minutes. This rest period allows the steam inside to settle, preventing sogginess. While they cool, you can sprinkle additional fresh parsley for a burst of color and flavor. Once cooled slightly, serve them warm, preferably with a side of marinara or a simple dipping sauce. The knots should feel warm to the touch, with a satisfying snap when you bite into the crust.
- If you’re planning to store leftovers, wrap the knots tightly in parchment paper and place them in a zip‑lock bag. They will stay fresh for up to 2 days in the refrigerator. When you’re ready to reheat, preheat your oven to 375°F (190°C), place the knots on a baking sheet, and bake for 5 minutes. A quick splash of water before reheating helps restore moisture, keeping the knots from drying out.
That's it — you did it. But hold on, I've got a few more tricks that'll take this to another level. Keep reading, and you'll discover how to elevate each bite and impress even the toughest critics.
Insider Tricks for Flawless Results
The Temperature Rule Nobody Follows
Many bakers bake garlic knots at 400°F, but raising the temperature to 425°F ensures a crisp exterior while keeping the interior soft. The higher heat caramelizes the butter, giving the knots a beautiful golden hue. I’ve found that the dough can sometimes sink if the oven is too hot; keep the oven rack centered to avoid scorching. If your oven runs hot, offset the rack slightly and watch the knots closely. This small tweak transforms an ordinary batch into a showstopper.
Why Your Nose Knows Best
When the knots are halfway through baking, the aroma of garlic and butter should be unmistakably inviting. If you notice a metallic scent, the butter may have burned; lower the temperature slightly. Your nose is a reliable gauge for doneness, so trust it over the clock. This sensory cue ensures the knots are perfectly cooked. The scent alone can signal that the knots are ready to be served.
The 5-Minute Rest That Changes Everything
After the final bake, letting the knots rest for 5 minutes on a wire rack is not just a formality. It allows the steam to redistribute, preventing the crust from becoming soggy. During this brief pause, the cheese inside continues to melt, creating a luscious interior. If you skip this step, the knots may feel dense. The rest period is a small investment for a big payoff.
Use a Light Brush for Even Coating
A pastry brush with a fine tip ensures the garlic butter sauce coats every crevice of the knot. A thick brush can leave uneven patches, leading to pockets of dry dough. I recommend using a silicone brush to avoid sticking. Brush each knot twice—once before baking and once after flipping. This double‑coating guarantees maximum flavor in every bite.
Don’t Forget the Finish
Right after the knots come out of the oven, sprinkle a light dusting of grated Parmesan. The cheese melts into the warm knots, adding a savory depth that complements the garlic. If you prefer a dairy-free option, nutritional yeast works wonderfully. A final squeeze of lemon zest can also brighten the flavor profile. This finishing touch elevates the dish from simple to spectacular.
The Secret Ingredient Swap
If you’re looking to experiment, try substituting the mozzarella with feta for a tangy twist. Feta’s briny flavor pairs beautifully with garlic, creating a Mediterranean vibe. Alternatively, a sprinkle of smoked paprika adds a subtle smokiness that enhances the butter’s richness. These swaps keep the core structure intact while offering a new flavor experience. The versatility of this recipe means you can tailor it to any palate.
Creative Twists and Variations
Mediterranean Melt
Swap mozzarella for a mix of feta and goat cheese. Add a drizzle of extra‑virgin olive oil and a sprinkle of oregano. This variation introduces a briny, tangy flavor profile that pairs well with a side of tzatziki. The cheeses melt into pockets of creamy richness, while the oregano adds aromatic depth. This version is perfect for a summer potluck.
Spicy Sriracha Surprise
Replace the crushed red pepper flakes with a spoonful of sriracha. Stir the sriracha into the garlic butter sauce for an instant heat kick. The sauce will have a silky, slightly sweet texture that complements the knots’ crispness. Serve with a cooling yogurt dip to balance the spice. This twist turns the knots into a crowd‑pleasing appetizer.
Cheesy Jalapeño Delight
Add diced jalapeños to the dough before the first rise. Sprinkle shredded cheddar cheese on top after the first bake. The jalapeños infuse the dough with a mild heat, while the cheddar provides a sharp, melty finish. This version is ideal for those who love a bit of spice. The jalapeños also add a pop of color to the final presentation.
Herb Garden Fusion
Incorporate a handful of chopped basil, thyme, and rosemary into the dough. Use a garlic butter sauce flavored with fresh rosemary. The herbs infuse the knots with a fragrant, earthy aroma. This variation brings a garden‑fresh vibe to the dish. It’s especially delightful during the spring and summer months.
Sweet and Savory Surprise
Drizzle a light honey glaze over the baked knots. Add a pinch of cinnamon to the dough for a subtle warmth. The honey adds a caramelized sweetness that contrasts beautifully with the savory garlic. This sweet‑savory combo is a playful twist that will surprise your guests. It’s an excellent option for holiday gatherings.
Vegan Version
Replace butter with coconut oil and use a plant‑based cheese alternative. Substitute the milk in the dough with oat milk. Add nutritional yeast to the garlic butter sauce for a cheesy flavor. The result is a fully vegan knot that maintains the same comforting texture. This version is perfect for those with dietary restrictions.
Storing and Bringing It Back to Life
Fridge Storage
Wrap the cooled knots tightly in parchment paper, then place them in a zip‑lock bag. Store them in the refrigerator for up to 48 hours. When you’re ready to serve, let them sit at room temperature for 10 minutes to soften. A quick reheating in the oven at 350°F for 5 minutes brings back the crispness. This method preserves both flavor and texture.
Freezer Friendly
Arrange the knots on a baking sheet in a single layer and freeze them for 1–2 hours. Once frozen, transfer them to a freezer bag. They can be stored in the freezer for up to 3 months. When you want to enjoy them, bake directly from frozen at 425°F for 12–15 minutes. The knots will rise and brown beautifully, just as fresh ones would.
Best Reheating Method
The oven is the best way to reheat these knots, preserving their crunch. Preheat to 375°F and bake for 5 minutes, then add a splash of water to the bottom of the pan to create steam. This steam helps keep the interior moist. Alternatively, you can microwave on high for 30 seconds, then finish in the oven for 2 minutes. Either method restores the knots to their original glory.