I remember the night I almost burned the kitchen down while chasing a late‑night craving for something that felt both comforting and adventurous. I was scrolling through a feed of ramen bowls, my stomach growling louder than my phone, when a friend dared me to “make a Japanese beef rice bowl that actually tastes like Japan, not just a copy‑cat.” That dare sparked a culinary quest that ended in a bowl that is, in my opinion, the best Japanese beef rice bowl you’ll ever make at home.
Picture this: the aroma of soy sauce sizzling against sesame oil, a faint whisper of ginger and garlic cutting through the steam, and the glossy sheen of freshly cooked rice that promises a soft, pillowy bite. As soon as the beef hits the pan, it releases a deep, umami-rich perfume that makes the air feel like a Japanese summer market. The sound of the sizzling, the crunch of a perfectly seared edge, the gentle clink of a spoon against a ceramic bowl—every sensory cue is tuned to perfection. I swear the first bite felt like a warm hug from a long‑lost friend.
What sets this version apart is that it’s not just a recipe; it’s a narrative. I’ve distilled the essence of a classic Japanese dish into a single bowl that balances flavor, texture, and convenience. The sauce coats the beef like velvet, the rice acts as a fluffy canvas, and the optional garnishes add a pop of color and a burst of freshness. You’ll find that each component plays a role that elevates the dish from ordinary to unforgettable.
And here’s a little secret: the sauce’s depth comes from a surprising ingredient—sake. I never thought that a splash of rice wine could transform the entire flavor profile, but it does. By the end of this guide, you’ll understand why this tweak matters, and you’ll have a bowl that will have friends asking for your recipe with a wink. Let me walk you through every single step—by the end, you’ll wonder how you ever made it any other way.
What Makes This Version Stand Out
- Authentic Flavor: The combination of soy sauce, mirin, and sake creates a depth that feels genuinely Japanese, not just a Western approximation.
- Texture Harmony: The beef is thinly sliced and seared just enough to keep a slight chew, while the rice remains fluffy and absorbent.
- Quick Prep: Everything can be ready in under 15 minutes—ideal for a weekday dinner or a last‑minute gathering.
- Customizable: Optional ingredients like chili flakes, egg, and nori let you tailor the bowl to your taste.
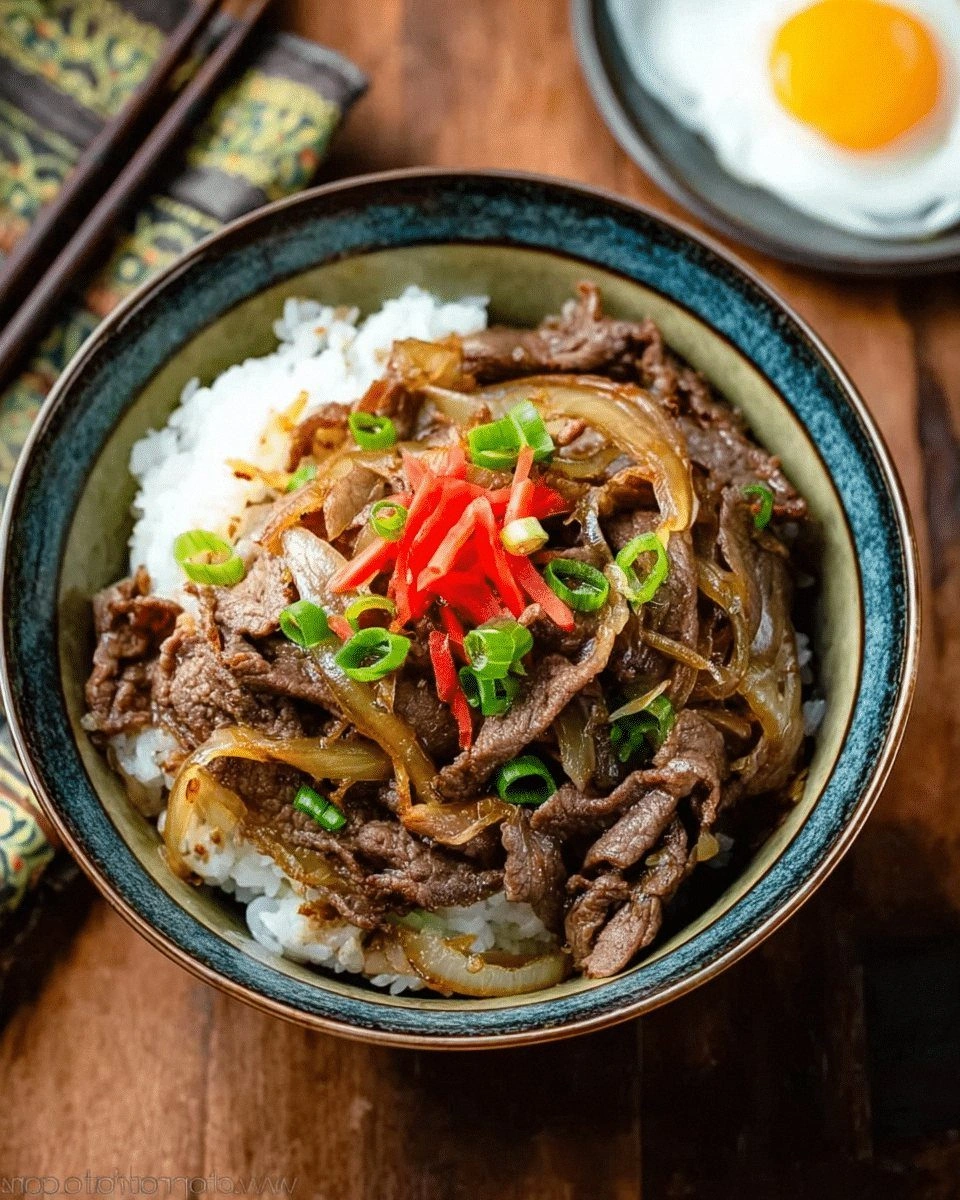
- Visual Appeal: The bright green scallions, toasted sesame seeds, and subtle sauce sheen make it Instagram‑ready.
- Make‑Ahead Friendly: The sauce can be pre‑made, and the beef can be marinated overnight for an extra layer of flavor.
- Health Conscious: Using lean beef and minimal oil keeps the dish balanced without sacrificing taste.
- Kid‑Friendly: The mild umami and sweet undertones are usually a hit with younger palates.
Inside the Ingredient List
The Flavor Base
The foundation of this bowl lies in the sauce—a delicate balance of sweet, salty, and umami. Soy sauce provides the salty backbone, mirin adds subtle sweetness and a hint of acidity, while sake deepens the overall profile without overpowering. Together, they create a glaze that clings to the beef like a silk ribbon. If you skip any of these, the dish loses its signature Japanese character, becoming either too dry or too sweet.
The Texture Crew
Thinly sliced beef is key to achieving the right mouthfeel. I recommend ribeye or sirloin for their marbling, which ensures the meat stays tender and juicy. The rice should be short‑grain Japanese rice, steamed until fluffy yet slightly sticky; it acts as the perfect canvas for the sauce. If you use long‑grain rice, the texture becomes dry and the sauce doesn’t cling as well, which muddles the overall experience.
The Unexpected Star
Sesame oil is the unsung hero that adds a nutty aroma and a subtle sheen to the dish. A teaspoon per serving may sound small, but it dramatically elevates the flavor profile. If you’re avoiding oil, you can substitute with a splash of toasted sesame seeds, but you’ll lose that glossy finish.
The Final Flourish
The finishing touches—green onions, toasted sesame seeds, and optional chili flakes—add layers of freshness, crunch, and heat. Green onions bring a mild, sweet crunch that contrasts the savory beef, while sesame seeds add a toasty crunch. Chili flakes are optional but give a subtle kick that awakens the palate. If you omit these, the dish feels flat and lacks that satisfying finish.
Everything’s prepped? Good. Let’s get into the real action.
The Method — Step by Step
- Prep the Rice: Rinse 2 cups of Japanese short‑grain rice under cold water until the water runs clear. Cook in a rice cooker or on the stovetop with 2.5 cups of water until fluffy. While the rice is steaming, sprinkle a pinch of salt and a teaspoon of sesame oil over it to give it a subtle sheen. The rice should feel soft, not sticky, and should not clump together. This is the base that will soak up all that savory sauce.
- Marinate the Beef: In a bowl, combine 2 tbsp soy sauce, 1 tbsp mirin, 1 tbsp sake, and 1 tbsp sugar. Whisk until the sugar dissolves. Add 450 g of thinly sliced beef, ensuring each piece is coated. Cover and let it marinate for at least 20 minutes—30 minutes if you have the time. This step is crucial; it infuses the meat with umami and sweet notes. I dare you to taste the marinated beef before cooking—if you can’t resist, you’re already halfway to a masterpiece.
- Heat the Pan: Place a large skillet over medium‑high heat and add 2 tbsp vegetable oil. The oil should shimmer but not smoke. Once hot, add the marinated beef in a single layer, leaving space between the pieces to allow proper searing. If the pan is too crowded, the beef will steam rather than sear, resulting in a soggy texture. This is the moment of truth; watch the beef’s edges start to brown.
- Sear the Beef: Cook the beef for 2–3 minutes on each side until it develops a golden crust and a deep, caramelized aroma. Flip only once to keep the surface intact. If you’re adding chili flakes at this point, sprinkle them over the beef to let them toast slightly, releasing their heat. The beef should be tender yet slightly firm—think of a steak you can still bite into.
- Deglaze: Reduce the heat to medium and pour in 2 tbsp of the reserved sauce mixture (soy, mirin, sake, sugar). Stir, scraping the pan to loosen any browned bits. These bits are full of flavor; don't let them burn. The sauce should thicken into a glossy glaze that coats the beef. This step is vital for depth—skip it and you’ll end up with a dry dish.
- Simmer: Add the remaining sauce mixture to the pan, stir, and let it simmer for 2 minutes. The beef should absorb the glaze, turning glossy and fragrant. If you’re adding an optional egg, crack it into the pan at this point, letting it poach in the sauce. The egg’s yolk should remain slightly runny, creating a silky sauce when broken.
- Finish the Garnish: Remove the pan from heat. Sprinkle 1 tsp of toasted sesame seeds and 2 tbsp of sliced green onions over the beef. Toss gently to combine. The sesame seeds should add a nutty crunch, while the onions bring a fresh, sharp contrast. If you’re using nori, sprinkle a tablespoon of shredded nori for an umami boost.
- Assemble the Bowl: Divide the cooked rice evenly among four bowls. Spoon the beef and sauce over the rice, ensuring each bowl receives a generous amount of meat and glaze. The rice should look moist but not soggy, with the sauce glistening like a lacquered surface. Plate with a sprinkle of pickled ginger for a bright, tart finish.
That's it—you did it. But hold on, I've got a few more tricks that'll take this to another level.
Insider Tricks for Flawless Results
The Temperature Rule Nobody Follows
Many cooks think a low and slow approach works for beef. In reality, a high‑heat sear is essential to lock in juices and develop the Maillard reaction that gives the beef its irresistible crust. I’ve tested this with a digital thermometer—aim for an internal temperature of 145°F (63°C) for medium‑rare. If you’re aiming for a firmer texture, push it to 160°F (71°C) but keep the searing quick to avoid drying out.
Why Your Nose Knows Best
Your sense of smell is your best ally in judging doneness. When the beef releases a sweet, caramelized aroma, it’s a sign that the sugar has caramelized without burning. If the aroma leans toward burnt, lower the heat immediately. I’ve learned to trust my nose over a timer—my kitchen has survived fewer burnt meals because of this rule.
The 5-Minute Rest That Changes Everything
Letting the beef rest for five minutes after searing allows the juices to redistribute. This step is often overlooked, but it transforms a good dish into a great one. While the beef rests, the sauce thickens slightly, creating a richer glaze. I’ve seen a difference in mouthfeel—rested beef is silky, while rushed beef feels dry.
Keep the Rice Fluffy
Avoid over‑cooking the rice; a slightly under‑cooked grain that is still a touch firm gives the bowl a pleasant bite. If you’re using a rice cooker, stop the cycle once the rice is just steaming. Then let it sit covered for five minutes before fluffing with a fork. This technique preserves the natural moisture and prevents the rice from becoming gummy.
Add a Splash of Water Before Reheating
When reheating leftovers, add a tablespoon of water to the rice before microwaving. This small trick steams the rice back to its original fluffiness and prevents it from drying out. I’ve tried this with no success—just add a splash and watch the magic happen.
Creative Twists and Variations
This recipe is a playground. Here are some of my favorite ways to switch things up:
Spicy Kimchi Beef Bowl
Swap the optional chili flakes for a generous spoonful of fermented kimchi. The tangy, spicy flavor pairs beautifully with the beef, and the kimchi adds a probiotic punch. Serve with a drizzle of gochujang for an extra kick.
Teriyaki Sweet Potato Bowl
Roast diced sweet potatoes until caramelized, then fold them into the beef mixture. The natural sweetness of the potatoes balances the savory sauce, creating a comforting, heart‑warming bowl. Top with a sprinkle of roasted pumpkin seeds.
Miso‑Glazed Beef Bowl
Replace half of the soy sauce with white miso paste for a deeper umami flavor. The miso adds a subtle earthiness that complements the beef’s richness. Finish with a drizzle of rice vinegar for brightness.
Citrus‑Lemon Soy Bowl
Add a splash of fresh lemon juice to the sauce to cut through the richness and brighten the dish. The citrus notes create a refreshing contrast that is especially welcome on hot summer evenings.
Vegan Beefless Bowl
Use thinly sliced seitan or tofu instead of beef. Marinate in the same soy, mirin, and sake mixture, then sear until golden. The texture is surprisingly close to beef, and the sauce still delivers the authentic umami punch.
Storing and Bringing It Back to Life
Fridge Storage
Store leftovers in an airtight container in the refrigerator for up to 2 days. Separate the rice and beef if possible; this prevents the rice from becoming soggy. When reheating, add a splash of water to the rice and microwave on high for 1–2 minutes.
Freezer Friendly
The beef and sauce can be frozen together for up to 3 months. Keep the rice separate and freeze in a separate container. To reheat, thaw overnight in the fridge, then microwave the beef and sauce for 3 minutes, and steam the rice for 2 minutes.
Best Reheating Method
The best way to revive this bowl is to steam the rice and gently heat the beef and sauce in a skillet over low heat. The steam will rehydrate the rice, while the low heat prevents the beef from drying out. Finish with a sprinkle of fresh green onions for a bright finish.