I still remember the day my air conditioning died during the hottest July on record. The thermostat read ninety-four degrees, my kitchen felt like a sauna, and I was desperately rummaging through my freezer for anything that could cool me down. Ice cream? Gone. Popsicles? Finished the night before during a Netflix binge. But hidden behind a bag of frozen peas sat a container of Greek yogurt, and next to it, half a jar of peanut butter. In that moment of desperation, these Frozen Greek Yogurt Peanut Butter Bites were born, and honestly, they've become the superhero of my summer snacking ever since.
What started as a frantic attempt to avoid melting into a puddle became the recipe that my friends now beg me to bring to every barbecue, pool party, and game night. I'll be honest — I ate half the batch before anyone else got to try it that first day. The combination of tangy Greek yogurt, rich peanut butter, and those little chocolate chip surprises creates something that tastes like you spent hours in the kitchen, when really, you just stirred a few things together and let your freezer do all the heavy lifting.
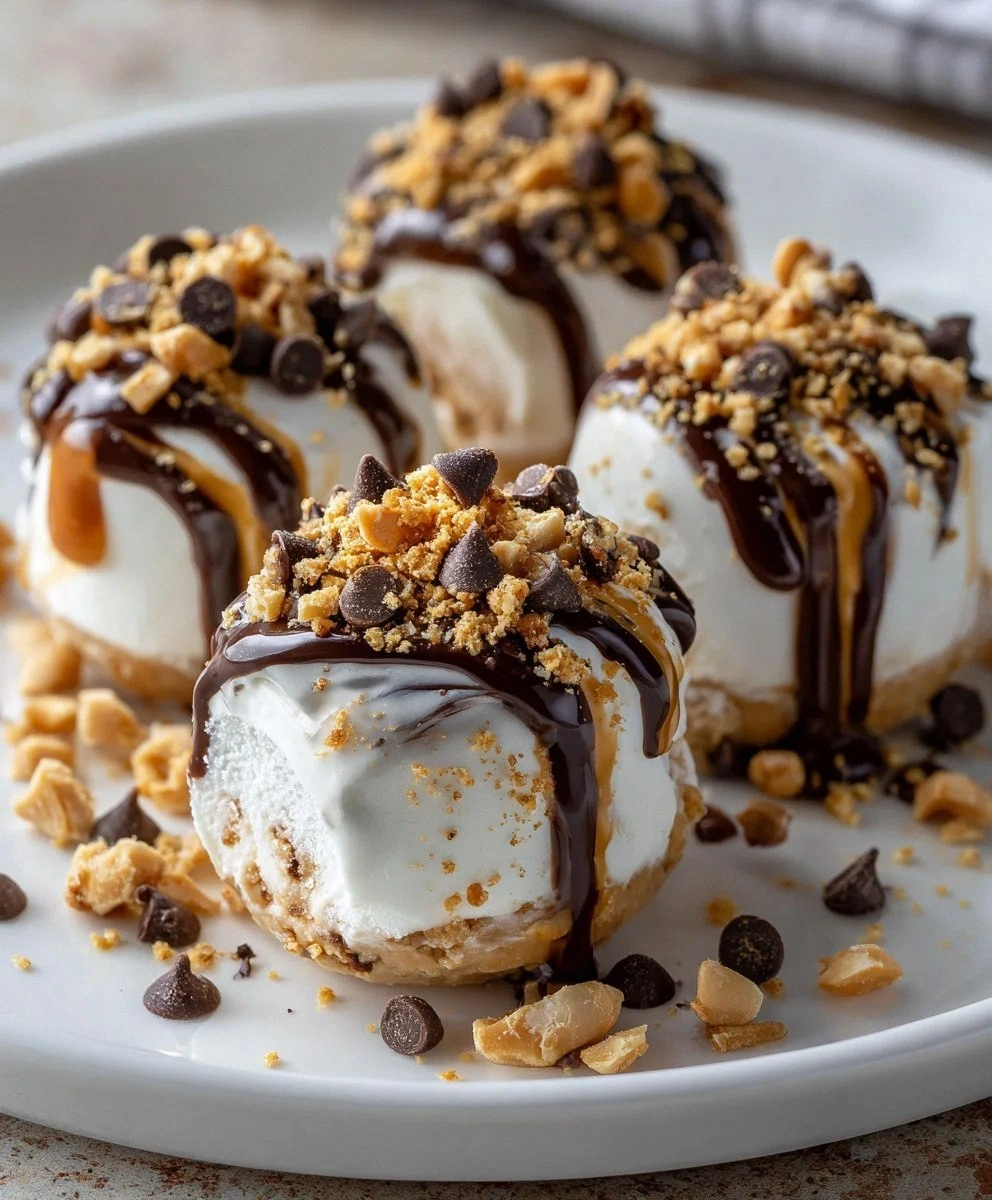
Picture this: creamy, protein-packed bites that taste like dessert but feel like you're doing something good for yourself. The tang of the yogurt plays beautifully against the nutty depth of peanut butter, while mini chocolate chips provide those moments of pure indulgence that make you close your eyes and sigh with satisfaction. And the texture? Oh, the texture is pure magic — frozen solid enough to give you that satisfying snap when you bite through, but creamy enough to melt luxuriously on your tongue.
Most frozen yogurt treats you'll find online are either too icy, too bland, or they separate into weird layers that make you question your life choices. This version? This is hands down the best version you'll ever make at home. The secret lies in the ratio of yogurt to peanut butter, the type of sweetener you use, and a few tricks I've learned through trial and error (and trust me, there were some errors). Let me walk you through every single step — by the end, you'll wonder how you ever made it any other way.
What Makes This Version Stand Out
The Texture Revolution: Most recipes get this completely wrong — they either end up rock-hard or they melt into a puddle the moment you touch them. The magic ratio I've discovered creates bites that are firm enough to hold their shape but creamy enough to bite through without breaking a tooth. The Greek yogurt provides structure while the peanut butter keeps everything luxuriously smooth.
Protein Powerhouse: Each little bite packs about six grams of protein, which means you're actually fueling your body instead of just feeding your sweet tooth. I've replaced my afternoon protein bar addiction with these, and honestly, they're more satisfying. Plus, your kids will never know they're eating something healthy — they'll just think you're the coolest parent ever for giving them "frozen candy."
Endless Customization: Once you master the base recipe, you can turn these into whatever flavor profile you're craving. Add cocoa powder for chocolate-peanut butter bites, swirl in some jam for a PB&J version, or add protein powder if you're feeling extra ambitious about your fitness goals. The base is like a blank canvas waiting for your personal touch.
Zero Cooking Skills Required: If you can stir with a spoon and operate a freezer, you can make these. There's no cooking, no baking, no tempering chocolate or whipping cream. I dare you to find an easier dessert that tastes this impressive. My eight-year-old nephew made these for his birthday party, and the other kids thought he was some kind of kitchen wizard.
Make-Ahead Magic: These beauties keep perfectly in the freezer for up to two months, which means you can make a double batch on Sunday and have instant desserts ready whenever the craving strikes. They're like little frozen treasures waiting to rescue you from those 3 PM energy crashes or late-night sweet tooth emergencies.
Portion Control Perfection: Each bite is perfectly portioned, so you're not tempted to "just have a little more" like you would with a pint of ice cream. They're naturally portion-controlled little gems that satisfy without the spiral of guilt that usually follows dessert. Plus, they look so cute in their little shapes that you almost feel bad eating them — almost.
The Crowd Reaction: I brought these to a dinner party last month, and people literally chased me around asking for the recipe. One friend told me they were better than the $8 frozen yogurt pops she buys at the gourmet market. Another asked if I could make her a batch for her birthday instead of cake. The real kicker? They're embarrassingly easy to make.
Alright, let's break down exactly what goes into this masterpiece, because understanding your ingredients is what separates good cooks from kitchen legends. Each component here has a job to do, and when they all work together, it's like a symphony of flavor and texture that'll make your taste buds sing.
Inside the Ingredient List
The Flavor Base
Greek yogurt isn't just any yogurt — it's the superhero of the dairy world, strained to remove excess whey and create that thick, luxurious texture that makes these bites so special. When you choose your yogurt, go for full-fat if you want the creamiest results, though 2% works beautifully if you're watching calories. The tanginess of the yogurt creates a perfect counterpoint to the sweet honey and rich peanut butter, preventing the whole thing from becoming cloyingly sweet. If you skip the yogurt entirely and try to use regular yogurt, you'll end up with icy, sad little pucks that nobody wants to eat.
The peanut butter you select will make or break this recipe — natural, creamy varieties work best because they incorporate smoothly without leaving weird chunks. Avoid the super-processed brands that contain added sugar and oils; you want the pure, roasted peanut flavor to shine through. If you're feeling adventurous, try almond butter for a more sophisticated version, or sunflower seed butter if you're cooking for someone with nut allergies. The key is to choose something that's well-stirred and pourable at room temperature.
The Sweetness Squad
Honey brings more than just sweetness to the party — it adds floral notes and helps keep the texture smooth and scoopable even when frozen. Maple syrup works equally well and gives you that lovely caramel undertone that pairs beautifully with peanut butter. You can adjust the amount based on your personal preference, but don't go overboard — too much sweetener will make the bites freeze rock-hard and you'll need an ice pick to get them out of the molds. Start with the lower amount and taste the mixture before freezing; you can always drizzle a little extra honey on top when serving.
Vanilla extract might seem like an afterthought, but it's the ingredient that makes people ask "what's that amazing flavor I can't quite identify?" A good quality vanilla adds warmth and depth that rounds out all the other flavors. Skip the imitation stuff here — since you're not baking it, the alcohol won't cook off, and cheap vanilla can leave an artificial aftertaste that ruins everything.
The Texture Team
Mini chocolate chips are my secret weapon for creating little pockets of joy throughout each bite. They stay suspended better than regular chocolate chips, and when you bite into them, you get that satisfying crunch of frozen chocolate. Dark chocolate chips work brilliantly if you want to keep things on the healthier side, but milk chocolate chips create that nostalgic peanut butter cup flavor that'll transport you straight back to childhood. If you can't find mini chips, roughly chop regular chocolate chips or even use chocolate shavings.
Crushed nuts add another layer of texture and nutrition, but they're entirely optional if you want to keep things simple. Almonds provide a sweet crunch, walnuts give you that buttery richness, and peanuts double down on the nutty flavor. Toast them first for maximum flavor impact — just a few minutes in a dry pan until they smell fragrant will make a world of difference. If you're making these for kids or anyone with dental work, you might want to leave the nuts out entirely.
The Equipment Essentials
Silicone molds are your best friend here because they allow the frozen bites to pop out effortlessly without any wrestling or broken pieces. Mini muffin tins work in a pinch, but you'll need to line them with paper liners or accept that you'll be running hot water over the back of the tin to release your treats. The smaller the mold, the faster they'll freeze, and the easier they'll be to eat — think one-bite wonders rather than hockey pucks. If you're really in a pinch, you can even use an ice cube tray, though your bites might look a little rustic.
Everything's prepped? Good. Let's get into the real action, because once you see how simple this process is, you're going to wonder why you ever bought those overpriced frozen yogurt bars at the store.
The Method — Step by Step
- Start by setting your Greek yogurt out on the counter for about ten minutes to take the chill off — this makes it easier to stir and helps everything combine smoothly. In a medium bowl, measure out your yogurt and give it a good stir to loosen it up; you want it to be creamy and spreadable, not cold and stiff. This is the foundation of your entire recipe, so take a moment to appreciate that thick, luxurious texture that's going to transform into frozen magic. If you're using flavored yogurt, reduce the honey slightly since it's already sweetened.
- Now comes the fun part — add your peanut butter to the yogurt and watch as they begin their beautiful dance together. Use a sturdy spoon or spatula to combine them thoroughly, making sure to scrape the bottom and sides of the bowl to incorporate everything evenly. The mixture should look like a lighter-colored, fluffy peanut butter cloud that makes you want to dive in face-first. Don't worry if it looks a little streaky at first; keep stirring and it'll come together into a smooth, homogeneous mixture.
- Drizzle in your honey or maple syrup and add the vanilla extract, then stir again to incorporate all the sweet, fragrant goodness. Taste the mixture at this point — it should be slightly sweeter than you want the final product since freezing dulls sweetness. If you prefer things less sweet, start with two tablespoons and add more if needed. The mixture should be thick but pourable, like a milkshake that's been sitting for a few minutes.
- This is where the magic happens — fold in your mini chocolate chips and crushed nuts if using, but save a few for sprinkling on top. The key is to fold rather than stir vigorously; you want to distribute them evenly without crushing the chips or creating air pockets. Watch as they disappear into the mixture like little treasure bombs waiting to be discovered. If you're making these for kids, let them help with this step — there's something deeply satisfying about folding chocolate into peanut butter yogurt.
- Now it's time to fill your molds, and this is where precision meets creativity. Use a small cookie scoop or two spoons to portion the mixture into your silicone molds, filling them about three-quarters full to allow for expansion. Tap the molds gently on the counter to release any air bubbles and create a smooth surface. If you're using mini muffin tins, line them with paper liners first for easy removal later.
- Sprinkle the remaining chocolate chips and nuts on top of each bite, pressing them in slightly so they adhere. This creates a pretty presentation and ensures you get chocolate in every bite — because let's be honest, who wants a chocolate-free bite? If you want to get fancy, you can swirl a little extra peanut butter on top with a toothpick for a marbled effect. The topping step is your chance to make each bite look like it came from a gourmet shop.
- Carefully transfer your filled molds to a flat surface in your freezer — this is crucial because you don't want them tipping over and creating a frozen yogurt tsunami. They need to freeze for at least three hours, but overnight is even better if you can wait that long. I dare you to taste this and not go back for seconds before they're even frozen — the mixture is dangerously delicious even at room temperature.
- After the agonizing wait, remove your frozen bites from the molds by gently pushing up from the bottom of each cavity. They should pop out like little frozen jewels, perfect and intact. If you're using silicone molds, they should release effortlessly; if they're sticking, let them sit at room temperature for two minutes before trying again. Store them in an airtight container in the freezer for up to two months, though I guarantee they won't last that long.
- The final step is the most important — let them sit at room temperature for about five minutes before serving. This brief rest transforms them from rock-hard pucks to creamy, scoopable bites that melt luxuriously on your tongue. Serve them in small bowls or on a pretty plate, and watch as your guests' eyes light up when they take their first bite. If you've ever struggled with frozen desserts that are too hard to enjoy, you're not alone — and I've got the fix.
That's it — you did it. But hold on, I've got a few more tricks that'll take this to another level, because once you master the basic recipe, you're going to want to experiment with every possible variation. These insider secrets are what separate the good frozen yogurt bites from the legendary ones that people talk about for years.
Insider Tricks for Flawless Results
The Temperature Rule Nobody Follows
Here's the thing that most recipes get wrong — the temperature of your ingredients matters more than you'd think. If your peanut butter is straight from the fridge, it'll seize up when it hits the cold yogurt and create lumpy, unpleasant bites. Let everything come to room temperature before you start mixing, and you'll achieve that silky-smooth texture that makes people think you went to pastry school. A friend tried skipping this step once — let's just say it didn't end well, and she ended up with frozen peanut butter gravel that even her dog wouldn't eat.
Why Your Nose Knows Best
Your sense of smell is your secret weapon when making these bites. When you open your jar of peanut butter, take a moment to really smell it — it should smell deeply nutty and slightly sweet, not oily or rancid. The same goes for your yogurt; it should smell fresh and tangy, not sour or off. If anything smells weird, trust your nose and start fresh with new ingredients. Rancid nuts or old yogurt will ruin your bites faster than you can say "freezer burn."
The 5-Minute Rest That Changes Everything
I know I've mentioned this before, but it bears repeating because it literally makes or breaks the final result. After you take the bites out of the freezer, let them sit for exactly five minutes — set a timer if you need to. This brief rest allows the surface to soften just enough to give you that perfect creamy texture, while the inside stays frozen and refreshing. Too short and they're still rock-hard; too long and they start to melt and lose their shape. This is the difference between good frozen yogurt bites and transcendent ones.
The Double-Freezer Method
If you really want to impress, try the double-freezer method: freeze your bites in the molds for two hours, then remove them and place them on a parchment-lined baking sheet to freeze for another hour. This creates a slightly firmer exterior while keeping the inside creamy, giving you that perfect contrast that makes people close their eyes when they eat them. It's an extra step, but it's pure magic when you want to serve these at a party and have them look like they came from a fancy gelato shop.
The Flavor Development Secret
Here's something wild — these bites actually taste better after they've been frozen for 24 hours. The flavors have time to meld and develop, creating a more complex, harmonious taste than when you eat them immediately. It's like the difference between a freshly made soup and one that's been sitting overnight — the waiting really does make them better. Make them a day ahead of when you need them, and you'll be rewarded with flavor that's deeper and more satisfying.
Creative Twists and Variations
This recipe is a playground. Here are some of my favorite ways to switch things up that'll keep you excited about making these all year long:
The Chocolate Lover's Dream
Add two tablespoons of cocoa powder to the base mixture and swap the mini chocolate chips for white chocolate chips. The result tastes like a frozen peanut butter cup had a baby with chocolate mousse, and it's absolutely irresistible. Top with a drizzle of melted chocolate and some crushed peanuts for the full candy bar experience without the guilt.
The Tropical Getaway
Replace the peanut butter with almond butter and add a tablespoon of coconut extract to the base. Fold in toasted coconut flakes instead of nuts, and use white chocolate chips for a piña colada vibe that'll transport you straight to the beach. These are particularly amazing in the dead of winter when you need a tropical vacation in bite form.
The Breakfast-Inspired Version
Add a tablespoon of instant espresso powder to the mixture and use maple syrup instead of honey. Fold in some granola clusters along with the chocolate chips, and you've got a frozen breakfast bite that tastes like your favorite coffee shop drink. I make these for early morning meetings, and people think I'm a genius for bringing "breakfast."
The Berry Blast
Keep the peanut butter but swirl in three tablespoons of your favorite jam before freezing. Raspberry creates that classic PB&J flavor, while strawberry gives you a more sophisticated taste. Don't mix it completely — leave some streaks for a pretty marbled effect that looks like you bought them at an artisanal market.
The Protein Powerhouse
Add a scoop of your favorite vanilla or chocolate protein powder to the mix, and reduce the yogurt by a quarter cup to maintain the right consistency. These become the perfect post-workout treat that feels like cheating but is actually helping your muscles recover. My gym buddies are obsessed with these, and they freeze even better than the original version.
The Holiday Special
During the winter holidays, add a teaspoon of cinnamon and a pinch of nutmeg to the base, and use butterscotch chips instead of chocolate. The result tastes like frozen gingerbread cookie dough and is absolutely perfect for holiday parties. Top with a dusting of edible gold glitter for extra festive flair that'll make your guests think you're a culinary wizard.
Storing and Bringing It Back to Life
Fridge Storage
While these are meant to be frozen treats, you can store them in the refrigerator for up to three days if you prefer a softer, mousse-like texture. They'll be more like little yogurt cups than frozen bites, but they're still delicious. Just keep them in an airtight container and give them a gentle stir before serving if any liquid separates out.
Freezer Friendly
These bites are freezer superstars — they'll keep perfectly for up to two months in an airtight container. The key is to layer them between sheets of parchment paper so they don't stick together, and make sure your freezer is set to zero degrees or below. If you notice any ice crystals forming, it's time to eat them up, but honestly, they've never lasted long enough in my house to get to that point.
Best Reheating Method
Okay, there really isn't a "reheating" method since these are meant to be frozen, but the five-minute room temperature rest is crucial. If you're in a hurry, you can microwave them for exactly five seconds — any longer and you'll have a melted mess. The goal is to take the edge off the freeze, not turn them into soup. Think of it as "tempering" rather than reheating.