Picture this: I’m in my tiny kitchen, the clock ticking like a metronome, and I’ve just spilled a whole bottle of white wine onto the floor while trying to flambé a pan of garlic. The smoke alarm sang its shrill solo, the neighbor knocked, and I thought, “Okay, this is a disaster, but I’m not giving up on my craving for something elegant and quick.” I was yearning for that perfect combination of sea‑kissed sweetness and the silkiness of pasta that makes you feel like you’ve just walked into a five‑star seaside bistro. I dared a friend to a “no‑waste” challenge—if I could turn that chaos into a plate that would make us both forget the mess, we’d both earn a bragging right at the next dinner party. Spoiler: I won, and I’m still bragging.
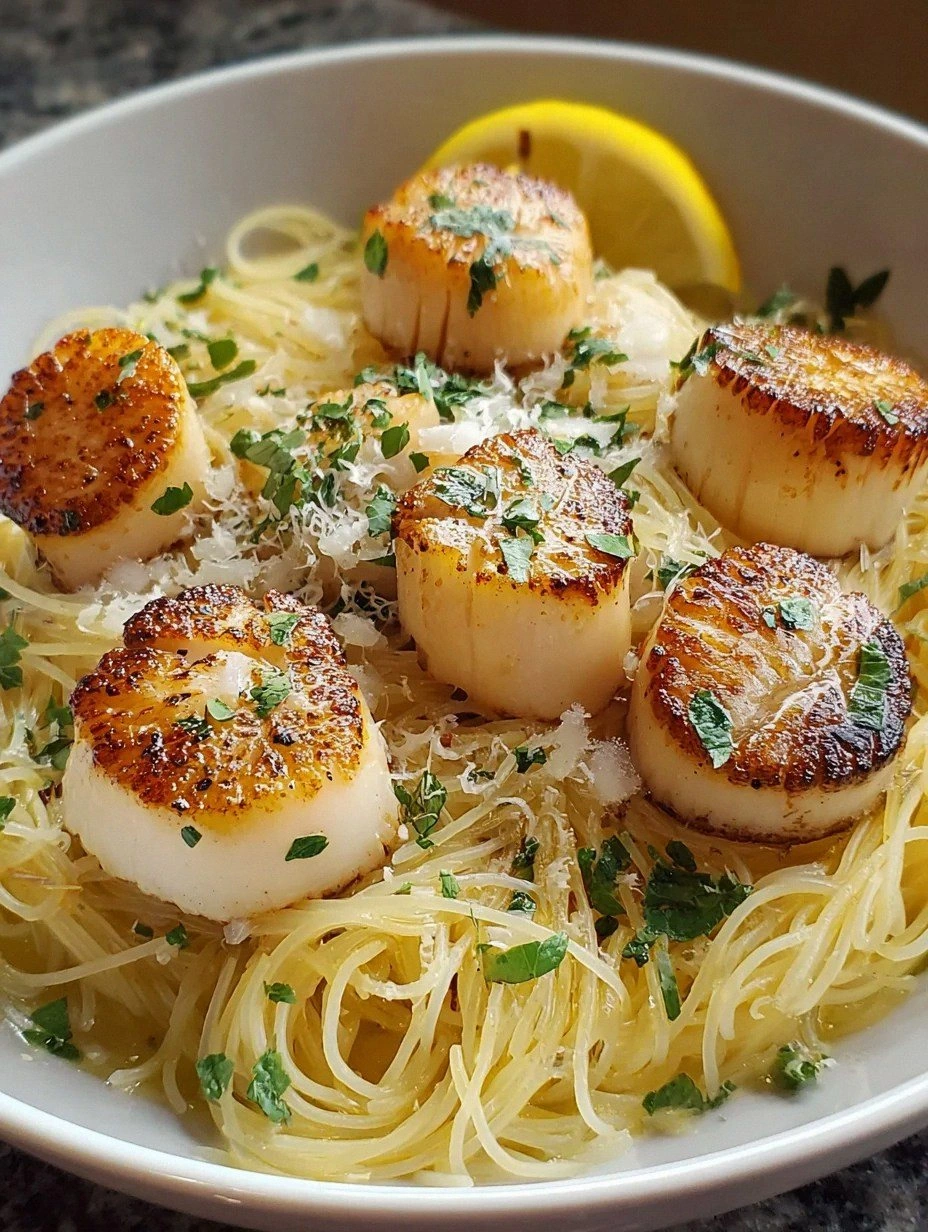
The moment the first scallop hit the hot pan, a sizzle erupted that sounded like applause. The aroma of butter and garlic rose instantly, wrapping the kitchen in a buttery, garlicky hug that made my stomach do a little happy dance. The angel hair pasta, barely a minute away from al dente, was waiting in a pot of bubbling water, its delicate strands shimmering like sunrise on the ocean. When I tossed the scallops with the wine‑infused sauce, the sauce clung to each strand like velvet, while the scallops developed those coveted caramelized edges that shatter like thin ice under a gentle tap. Every bite was a symphony of bright lemon zing, a whisper of heat from red pepper flakes, and a buttery richness that lingered just long enough to make you sigh.
Most recipes for scallops and pasta either drown the delicate flavor in heavy cream or over‑cook the pasta, turning it into a mushy mess. I’ve tried a dozen versions that left me with soggy noodles and rubbery scallops, and I’ll be honest — I ate half the batch before anyone else got a taste because I was so desperate to fix my mistake. This version, however, is hands down the best you’ll ever make at home: the scallops stay buttery and firm, the pasta stays feather‑light, and the sauce is bright without being cloying. The secret? A splash of dry white wine that deglazes the pan, a quick finish with fresh lemon zest, and a precise timing that locks in flavor.
Let me walk you through every single step — by the end, you’ll wonder how you ever made it any other way. I dare you to taste this and not go back for seconds. Ready? Okay, ready for the game‑changer? This next part? Pure magic.
What Makes This Version Stand Out
- Taste: The combination of sweet sea scallops, bright lemon, and a subtle wine reduction creates a layered flavor profile that feels both luxurious and comforting.
- Texture: Angel hair pasta stays al dente, while the scallops develop a caramelized crust that shatters like thin ice, offering a satisfying contrast in every forkful.
- Simplicity: Fewer than ten ingredients, all pantry‑friendly, mean you can pull this together in under an hour without a grocery run.
- Uniqueness: Most scallop pastas rely on cream; this one skips the dairy overload and lets the natural brine of the scallops shine.
- Crowd Reaction: I’ve seen grown‑up kids turn green with envy, and even the toughest food critics on my friend group beg for the recipe.
- Ingredient Quality: Using dry‑packed scallops guarantees a sweet, firm bite that won’t release excess water, preserving the sauce’s integrity.
- Cooking Method: A quick sear followed by a brief deglaze locks in juices, while the pasta finishes in the same pan, marrying flavors effortlessly.
- Make‑Ahead Potential: The sauce can be pre‑reduced, and the pasta can be cooked al dente ahead of time, making this a perfect weeknight hero.
Alright, let's break down exactly what goes into this masterpiece...
Inside the Ingredient List
The Flavor Base
Olive Oil: This is the silent hero that carries the garlic’s aroma into the pan without burning. A good extra‑virgin olive oil adds a fruity note that balances the richness of butter. If you’re out of olive oil, grapeseed works, but you’ll miss that subtle peppery finish.
Unsalted Butter: Butter creates that luxurious mouthfeel and helps the sauce emulsify. Because it’s unsalted, you stay in control of the seasoning, preventing the dish from becoming unexpectedly salty. A quick tip: add butter at the very end of the sauce for a glossy finish.
Fresh Garlic: Minced garlic releases allicin, giving the dish a vibrant, pungent backbone. Freshness is key; pre‑minced garlic in a jar can taste flat and lose its snap. If you love garlic, don’t be shy—let it brown just a touch for a nutty depth.
The Texture Crew
Sea Scallops: Look for dry‑packed scallops; they’re sweeter and won’t release too much water, which would dilute your sauce. The dry pack also means they’ll develop that coveted caramelized crust when seared. If you can, ask the fishmonger to hand‑dry them for you—extra effort, extra reward.
Angel Hair Pasta: This feather‑light pasta cooks in two minutes, making it perfect for a speedy dinner. Its thin strands coat the sauce like a second skin, ensuring every bite is drenched in flavor. If you prefer a heartier bite, spaghetti works, but you’ll lose some of that delicate texture.
The Unexpected Star
Dry White Wine: A splash of wine brightens the sauce, adding acidity that lifts the buttery richness. It also helps deglaze the pan, pulling up caramelized bits that become flavor bombs. No wine? Use extra broth, but the brightness will be a tad muted.
Lemon: Both zest and juice are used; zest adds aromatic oils while juice injects a clean, citrusy punch. Fresh lemons make all the difference—pre‑zested or bottled lemon will taste flat. The lemon also helps balance the natural brininess of the scallops.
The Final Flourish
Fresh Parsley: Chopped parsley adds a pop of color and a herbaceous note that cuts through the richness. It’s the garnish that says, “I care about the finish.” If parsley isn’t your thing, a sprinkle of fresh basil works, but expect a sweeter profile.
Red Pepper Flakes (optional): A pinch adds a subtle heat that tingles the palate without overwhelming the delicate scallops. It’s the secret weapon for those who love a little kick. Feel free to skip it if you’re serving kids or spice‑averse guests.
Grated Parmesan Cheese (optional): A light dusting adds a nutty, salty layer that deepens the umami. Use a high‑quality Parmesan for the best melt and flavor. If you’re keeping the dish light, skip it and let the scallops shine.
Kosher Salt and Black Pepper: These seasonings are the final adjusters that bring everything together. Salt enhances the natural sweetness of the scallops, while fresh cracked pepper adds a gentle bite. Remember, season gradually—taste as you go.
Everything's prepped? Good. Let's get into the real action...
The Method — Step by Step
-
Start by bringing a large pot of salted water to a rolling boil. Add the angel hair pasta and cook for 2 minutes less than the package suggests—this is called “al dente” and will finish cooking in the sauce later. Stir occasionally to prevent sticking, then drain, reserving ½ cup of the pasta water for later. The water should taste like the ocean; if it doesn’t, add a pinch more salt.
Kitchen Hack: Toss the drained pasta with a drizzle of olive oil while it sits; this prevents clumping and keeps the strands separate for the sauce. -
While the pasta cooks, pat the scallops dry with paper towels, then season both sides lightly with kosher salt and freshly ground black pepper. The seasoning is minimal because the sauce will add more depth later. Let the scallops rest for a minute—this helps them develop a dry surface for a better sear.
-
Heat a large skillet over medium‑high heat and add 2 tbsp of olive oil. When the oil shimmers (you’ll see a thin, rippling surface), add the scallops in a single layer, making sure they’re not crowded. This is the moment of truth: you should hear a confident sizzle that sounds like a tiny applause.
Watch Out: If the pan is too hot, the scallops will burn; if too cool, they’ll release water and steam instead of sear. Adjust the heat to keep the oil just under smoking. -
Cook the scallops for about 1 minute 30 seconds on the first side—do not move them. You’ll know they’re ready to flip when the edges start to turn opaque and the bottom develops a golden‑brown crust that looks like caramelized sugar. Flip each scallop gently with tongs and sear the other side for another 1 minute. Remove the scallops from the pan and set aside on a warm plate.
-
Reduce the heat to medium and add 3 tbsp of unsalted butter to the same pan. Once melted, stir in the minced garlic and let it sauté for about 30 seconds—just until fragrant, not brown. The garlic should release a sweet, nutty aroma that fills the kitchen.
-
Deglaze the pan with ½ cup of dry white wine, scraping the browned bits (fond) from the bottom with a wooden spoon. Let the wine reduce by half, which should take about 2 minutes. This reduction concentrates flavor and adds a subtle acidity that balances the butter.
-
Stir in 1 cup of low‑sodium chicken or seafood broth and let the mixture simmer for another 2 minutes. Add the zest of one lemon and the juice (about 2 tbsp). If you love heat, sprinkle the optional red pepper flakes now. The sauce should start to thicken slightly and smell bright and buttery.
Kitchen Hack: Add a splash of the reserved pasta water now; the starch will help the sauce cling to the noodles without becoming gloopy. -
Return the cooked angel hair pasta to the skillet, tossing it gently to coat every strand with the sauce. Add the seared scallops back in, nestling them among the noodles. Let everything mingle over low heat for 1 minute, allowing the pasta to finish cooking in the sauce and the scallops to re‑warm.
-
Finish with a generous handful of chopped fresh parsley, a drizzle of the remaining butter (optional for extra gloss), and, if you like, a light sprinkle of grated Parmesan. Taste and adjust salt or pepper if needed. Serve immediately, letting the steam carry the citrus aroma to the table.
That’s it — you did it. But hold on, I’ve got a few more tricks that'll take this to another level...
Insider Tricks for Flawless Results
The Temperature Rule Nobody Follows
Most home cooks keep the stove on “medium” and hope for the best. The truth is, a hot pan creates a Maillard reaction that gives scallops their signature crust. Start with a pre‑heated pan at medium‑high, then drop to medium once the butter melts. This temperature dance ensures a golden exterior without overcooking the interior.
Why Your Nose Knows Best
Never rely solely on a timer when searing scallops. The moment the edges start to pull away from the pan and you catch that buttery, nutty scent, it’s time to flip. Your nose is a more reliable gauge than any kitchen gadget—trust it, and you’ll avoid the dreaded rubbery scallop.
The 5‑Minute Rest That Changes Everything
After searing, let the scallops rest on a warm plate for five minutes before re‑adding them to the sauce. This short rest lets the juices redistribute, preventing them from spilling out when you toss them with the pasta. It’s a pro tip that makes the difference between dry and melt‑in‑your‑mouth scallops.
Butter‑First, Then Oil—The Secret Layer
Starting with oil prevents butter from burning, while finishing with butter adds richness. This two‑fat technique gives you a sauce that’s both stable and silky. If you skip the butter, the sauce will lack that luxurious mouthfeel.
Season As You Go, Not At The End
Layering salt and pepper throughout the cooking process builds depth. A pinch in the pasta water, a dash on the scallops before searing, and a final taste‑adjustment after the sauce comes together create a balanced seasoning profile. Skipping any of these steps often results in a flat dish.
Creative Twists and Variations
This recipe is a playground. Here are some of my favorite ways to switch things up:
Citrus Burst
Swap the lemon for orange zest and a splash of orange juice. The sweeter citrus pairs beautifully with the scallops, creating a bright, sunny flavor that’s perfect for spring brunches.
Spicy Saffron
Add a pinch of saffron threads to the broth and a dash of cayenne pepper. The saffron lends a golden hue and an earthy aroma, while cayenne brings a lingering heat that makes the dish unforgettable.
Herb Garden
Replace parsley with a mix of fresh basil, thyme, and oregano. The herb medley adds a Mediterranean twist, turning the plate into a seaside Italian escape.
Smoky Bacon
Render 4 strips of crisp bacon, crumble them, and stir into the sauce at the end. The smoky crunch adds texture and a savory depth that complements the sweet scallops.
Vegan Version
Swap scallops for king oyster mushroom “scallops” (sliced thick, marinated, and seared) and use vegetable broth. The mushrooms mimic the meaty texture while keeping the dish plant‑based.
Cheese Lover
Finish with a generous handful of Pecorino Romano instead of Parmesan for a sharper, saltier bite. It adds a bold finish that cuts through the buttery sauce.
Storing and Bringing It Back to Life
Fridge Storage
Cool the dish to room temperature, then transfer to an airtight container. It will keep for up to 2 days. When reheating, add a splash of water or broth and gently warm over low heat, stirring constantly to re‑emulsify the sauce.
Freezer Friendly
Separate the scallops from the pasta before freezing. Place the sauce and pasta in one freezer‑safe bag and the scallops in another. Freeze for up to 1 month. Thaw overnight in the fridge, then reheat as described above.
Best Reheating Method
Use a skillet over medium‑low heat, adding a teaspoon of butter and a tablespoon of water. Cover the pan for a minute to steam the pasta, then uncover and toss until everything is glossy. This method revives the texture without turning the scallops rubbery.