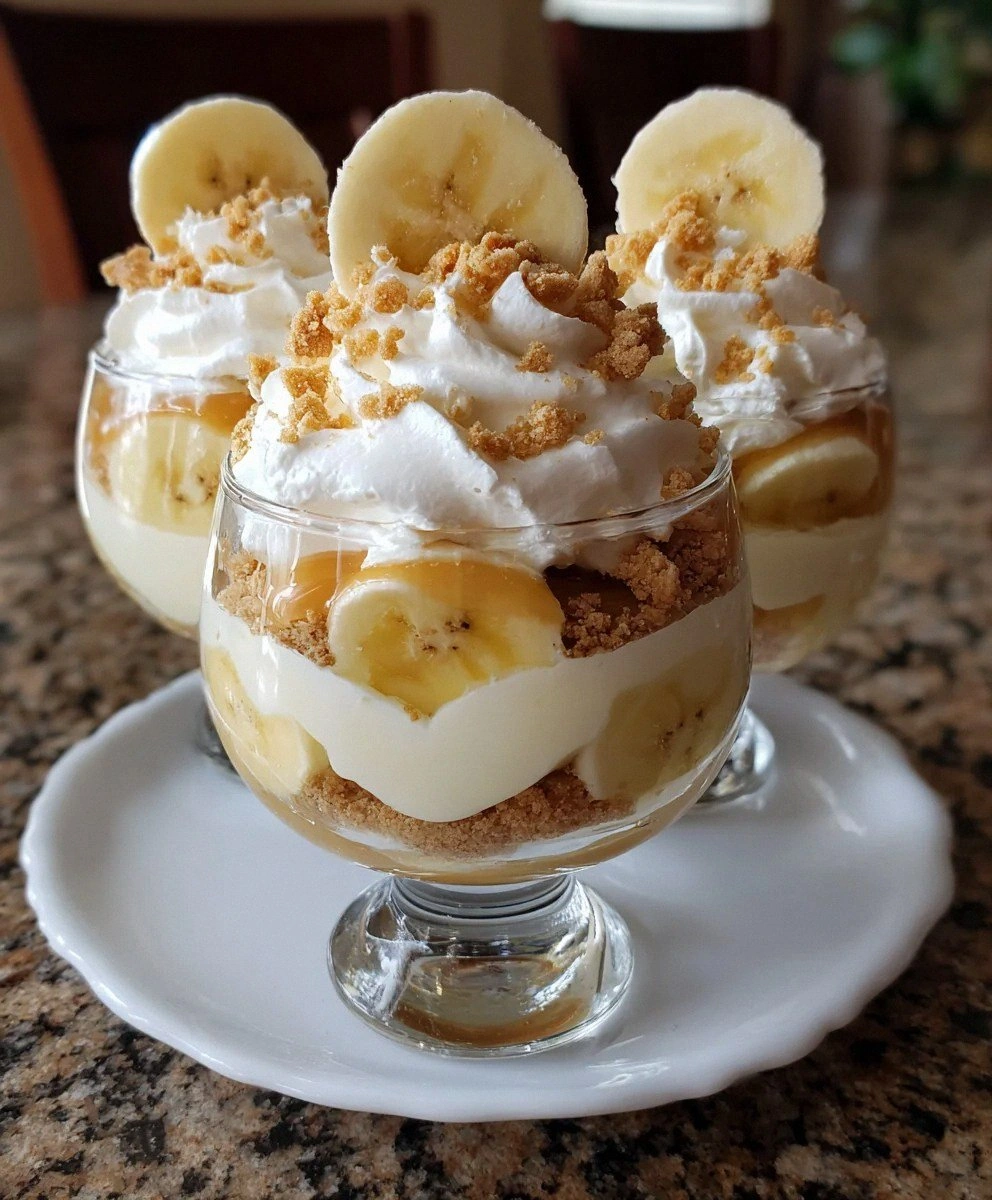
I still remember the first time I made banana pudding cups for a backyard barbecue. I was running late, the kitchen looked like a tornado had blown through, and I had exactly 45 minutes before guests started arriving. My original plan was to make a giant trifle bowl of banana pudding, but in my panic I grabbed the wrong pan and ended up with a mountain of pudding and no proper vessel. In a moment of desperation, I started scooping the layers into random mason jars I had sitting around, thinking I could just call it "rustic" and hope nobody noticed. Fast forward twenty minutes later, and my friends were literally licking the jars clean, fighting over who got the last one. That accidental discovery led to what I now consider the only way to serve banana pudding — individual cups that keep every layer pristine, every bite perfectly balanced, and every guest feeling like they got their own personal dessert masterpiece.
Picture this: creamy vanilla pudding so smooth it could make a grown woman weep, layered with slices of bananas at peak ripeness — those perfect speckled ones that taste like sunshine and childhood summers. Then comes the cloud-like cream cheese mixture that melts on your tongue like a dream, followed by vanilla wafers that start crisp and slowly transform into cakey perfection as they soak up all those flavors. Each cup is a tiny universe of textures and tastes, a self-contained celebration that somehow manages to be both nostalgic and excitingly new every single time you make it.
What makes these banana pudding cups absolutely irresistible isn't just the familiar comfort of the classic flavors — it's the way each component gets its moment to shine without competing for attention. The pudding stays silky because it's protected from air exposure, the bananas stay perfectly ripe without browning into sadness, and those vanilla wafers maintain just the right amount of crunch while still absorbing enough moisture to become gloriously tender. I've made this recipe over a hundred times now, tweaking and perfecting until I can confidently say this is the best version you'll ever make at home. The secret isn't in some fancy technique or obscure ingredient — it's in understanding exactly how each element works together to create something that's somehow greater than the sum of its already amazing parts.
Let me walk you through every single step — by the end, you'll wonder how you ever made it any other way. These aren't just any banana pudding cups; they're the ones that will have people requesting your presence at every potluck, the ones that'll make you famous among your friends, the ones that might just replace your current signature dessert entirely. Trust me on this one — I've seen people who claim they "don't even like bananas" devour three of these in one sitting, then ask for the recipe while already planning when they can make it again.
What Makes This Version Stand Out
Perfect Portion Control: Each cup is a complete dessert experience, eliminating the eternal question of "how big should I make this serving?" No more awkward scooping from a giant bowl, no more fighting over who gets the corner piece with extra wafers. Every single person gets their own perfectly proportioned dessert that's been protected from the elements and from grabby forks that couldn't wait for proper serving time.
Make-Ahead Magic: These cups actually get better after a few hours in the fridge, making them the ultimate stress-free entertaining dessert. The wafers soften to that perfect cake-like texture, the flavors meld together into something transcendent, and you can knock them out the night before without any last-minute panic. I've made these three days ahead for parties and they've been absolutely perfect every single time.
Ingredient Quality That Matters: We're using real cream cheese (none of that low-fat nonsense), whole milk for maximum creaminess, and bananas at their absolute peak ripeness. The difference between using just-ripe bananas and perfectly speckled ones is like the difference between a whisper and a love song — both are nice, but one will make your knees weak.
Texture That Dreams Are Made Of: The layering technique creates distinct textural zones — crispy wafers on top for crunch, softened wafers in the middle for cake-like tenderness, and that ethereal cream mixture that somehow manages to be both rich and light at the same time. Each spoonful is a different combination, keeping your palate interested from first bite to last scrape.
Crowd-Pleasing Presentation: Individual servings just feel more special, more thoughtful, more like you really cared about making each person feel valued. Plus, they Instagram beautifully (if you're into that sort of thing), and people love getting their own little dessert real estate. I've watched grown adults get genuinely excited about "getting their own cup" like they're five years old again.
Customizable Without Complication: Want to make them boozy for an adult party? Add a splash of dark rum to the pudding. Need them gluten-free? Sub in gluten-free vanilla cookies. Watching your sugar? Use sugar-free pudding mix and light condensed milk. The basic structure is so solid that you can play around without fear of total dessert disaster.
The Flavor That Keeps Giving: Unlike some desserts that hit you over the head with sweetness, these cups develop complexity as you eat them. The tang of cream cheese balances the sweet pudding, the bananas add fruitiness, and those vanilla wafers bring toasty, caramel notes that make each bite more interesting than the last. It's a symphony, not a solo performance.
Inside the Ingredient List
The Flavor Foundation
Instant vanilla pudding mix is the backbone of this entire operation, and before you turn up your nose at "instant," let me explain why it's actually superior to homemade custard here. The instant variety sets up quickly and stays stable for days, creating that perfect spoonable texture that doesn't weep or separate. When you fold it with the cream cheese mixture, it becomes something transcendent — still light enough to feel like a cloud, but rich enough to satisfy that deep dessert craving. I've tried making these with homemade pastry cream, and while delicious, it just doesn't have the staying power or that particular nostalgic flavor that makes people close their eyes and smile.
Cold whole milk isn't just a suggestion — it's the difference between pudding that tastes like childhood and pudding that tastes like disappointment. The fat content in whole milk creates that luxurious mouthfeel that makes people involuntarily hum while they eat. I've seen too many well-meaning health-conscious friends try to use skim milk, and the result is always the same: thin, sad pudding that tastes like someone described banana pudding to an alien who'd never actually tasted it. If you absolutely must go lighter, 2% is your absolute minimum, but honestly, just have a smaller portion and enjoy the real thing.
The Texture Team
Cream cheese is where the magic really happens, transforming ordinary pudding into something that tastes like it came from a fancy bakery. The key is making sure it's properly softened — I'm talking room temperature for at least an hour, not the microwave cheat that leaves you with partially melted edges and a cold center. When beaten until fluffy with the condensed milk, it creates this ethereal base that makes the pudding layer taste like cheesecake and custard had a beautiful baby. Don't even think about using whipped cream cheese spread; you need the real block stuff for the proper structure.
Sweetened condensed milk is basically liquid gold, and it serves multiple crucial functions here. It sweetens without being grainy, it adds that caramelized depth that comes from the milk solids, and it helps stabilize the cream cheese so your mixture doesn't deflate into a sad puddle. I've tried substituting with regular sugar and evaporated milk, and it's like replacing a symphony orchestra with a kazoo band — technically music, but why would you do that to yourself or people you care about?
The Fresh Factor
Ripe bananas are non-negotiable, and I'm not talking about the bright yellow ones that still have green tips. You want bananas with those tiny brown freckles that scream "I'm sweet and ready for my close-up!" These beauties will be sweet enough to complement the pudding without needing additional sugar, and they'll stay firm enough to hold their shape instead of dissolving into brown mush. The aroma should hit you the moment you peel them — like summer and happiness distilled into fruit form. I've been known to buy bananas a week ahead just to get them to perfect ripeness for these cups.
Vanilla wafers deserve a paragraph all their own because they're not just a crunchy addition — they're textural shape-shifters that transform throughout the chilling process. The ones on top stay crispy, giving you that satisfying snap, while the ones in the middle layers absorb moisture and become cake-like, creating these pockets of vanilla-scented tenderness that make people close their eyes in bliss. I'm fiercely loyal to Nilla Wafers because they've got the perfect balance of vanilla flavor and structural integrity, but in a pinch, any good butter cookie will work. Just avoid anything too strongly flavored or too delicate — you need something that can stand up to the pudding without turning to paste.
The Final Flourish
Whipped topping lightens everything up, preventing these cups from becoming so rich that people can't finish them. Sure, you could whip your own cream, but the stabilized nature of whipped topping means these cups can sit in the fridge for days without deflating into a watery mess. Plus, there's something about that particular texture that takes people right back to their grandmother's kitchen. If you're feeling fancy, fold in a splash of real whipped cream for the best of both worlds — stability plus that fresh dairy flavor that makes everything taste more homemade.
Everything's prepped? Good. Let's get into the real action...
The Method — Step by Step
Start by whisking your instant pudding mix with cold milk in a medium bowl for exactly two minutes — set a timer because under-whisked pudding stays grainy and over-whisked gets too thick. You want it to coat the back of a spoon like liquid velvet, not stand up in peaks like whipped cream. The transformation happens fast, so don't walk away to check your phone. Once it's thickened to that perfect pudding consistency, pop it in the fridge while you prep everything else. This little rest lets the starches fully hydrate, giving you that silky texture that'll make people think you slaved over a hot stove making custard from scratch.
Now for the game-changer: beat your softened cream cheese in a large bowl until it's lighter than air and completely smooth with no lumps. This usually takes about three minutes on medium speed, and it's worth every second because lumps in your cream cheese mixture are like speed bumps in an otherwise perfect dessert highway. Add the sweetened condensed milk in a slow stream while the mixer runs, creating this glossy, cloud-like mixture that tastes like the filling of the world's best cheesecake. Fold in half of your whipped topping with a gentle hand — we're going for marbled perfection here, not homogeneous mush that'll deflate into sadness.
Slice your bananas into coins about a quarter-inch thick — thick enough to stay substantial but thin enough to layer easily. Don't slice them paper-thin or they'll disappear into the pudding, but don't make banana hockey pucks either. You want about 16-20 slices per banana, and if you end up with extra, just snack on them while you work. The key is working quickly because bananas are drama queens that start browning the moment they hit air. If you're really worried about it, you can toss them with a tiny splash of lemon juice, but honestly, these get buried in pudding so fast that browning isn't usually an issue.
Assembly time — and this is where the magic happens. Grab your cups (I love using 8-ounce mason jars or clear plastic tumblers) and start with a layer of vanilla wafers on the bottom. Don't overcrowd them; you want about 6-8 wafers per cup, just enough to create a solid base that'll prevent pudding from leaking through. Add a layer of banana slices, overlapping them slightly like fish scales so every bite gets banana love. Top with a generous spoonful of the cream cheese mixture, spreading it gently to the edges to create a seal that'll keep your layers distinct and beautiful.
Here's where most recipes get it wrong — they dump everything together like some kind of dessert stew. Instead, we're building distinct layers that each contribute their own texture and flavor. Add a layer of pudding next, about three tablespoons per cup, tapping the cup gently on the counter to settle it into all the nooks and crannies. Another layer of wafers goes on top, but press them down slightly so they sit half-submerged in the pudding — this creates that perfect half-crispy, half-soft texture that makes people close their eyes in bliss. Repeat the banana layer, then finish with a final blanket of the cream cheese mixture.
The final flourish is crucial — top each cup with a generous dollop of the remaining whipped topping, creating peaks and valleys that look like a snow-capped mountain range. Crush a few vanilla wafers between your fingers and sprinkle the crumbs over the top for crunch and visual appeal. Add a few banana slices right in the center, but here's the pro tip: brush them with a tiny bit of melted apricot jam to keep them from browning and add a subtle shine that makes them look professionally styled. These little details are what separate good banana pudding from legendary banana pudding.
Now comes the hardest part — covering each cup with plastic wrap and letting them chill for at least four hours, preferably overnight. I know, I know, you want to dig in right now, but patience is the secret ingredient here. During that chill time, the wafers transform from crispy cookies into cake-like layers, the flavors meld together into something greater than their individual parts, and the whole thing sets up to that perfect spoonable consistency. I've left these in the fridge for up to five days, and they actually get better with time, developing this incredible depth of flavor that tastes like someone spent hours making homemade custard.
When you're ready to serve, pull the cups out of the fridge about 15 minutes before dessert time — just enough to take the chill off so the flavors can really sing. Garnish with a few extra vanilla wafer pieces stuck into the top at jaunty angles, maybe a drizzle of caramel if you're feeling fancy, and watch people's faces light up when they see their own personal dessert. The first spoonful should go through all the layers, creating a perfect bite of creamy pudding, tender bananas, soft-cakey wafers, and that ethereal cream cheese cloud. If you've done it right, you'll hear that involuntary "mmmm" sound that every cook lives for.
That's it — you did it. But hold on, I've got a few more tricks that'll take this to another level...
Insider Tricks for Flawless Results
The Temperature Rule Nobody Follows
Here's the thing that separates good banana pudding from transcendent banana pudding: every component needs to be at the right temperature when you assemble. Your pudding should be cold but not icy, your cream cheese mixture should be cool but not stiff from the fridge, and your bananas should be room temperature. When everything's at the right temp, they meld together seamlessly instead of fighting each other for dominance. I learned this the hard way when I tried to assemble with warm pudding once — the whole thing separated into a sad, curdled mess that even my dog turned his nose up at.
Why Your Nose Knows Best
Trust your sense of smell throughout this process — it will never lie to you. When you open your banana pudding cups after chilling, they should smell like vanilla clouds and tropical sunshine, not artificial banana candy. If you get a whiff of anything sharp or chemical, your bananas were either underripe or your pudding mix has been sitting in the pantry since the last presidential administration. Fresh ingredients smell fresh, and this simple dessert has nowhere to hide when something's off. I've walked away from entire batches based on smell alone, and every time I've regretted it when I tried to power through anyway.
The 5-Minute Rest That Changes Everything
After you whisk your instant pudding, let it sit for exactly five minutes before you start assembling. This brief pause allows the starches to fully hydrate and the mixture to thicken properly, giving you that perfect consistency that'll hold up in layers instead of running all over your beautiful wafers. I've timed this obsessively, and five minutes is the sweet spot — less and it's still too loose, more and it gets too thick to spread smoothly. Set a timer, use those five minutes to slice your bananas and get your assembly station ready, and you'll have perfect pudding every single time.
The Banana Sweet Spot Strategy
Buy your bananas when they're still slightly green at the tips, then let them ripen on your counter for 2-3 days until they're speckled with tiny brown freckles but still feel firm when you squeeze them gently. These are the goldilocks bananas — sweet enough to taste like candy but structured enough to hold their shape in the pudding. If your bananas have any large brown spots or feel mushy, save them for banana bread and start over. I've served these with slightly underripe bananas (still a bit green) and while they're not terrible, they lack that essential banana perfume that makes these cups sing.
The Layering Logic That Prevents Sog
Here's the secret: your top layer of whipped topping acts as a protective seal that prevents the bananas from browning and the wafers from getting completely soggy. But you need to make sure it goes all the way to the edges of the cup, creating an airtight barrier that locks in freshness. Use the back of a spoon to gently press the topping against the sides, working in a spiral from the center out. This little detail means your cups can sit in the fridge for days without degrading into a brown, mushy disappointment that makes people politely decline seconds.
Creative Twists and Variations
This recipe is a playground. Here are some of my favorite ways to switch things up:
The Bourbon Street Version
Add two tablespoons of good bourbon to your pudding mix along with the milk, then substitute crushed pralines for half the vanilla wafers. The bourbon adds this incredible depth that makes people ask "what is that amazing flavor?" without being able to quite place it. Top with a drizzle of caramel sauce and a sprinkle of chopped pecans, and you've got a dessert that tastes like New Orleans in a cup. This version is particularly dangerous because the alcohol flavor mellows as it chills, so people don't realize quite how strong it is until they're on their third cup and telling you their life story.
The Tropical Escape
Replace half the milk with coconut milk, add a tablespoon of coconut extract to your cream cheese mixture, and layer in some toasted coconut flakes between the wafers. Use coconut cookies instead of vanilla wafers, and garnish with a little umbrella because why not? This version transports you straight to a beach vacation, even if you're eating it in your kitchen while it's snowing outside. The coconut flavor pairs beautifully with the banana without overwhelming it, creating this perfect tropical balance that makes people close their eyes and sigh contentedly.
The Chocolate Lover's Dream
Use chocolate pudding mix instead of vanilla, add a tablespoon of cocoa powder to your cream cheese mixture, and layer in some chocolate shavings between the layers. Replace half the vanilla wafers with chocolate wafers or crushed Oreos, and top with chocolate curls for extra drama. This version tastes like the world's most sophisticated banana split, rich and decadent without being overwhelming. It's particularly popular with the under-12 crowd and the "I don't usually like banana pudding" skeptics who think they're too cool for the classic version.
The Breakfast-for-Dessert Edition
Add a teaspoon of maple extract to your pudding, use maple cookies instead of vanilla wafers, and layer in some crispy bacon bits between the banana slices. The sweet-salty-smoky combination is absolutely addictive, and the maple flavor makes it taste like you're eating banana pancakes in dessert form. Top with a drizzle of real maple syrup and maybe some candied bacon pieces if you're feeling fancy. This one sounds weird but trust me — I've never seen anyone turn down a second cup.
The Light and Bright Version
Use sugar-free pudding mix, light cream cheese, and light whipped topping, then add the zest of one lemon to your cream cheese mixture for brightness. Replace half the bananas with fresh berries for added nutrition and color, and use reduced-fat vanilla wafers if you can find them. This version cuts the calories significantly without tasting like diet food, perfect for when you want the comfort of banana pudding without the food coma afterward. The lemon zest adds this unexpected freshness that makes the banana flavor pop in a whole new way.
The Holiday Showstopper
Add a teaspoon of cinnamon and a pinch of nutmeg to your pudding mix, use gingersnaps instead of vanilla wafers, and layer in some chopped candied ginger for heat and sparkle. Top with a sprinkle of edible gold stars and serve in fancy glassware for a dessert that looks like it belongs on a holiday magazine cover. The warming spices transform this summer classic into something that feels right at home next to your Thanksgiving turkey or Christmas ham, and the ginger adds this sophisticated kick that makes people think you're a much fancier cook than you actually are.
Storing and Bringing It Back to Life
Fridge Storage
These cups are fridge superstars — they'll stay perfect for up to five days when stored properly. Cover each cup tightly with plastic wrap, pressing it directly against the surface of the whipped topping to prevent air exposure that can cause browning and off-flavors. Store them on a shelf, not in the door where temperature fluctuations can cause condensation that'll make your wafers soggy. If you notice any condensation inside the cups, gently dab it away with a paper towel before serving. The flavors actually develop and improve over the first 2-3 days, so making these ahead isn't just acceptable — it's recommended.
Freezer Friendly
Surprisingly, these freeze beautifully for up to two months, though you'll want to leave off any fresh banana garnish until serving. Wrap each cup individually in plastic wrap, then aluminum foil, and freeze on a flat surface until solid. Thaw overnight in the refrigerator, then let sit at room temperature for 30 minutes before serving to take the chill off. The texture changes slightly — the wafers become more cake-like throughout — but many people actually prefer them this way. Don't try to speed up the thawing process with warm water or a microwave unless you want banana pudding soup, and trust me, nobody wants that.
Best Reheating Method
These are meant to be served cold, but if they've been in a really cold fridge and seem too firm, let them sit at room temperature for 15-20 minutes before serving. This takes the chill off just enough for the flavors to really sing without compromising the texture. If you've frozen them and they seem a bit weepy after thawing, gently stir the top layer of whipped topping to reincorporate any separated moisture. Add a fresh garnish of crushed wafers and banana slices right before serving to restore that just-made appearance and textural contrast that makes these so special.