I burned the first batch. Not just a little charred around the edges — I'm talking full-on smoke-alarm-going-off, neighbors-knocking-on-the-door, cat-hiding-under-the-bed kind of burned. But here's the thing: those blackened, twisted little disasters smelled like heaven for the first three minutes before they turned into charcoal. That scent — butter and sugar and cinnamon swirling through the kitchen — haunted me for days. I had to try again. And again. And, well, let's just say batch number seven is the reason I'm writing this at 2 a.m. with cinnamon sugar under my fingernails and absolutely zero regrets.
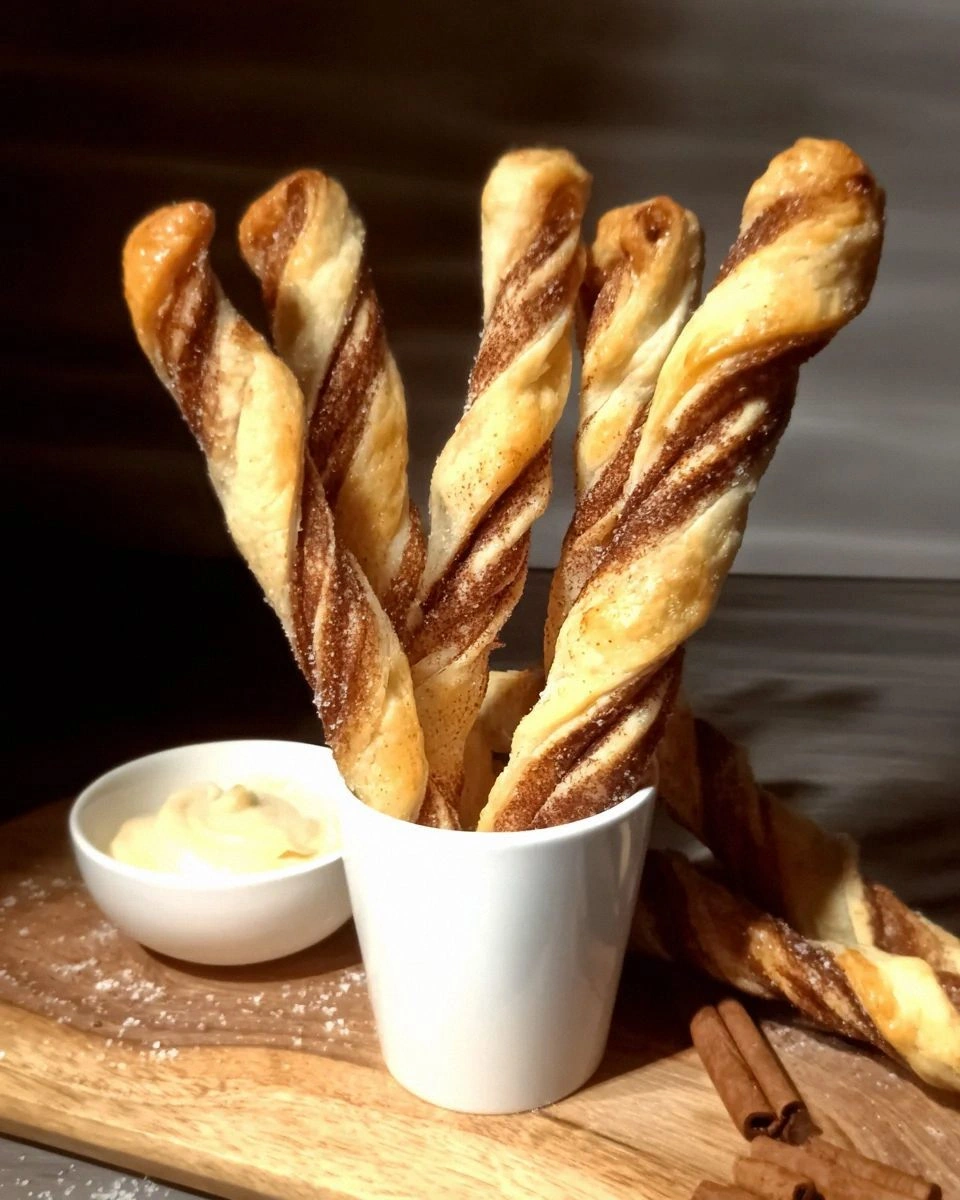
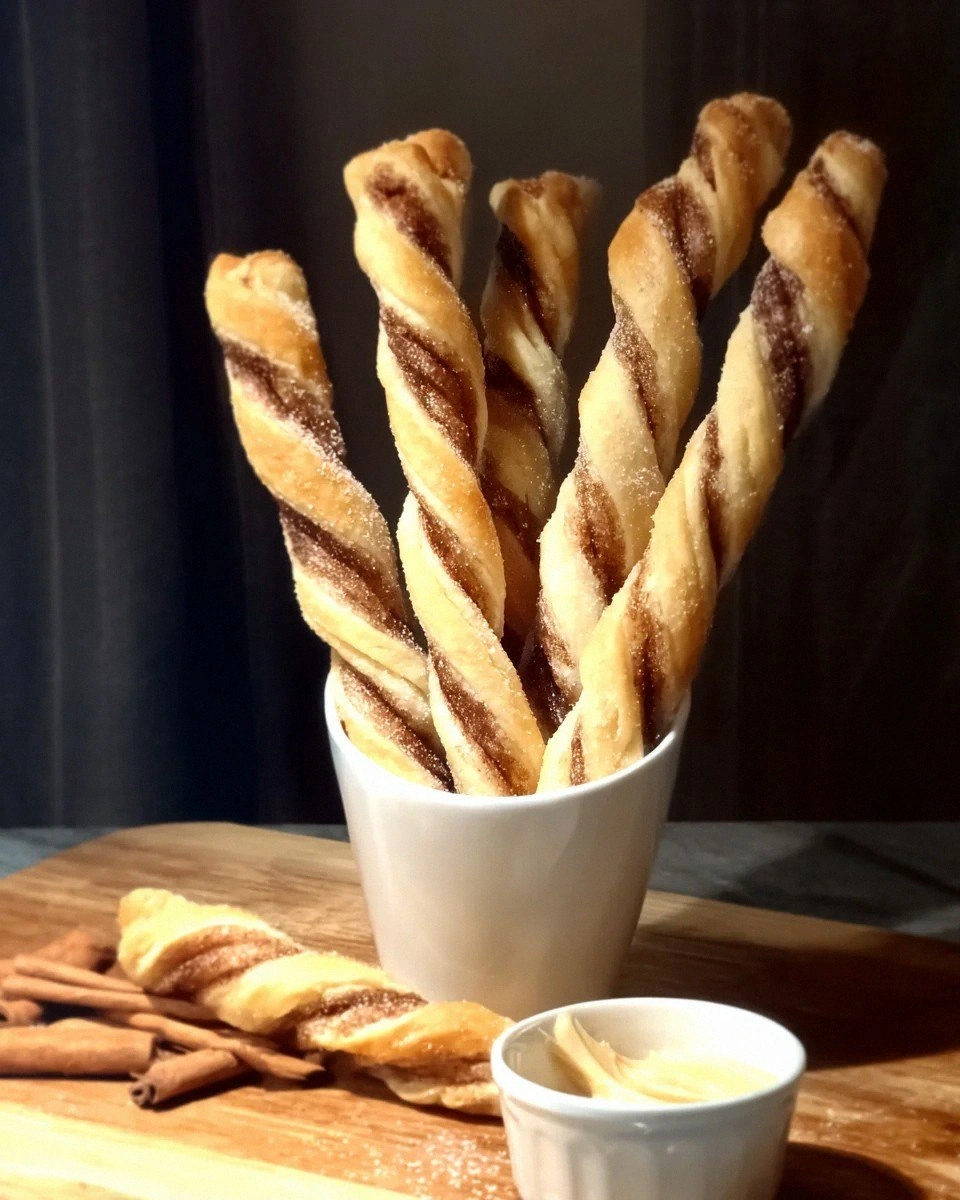
What I'm about to share isn't just another cinnamon roll copycat or some sad, dry breadstick pretending to be dessert. These Twisted Cinnamon Sticks are the love child of a churro and a cinnamon roll, wearing a crispy caramel coat and flaunting layers that spiral like a French croissant's wild cousin. They shatter when you bite them, then melt into this soft, pull-apart center that's basically illegal in twelve states. I dare you to taste one and not go back for seconds. Actually, I double-dog dare you, because I ate half the batch before anyone else got to try it, and I need someone else to confess to similar crimes.
Picture yourself pulling these out of the oven, the whole kitchen smelling like that corner bakery you stumbled into once in Prague — the one where the owner handed you a still-warm pastry and suddenly everything in the world felt fixable. The sugar coating crackles under your fingers, the steam rises in lazy curls, and for a moment you're eight years old again, convinced that magic is real and it lives in butter. Stay with me here — this is worth it.
Most recipes get this completely wrong. They treat these like breadsticks with a cinnamon sprinkle, or they drown them in so much glaze they turn into soggy noodles. Nope. The secret is in the twist — literally — and in a technique that takes five extra minutes but changes everything. Let me walk you through every single step — by the end, you'll wonder how you ever made it any other way.
What Makes This Version Stand Out
Shatter-Crisp Edges: We're talking caramelized sugar that crackles like thin ice under your teeth, giving way to a soft, almost brioche-like interior. The contrast isn't just satisfying — it's addictive. I once watched a friend eat six in a row just chasing that textural high.
Layer Upon Layer: Instead of a simple rope of dough, we laminate. Think croissant vibes without the three-day commitment. Cold butter gets folded and rolled, creating hundreds of delicate sheets that separate in the oven. When you twist, those layers spiral like a cinnamon galaxy. That sizzle when it hits the pan? Absolute perfection.
Speed Demon Dough: No waiting around for hours of proofing. This dough uses a clever combo of baking powder and just a whisper of yeast for flavor, so you go from zero to twist in about forty-five minutes. Perfect for those 9 p.m. cravings that refuse to be ignored.
Built-In Portion Control: Each stick is basically a two-bite affair — which means you can eat three and still claim plausible deniability. They're like the French fry of pastries: impossible to count accurately.
Pantry Staple Hero: No fancy equipment, no obscure flours, no specialty pans. If you've got flour, butter, sugar, cinnamon, and an oven, you're golden. I've made these in a toaster oven in a beach rental, and they still disappeared in minutes.
Crowd Reaction Guarantee: I've served these at brunch parties, office meetings, and once at a very serious book club where we were supposed to be discussing Russian literature. Conversation stopped mid-sentence. Someone actually applauded. Another asked for my hand in marriage. Granted, we'd all had mimosas, but still.
Make-Ahead Magic: You can prep these through the shaping stage, freeze them on a sheet pan, then bake straight from frozen when guests show up unannounced. They'll think you're a domestic wizard. I won't tell if you don't.
Alright, let's break down exactly what goes into this masterpiece...
Inside the Ingredient List
The Flavor Base
All-purpose flour: The backbone, the canvas, the reliable friend who never lets you down. I use unbleached because it has a slightly nuttier flavor that plays beautifully with brown butter and caramelized sugar. Don't even think about swapping in whole wheat — you'll get dense, earnest sticks that taste like health food. If you must experiment, bread flour will give you a chewier, more substantial twist, but honestly, plain AP is where the magic lives.
Ground cinnamon: Not all cinnamon is created equal. The grocery store stuff can be bitter and one-dimensional. I splurge on Ceylon cinnamon — it's warmer, almost citrusy, and melts into the sugar instead of sitting on top like angry sawdust. One whiff and you'll understand why this matters. Skip the pre-mixed "cinnamon sugar" — it's usually cut with fillers and anti-caking agents that dull the flavor.
Unsalted butter: This is where you taste everything, so buy the good stuff. European-style with higher fat content gives you richer flavor and flakier layers. I keep mine in the freezer and grate it directly into the flour — cold butter is happy butter, and happy butter makes happy twists. If you only have salted, cut the added salt in half, but honestly, unsalted gives you control, and control is delicious.
The Texture Crew
Baking powder: Our leavening workhorse. Make sure it's fresh — if you can't remember when you bought it, test a spoonful in hot water. It should fizz like a tiny volcano. Old baking powder leads to sad, dense sticks that taste like disappointment. I go with aluminum-free because I find the metallic aftertaste distracting, but use what you have.
Granulated sugar: Two roles here — it sweetens the dough just enough to make it taste like dessert, and then we roll the hot twists in more sugar for that crackly shell. I use plain white sugar for the coating because it melts and recrystallizes into the most satisfying crunch. Brown sugar works in the dough for deeper flavor, but save it for variations — the classic needs that clean sweetness.
Whole milk: Full-fat is non-negotiable. The fat tenderizes the dough and helps carry flavors. I've used 2% in a pinch, and while it works, the sticks turn out slightly less luxurious. Warm it just to body temperature — too hot and you'll melt the butter, too cold and the dough will fight you like a stubborn toddler.
The Unexpected Star
Vanilla bean paste: Extract works, but paste gives you those gorgeous little specks and a more intense flavor. It's like vanilla extract's sophisticated older cousin who studied in Paris. A little goes a long way — we're not making vanilla sticks, just giving the cinnamon a beautiful background note. If you're using extract, go with a full teaspoon instead of the half-teaspoon for paste.
Cardamom: My secret weapon. Just a pinch wakes up the cinnamon and adds this mysterious floral note that makes people ask "what is that?" in the best way. It's optional but highly recommended. If you don't have it, a whisper of nutmeg works too, but cardamom is the twist that keeps these from tasting like every other cinnamon thing you've ever had.
The Final Flourish
Coarse sugar: For rolling. Sugar in the raw, turbinado, or even crushed sugar cubes — something with larger crystals that won't dissolve completely in the oven heat. They create these tiny pockets of caramel that crunch like toffee. Regular sugar works if that's all you have, but the coarse stuff is what makes people close their eyes when they bite in.
Flaky salt: Just a few crystals on top before serving. That hit of salt against the sweet makes the cinnamon sing and keeps the whole thing from being cloying. Maldon is my go-to, but any finishing salt works. Skip the table salt — we want texture and clean flavor, not a salt lick.
Everything's prepped? Good. Let's get into the real action...

The Method — Step by Step
- Start by whisking your dry ingredients in a large bowl — flour, sugar, baking powder, salt, cinnamon, and that sneaky pinch of cardamom. Whisk like you mean it; we want everything distributed because once the butter goes in, we stop mixing. The aroma should hit you immediately — warm, sweet, with that little floral lift from the cardamom. This is your moment to check that your butter is cold — pop it in the freezer for ten minutes if it's been sitting on the counter looking melty.
- Grate the butter directly into the flour mixture using the large holes of a box grater. Work quickly — think of it as a race against time and body heat. Toss the butter shreds in the flour as you go so they don't clump. When you're done, it should look like coarse meal with pea-sized bits of butter. Those bits are your future layers, so don't smash them yet. If you've never grated butter before, prepare to feel like a kitchen genius.
- Make a well in the center and pour in the milk and vanilla. Using a fork, gently toss and stir just until a shaggy dough forms. It will look rough and slightly dry — perfect. Overworking is the enemy of tenderness. If it's impossibly dry, drizzle in milk a teaspoon at a time, but resist the urge to make it smooth and pretty. Rustic is our friend here.
- Turn the dough onto a lightly floured surface and knead exactly five times. Count them out — one, two, three, four, five. Pat into a rough rectangle, fold it in thirds like a letter, then pat again. This creates layers without developing too much gluten. The dough should feel soft and slightly elastic, not sticky. If it's sticking like crazy, dust with a whisper of flour, but don't go nuts — too much flour makes tough twists.
- Roll the dough into a 12x8-inch rectangle about 1/4-inch thick. Keep the edges as square as possible — we're going for bakery vibes, not abstract art. If the edges crack, pinch them back together. Brush off any excess flour with a pastry brush or your hand. The butter should still be visible as streaks — those will create pockets of steam and flakiness. This is the moment of truth where you start to believe this might actually work.
- Mix your cinnamon sugar coating in a small bowl — I like a 3:1 ratio of sugar to cinnamon for rolling, plus a pinch of salt to wake it up. Have it ready by the stove because once these come out of the oven, we move fast. The sugar sticks best when the twists are hot and slightly oily from the butter. Some recipes wait until they're cool, but trust me — warm is where the magic happens. Don't walk away from the stove here.
- Cut the rectangle lengthwise into 12 strips, each about 3/4-inch wide. A pizza cutter works brilliantly here, but a sharp knife does the job. Separate the strips so they don't reattach while you're twisting. Pick up one strip and gently stretch it to about 10 inches — it should be elastic and slightly resistant. If it tears, just pinch it back together and keep going. These are rustic, remember?
- Twist each strip by holding one end in each hand and twisting in opposite directions until it spirals tightly. Place on a parchment-lined baking sheet, pressing the ends down lightly so they don't untwist in the oven. They should look like little cinnamon tornadoes. Leave an inch between them — they puff and spread slightly. If some are twisted tighter than others, that's fine; variety is the spice of life and also of cinnamon sticks.
- Bake at 400°F for 12-15 minutes until golden brown and crisp on the bottoms. They should smell like a Cinnabon collided with a French patisserie. The edges will be deeper brown — that's the caramelized sugar creating the shatter-crisp effect. If they're pale, give them another 2-3 minutes, but watch closely; they go from perfect to tragic in sixty seconds. That sizzle when butter hits hot pan? Same energy here, but inside your oven.
- Immediately upon removing from the oven, roll the hot twists in the cinnamon sugar mixture. Work quickly — they cool fast and the sugar needs to adhere to the residual butter. Some people dunk them, but I prefer rolling so you get an even coat without breaking the delicate layers. Place on a wire rack to cool for exactly five minutes. This sets the sugar shell. After five minutes, they're ready to devour. I dare you to taste this and not go back for seconds.
That's it — you did it. But hold on, I've got a few more tricks that'll take this to another level...
Insider Tricks for Flawless Results
The Temperature Rule Nobody Follows
Your butter should be cold enough to grate but not frozen solid — think refrigerated stick that's been out for exactly five minutes. Too cold and it shatters into dust; too warm and you lose those distinct layers. I keep a thermometer in my fridge like a total nerd, but the finger test works: press the butter — it should dent slightly but not smear. A friend tried skipping this step once — let's just say it didn't end well. Her twists baked up like little sugar-coated hockey pucks. Delicious hockey pucks, but still.
Why Your Nose Knows Best
The scent tells you everything. When they're nearly done, the aroma shifts from raw dough and butter to deep, toasty caramel with bright cinnamon top notes. If your kitchen doesn't smell like you should charge admission, they're not ready. This is when you hover by the oven like a pastry guardian. I set a timer for two minutes less than I think they'll need, then stand there sniffing like a bloodhound. Overbaking smells slightly bitter and sharp — pull them immediately if you catch that edge.
The 5-Minute Rest That Changes Everything
After sugaring, let them rest on a wire rack for five full minutes. Not four, not six — five. This sets the sugar shell so it crackles instead of sliding off. During this time, the residual heat finishes cooking the centers so they're soft and yielding instead of doughy. It's torture, I know. I've burned my mouth more times than I care to admit because patience is not my virtue. But those five minutes are the difference between good and transcendent.
Twist Tightness = Texture Control
Loose twists give you soft, breadstick vibes — great for dunking in coffee. Tight twists create more surface area for caramelization, resulting in deeper crunch and concentrated flavor. I do a mix on one sheet because I'm indecisive and also because texture variety keeps things interesting. Pro tip: twist them over the baking sheet so any sugar that falls becomes bonus caramel shards. Those bits are cook's treat — scrape them up and sprinkle over vanilla ice cream.
The Freezer Is Your Friend
Shape them, freeze on a sheet pan until solid, then store in a bag for up to two months. Bake straight from frozen, adding 3-4 extra minutes. This is how I survive surprise guests and midnight cravings. There's something deeply satisfying about pulling homemade pastries from your own freezer like you're some kind of domestic superhero. I've been known to "casually" mention they're from scratch while friends stare in awe. Never reveal the freezer trick — let them think you're a wizard.
Creative Twists and Variations
This recipe is a playground. Here are some of my favorite ways to switch things up:
Orange-Cardamom Dream
Swap the vanilla for orange zest and a teaspoon of orange juice. Add an extra pinch of cardamom to the dough and replace half the cinnamon in the coating with more cardamom. The result tastes like a Scandinavian bakery exploded in the best way. These are especially dangerous with strong coffee and good conversation. I've watched three of these disappear during one phone call.
Chocolate Hazelnut Indulgence
Roll the dough rectangle with a thin smear of Nutella before cutting strips. Twist gently — the spread wants to squish out, but that's fine. After baking and sugaring, drizzle with melted dark chocolate and sprinkle with chopped toasted hazelnuts. These are what happens when breakfast and dessert have a beautiful baby. Fair warning: they're ridiculously rich. One is plenty, but you'll eat three anyway.
Savory-Sweet Paradox
Reduce sugar in the dough to 2 tablespoons, omit cinnamon, and add cracked black pepper and fresh thyme. After twisting, brush with garlic butter and sprinkle with coarse salt and a little sugar. These walk the line between sweet and savory — perfect alongside a cheese plate or a glass of dry Prosecco. They confuse and delight people in equal measure. "Am I eating dessert or an appetizer?" Yes.
Pumpkin Spice Autumn Vibes
Replace 2 tablespoons of milk with pumpkin puree, add pumpkin pie spice to the dough, and use brown sugar in the coating. They taste like October even in July. The pumpkin keeps them extra moist and adds a beautiful orange hue. These are what you make when you want your house to smell like a candle but also want to eat your candle. I won't judge.
Coconut-Lime Vacation Mode
Add shredded coconut to the dough, swap vanilla for lime zest, and roll finished twists in coconut sugar. A tiny pinch of cayenne in the coating gives a subtle warmth that makes the lime pop. Close your eyes while eating and you're on a beach somewhere. I've served these at brunch and watched people physically relax like they just got vacation news.
Espresso Morning Buzz
Dissolve a teaspoon of instant espresso powder in the milk. Add espresso powder to the cinnamon sugar for rolling. These taste like coffee and cinnamon had a beautiful, crunchy baby. They're what you eat when you need caffeine but also dessert but also breakfast. Multitasking never tasted so good.
Storing and Bringing It Back to Life
Fridge Storage
Store completely cooled twists in an airtight container at room temperature for up to 3 days. Line the container with paper towels to absorb moisture and keep them from getting soggy. They'll lose some crunch but still taste incredible. To revive, pop them in a 350°F oven for 5-7 minutes — they'll crisp right back up like magic. I usually "test" one straight from the container, then decide they need reheating. Quality control, obviously.
Freezer Friendly
These freeze beautifully either baked or unbaked. For baked, cool completely, then freeze in a single layer before transferring to a bag. Reheat from frozen at 350°F for 8-10 minutes. For unbaked, freeze after shaping on a sheet pan, then store in bags. Bake straight from frozen, adding 3-4 minutes to the time. I've got a bag in my freezer right now that I'm pretending I don't know about. Self-control is overrated.
Best Reheating Method
Oven is king — 350°F for 5-8 minutes restores the crunch without drying them out. Skip the microwave unless you like soggy sugar coating. If you must microwave, wrap in a barely damp paper towel and heat for 10-15 seconds, then immediately crisp in a dry skillet. It's extra work but saves you from sad, rubbery twists. For an indulgent treat, split and toast under the broiler for 2 minutes, then sandwich with vanilla ice cream. You're welcome.