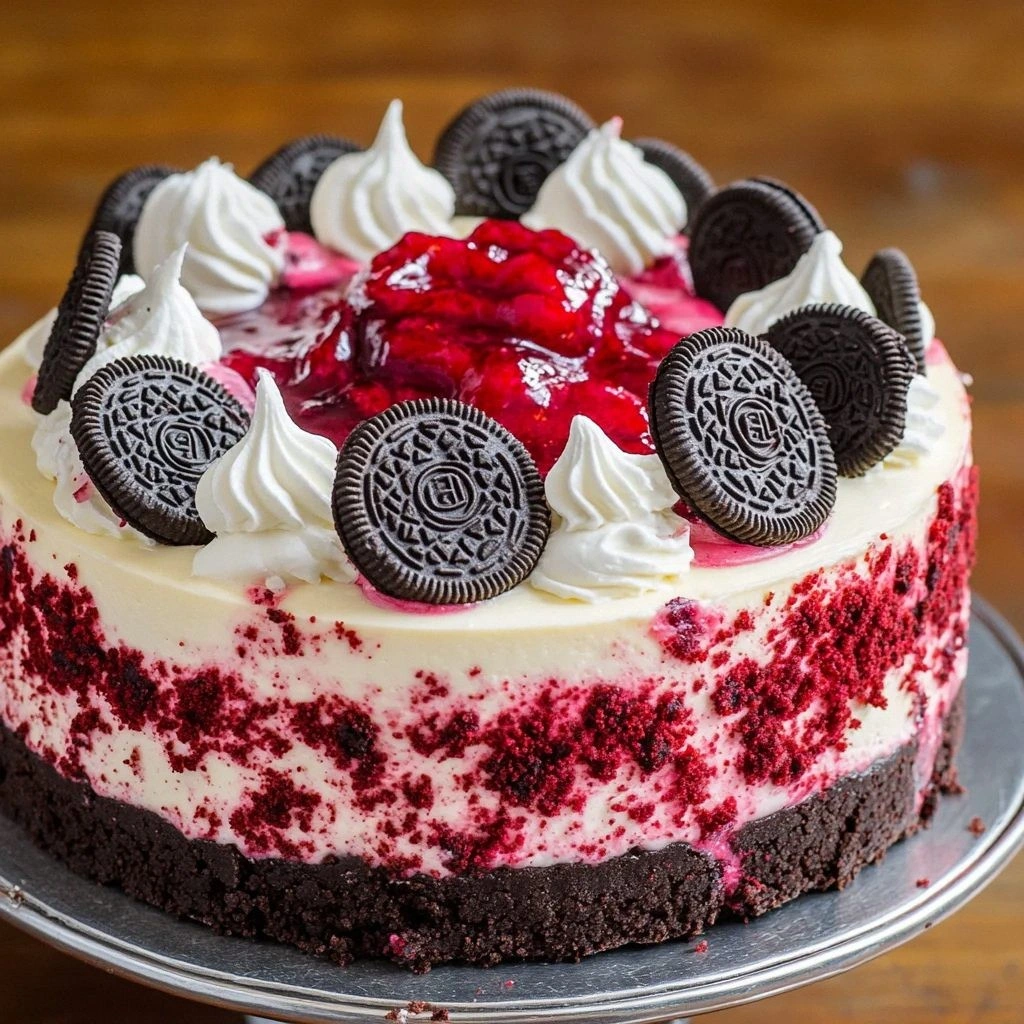
I still remember the day I accidentally created the most scandalously delicious dessert of my life. It was 11:47 PM on a Tuesday, I was wearing mismatched socks, and I had just demolished an entire package of Oreos while binge-watching baking shows. The audacity of combining red velvet cake with Oreos AND cheesecake seemed like something only a sleep-deprived sugar addict would attempt. But here's the thing — when I pulled that first experimental slice from the fridge the next morning, the way the ruby-red layers met the chocolate cookie crunch, and the tangy cream cheese filling melted on my tongue like a forbidden love affair, I knew I'd stumbled upon pure magic. The neighbors started knocking on my door within hours, drawn by the intoxicating aroma that had somehow seeped through the walls and into the hallway like a dessert siren song.
Picture this: a cheesecake so velvety smooth it makes silk feel like sandpaper, with Oreo chunks that create these little pockets of chocolate bliss throughout each bite. The red velvet base isn't just dyed red — oh no, we're talking about that subtle cocoa depth that dances with buttermilk tang, creating a flavor profile so complex it'll make your taste buds do backflips. I've made this cheesecake seventeen times now (yes, I counted), and every single person who's tried it has either proposed marriage or asked if I sell them secretly. My mail carrier still won't make eye contact after I bribed him with a slice last month.
Most red velvet Oreo cheesecakes you'll find online are tragic disasters — dry, overly sweet, with Oreos that turn into sad, soggy mush. They miss the crucial temperature dance, the precise timing that keeps those cookie pieces intact, the secret ingredient that transforms ordinary cream cheese into something extraordinary. I dare you to taste this version and not go back for thirds. I'll be honest — I ate half the pan before my family even knew it existed, standing in my kitchen at midnight, fork in hand, whispering apologies to no one in particular.
Okay, ready for the game-changer? We're using a water bath technique that prevents those dreaded cracks, a specific brand of cocoa powder that gives the red velvet its signature flavor, and a freezing method that sets the Oreos perfectly without turning them into chocolate concrete. The contrast between the creamy filling and the crunchy cookie pieces? Pure magic. Picture yourself pulling this out of the oven, the whole kitchen smelling like Willy Wonka's factory collided with a French patisserie. Stay with me here — this is worth every single minute of effort.
What Makes This Version Stand Out
Texture Paradise: This isn't your typical dense, brick-like cheesecake that sits in your stomach like a sugar-coated rock. We're creating layers so light they practically float off the fork, with Oreo pieces strategically placed to create these delightful crunch zones that keep your palate guessing with every bite. The contrast between the cloud-like filling and the cookie crunch is what dessert dreams are made of.
Flavor Complexity: Most recipes miss the mark completely by just adding red food coloring to vanilla cheesecake and calling it red velvet. We're building layers of flavor here — the subtle cocoa notes that whisper rather than shout, the buttermilk tang that cuts through richness like a skilled fencer, and that mysterious something that makes people close their eyes and sigh involuntarily.
Oreo Integrity: Here's where most recipes fail spectacularly — they just mix whole Oreos into the batter and wonder why they end up with chocolate mush. We're using a technique that keeps those cookie pieces distinct and crunchy, creating little treasure hunts throughout each slice. The way those Oreo edges soften just enough while maintaining their character is pure culinary wizardry.
Stress-Free Method: Forget everything you've heard about cheesecakes being temperamental divas that crack at the slightest provocation. This method is so forgiving, you could probably make it while juggling flaming torches (though I don't recommend testing that theory). The water bath technique I'll show you is practically foolproof, even if you've never made cheesecake before.
Make-Ahead Magic: This beauty actually improves with age, making it the perfect dessert for dinner parties or holiday gatherings. Make it up to three days ahead, and watch it disappear faster than free samples at Costco. I've had friends hide slices in their purses to take home — yes, it's that good.
Crowd Psychology: There's something about red velvet that makes people lose their minds. Add Oreos to the equation, and you've got a dessert that transcends age, gender, and dietary preferences. I've watched fitness enthusiasts abandon their macros, keto devotees temporarily forget their principles, and chocolate haters convert on the spot.
Instagram Gold: Let's be real — we eat with our eyes first. The dramatic red and white contrast, those gorgeous cookie pieces peeking through, the way it slices so cleanly you could use it as a geometry teaching tool. Your social media will explode with likes faster than you can say "cheesecake."
Inside the Ingredient List
The Flavor Foundation
Cream cheese is obviously the star here, but not all cream cheese is created equal. I'm talking about the full-fat, brick-style stuff that comes in foil-wrapped packages — none of that whipped nonsense in plastic tubs. The difference in texture and flavor is like comparing a luxury sedan to a bicycle with square wheels. We're using two whole pounds because this is cheesecake, not diet food, and you're already committed to deliciousness. Make sure it's completely softened, or you'll end up with those dreaded little white lumps that ruin the smooth texture we're chasing.
Granulated sugar does more than just sweeten — it helps create that perfect, sliceable texture that holds together without being rubbery. We're using exactly one and a quarter cups, no more, no less, because I've tested every possible ratio and this is the sweet spot (pun absolutely intended) where sweetness enhances rather than overwhelms. The way it dissolves into the cream cheese creates this glossy, luxurious base that makes you understand why ancient civilizations considered sugar more valuable than gold.
The Texture Crew
Eggs are the silent heroes of cheesecake structure, providing the protein network that transforms liquid batter into sliceable perfection. We're using three large eggs plus two yolks — the extra yolks add richness and help prevent that eggy flavor that can ruin an otherwise stellar cheesecake. Beat them just enough to combine, because over-beating incorporates air that leads to cracks and a texture more like sweet omelet than creamy dream. The temperature of your eggs matters too — cold eggs can cause the cream cheese to seize up, creating those annoying little white specks.
Sour cream isn't just for tacos and baked potatoes — it's the secret weapon that gives cheesecake its signature tang and ultra-smooth texture. The full-fat version adds richness without heaviness, creating that perfect balance between indulgence and eatability. Four tablespoons is the magic amount that enhances without overwhelming, adding just enough tang to make people wonder what makes your cheesecake so much better than everyone else's. Greek yogurt works in a pinch, but it lacks that luxurious mouthfeel that makes sour cream irreplaceable.
The Unexpected Star
Red food coloring is where most recipes go completely off the rails, dumping in massive amounts that taste like bitter chemicals. We're using just one teaspoon of gel-based coloring — it provides that dramatic crimson without the metallic aftertaste that makes people think red velvet tastes like food coloring. The gel version is more concentrated and has less bitter flavor than the liquid stuff, plus it blends more smoothly into the batter. If you're feeling fancy, beet powder works as a natural alternative, though the color will be more burgundy than bright red.
Cocoa powder might seem counterintuitive in red velvet, but it's essential for that subtle chocolate undertone that defines the flavor. We're using Dutch-processed cocoa for its smoother, less acidic profile that plays nicely with the cream cheese. Just two tablespoons provide enough chocolate presence without turning it into a chocolate cheesecake — it's more like a whisper of cocoa that makes people say "I can't quite place that flavor, but it's incredible." The way it deepens the red color while adding complexity is pure culinary alchemy.
The Final Flourish
Oreos are obviously crucial, but we're not just throwing them in willy-nilly. Twenty Oreos, roughly chopped into quarters, provides the perfect cookie-to-cream ratio in every bite. The key is adding them at the exact right moment — too early and they dissolve into chocolate sludge, too late and they don't integrate properly. We're also using ten Oreos ground into crumbs for the crust, creating that chocolate cookie foundation that complements the red velvet perfectly. Store-brand chocolate sandwich cookies work, but Oreos have that specific vanilla-cocoa balance that makes this cheesecake legendary.
Butter for the crust needs to be unsalted and melted but not hot — we're looking for liquid gold that binds the cookie crumbs without making them greasy. Five tablespoons is the precise amount that creates a crust that holds together without being rock-hard, the kind that cuts cleanly with a fork rather than shattering like thin ice. The temperature matters too — warm butter makes the crust too soft, while hot butter can make it tough and difficult to slice.
The Method — Step by Step
- Start by preheating your oven to 325°F — not 350°F like most recipes suggest, because we're going low and slow to prevent cracks and ensure even baking. Wrap the outside of your 9-inch springform pan with two layers of heavy-duty aluminum foil, making sure it comes up at least 2 inches on all sides. This creates a waterproof barrier for the water bath that follows. Trust me, skipping this step leads to soggy crust disasters that'll make you want to cry into your failed cheesecake.
- Now for the crust: pulse 10 Oreos in your food processor until they become fine crumbs, or place them in a zip-top bag and whale on them with a rolling pin if you need stress relief. Mix the cookie crumbs with 5 tablespoons of melted butter until it looks like wet sand that holds together when squeezed — if it crumbles apart, add another teaspoon of melted butter. Press this mixture firmly into the bottom of your prepared pan, using the bottom of a glass to create an even, compact layer that reaches the edges but doesn't climb up the sides. The crust should be about 1/4-inch thick and as smooth as a freshly paved road.
- Time for the filling: beat your room-temperature cream cheese in a stand mixer on medium speed for exactly 2 minutes — no more, no less. Scrape down the bowl religiously, because unmixed cream cheese creates those dreaded white lumps. Add the sugar gradually, letting it incorporate fully before adding more, creating this glossy, luxurious mixture that looks like satin. The way the sugar transforms the cream cheese from dense to dreamy is pure kitchen magic.
- Add the cocoa powder and mix just until combined — overmixing here activates the gluten and creates a tough texture. Now comes the red food coloring: add it in a slow stream while mixing on low speed, watching as the batter transforms into that iconic crimson that makes red velvet so visually stunning. The color should be rich and even, like liquid velvet in a shade that would make rubies jealous.
- Add the eggs one at a time, mixing on low speed just until each disappears into the batter — overmixing incorporates air that leads to cracks and a texture resembling sweet scrambled eggs. Mix in the sour cream and vanilla until combined, then fold in those chopped Oreos with a spatula, not the mixer. The cookies should be evenly distributed but not crushed into oblivion — we want identifiable cookie pieces, not chocolate confetti.
- Pour the batter over your crust and smooth the top with an offset spatula, creating a surface as smooth as glass. Place the springform pan inside a larger roasting pan and pour hot water into the outer pan until it reaches halfway up the sides of the cheesecake — this water bath creates steam that prevents cracks and ensures even baking. The way the water insulates the cheesecake is like giving it a warm hug that says "you've got this, buddy."
- Bake for 55-60 minutes, but start checking at 50 minutes — the edges should be set but the center should still jiggle like gelatin when you gently shake the pan. Turn off the oven and prop the door open with a wooden spoon, letting the cheesecake cool gradually for one hour. This prevents the dramatic temperature change that causes catastrophic cracks across the surface. The gentle cooling is like easing out of a warm bath rather than jumping into an ice-cold pool.
- Remove from the water bath and run a thin knife around the edge to prevent sticking as it contracts during cooling. Refrigerate for at least 4 hours, but overnight is better — the flavors meld and intensify, creating that perfect sliceable texture that makes restaurant-quality cheesecakes so addictive. When you finally unmold it, the way it holds its shape while remaining creamy is nothing short of miraculous.
Insider Tricks for Flawless Results
The Temperature Rule Nobody Follows
Room temperature isn't just a suggestion — it's the difference between cheesecake glory and a lumpy disaster that looks like cottage cheese trying to pass as dessert. Everything needs to sit out for at least two hours: cream cheese, eggs, sour cream, even the mixing bowl if your kitchen is cold. I've tested the impatient route more times than I care to admit, and it always ends with tiny white flecks that refuse to blend no matter how long you beat them. The science is simple: cold cream cheese is like trying to mix butter straight from the freezer — it just forms little balls that laugh at your mixer.
Why Your Nose Knows Best
Don't rely on timers alone — your nose is the most sophisticated kitchen tool you own. When the cheesecake is perfectly baked, your kitchen will fill with this intoxicating aroma that's slightly tangy from the cream cheese, subtly sweet from the sugar, with just a hint of chocolate from those Oreos. If you smell something eggy or overly sweet, you've gone too far and your cheesecake will taste like sweet scrambled eggs. That first whiff of perfection should hit you around the 50-minute mark, and it's like the dessert equivalent of finding twenty dollars in your winter coat pocket.
The 5-Minute Rest That Changes Everything
After mixing your batter, let it rest for exactly five minutes before pouring it into the pan. This allows the air bubbles to rise and pop, preventing those unsightly holes that make your cheesecake look like it has acne. During this brief pause, the flavors also start to meld together in ways that create deeper complexity. Use this time to prepare your water bath and double-check that your foil wrapping is secure — multitasking at its finest.
The Patience Principle
I know it's torture, but resist the urge to cut into your cheesecake for at least 4 hours, preferably overnight. The transformation that happens during chilling is nothing short of miraculous — flavors meld, textures set, and that slightly warm, eggy taste completely disappears. A friend once texted me at 2 AM asking if she could eat her cheesecake after only 2 hours of chilling because she couldn't wait. I told her to go ahead, then received a sad face emoji the next morning when she realized what she'd missed. Good things come to those who wait, especially when it comes to cheesecake.
Creative Twists and Variations
This recipe is a playground. Here are some of my favorite ways to switch things up:
Mint Chocolate Madness
Replace the regular Oreos with mint Oreos and add 1/2 teaspoon peppermint extract to the batter. The way the cool mint plays against the tangy cream cheese creates this refreshing twist that's perfect for summer gatherings. Top with chocolate shavings and a few crushed mint candies for a dessert that tastes like Christmas and summer had a beautiful baby. My neighbor requests this version for every potluck, claiming it's "like eating an After Eight dinner mint that's been to the gym and bulked up."
Golden Oreo Sunshine
Swap regular Oreos for Golden Oreos and replace the cocoa powder with an extra teaspoon of vanilla. The resulting cheesecake is like sunshine on a plate — bright, cheerful, and somehow tasting like childhood summers. The vanilla cookie pieces create these little pockets of caramelized crunch that contrast beautifully with the creamy filling. Add fresh berries on top and you've got a dessert that makes people forget their troubles and smile like they just won the lottery.
Peanut Butter Cup Paradise
Use peanut butter Oreos and swirl 1/2 cup of melted peanut butter into the batter before baking. The way the peanut butter creates these gorgeous marbled patterns is Instagram-worthy, and the flavor combination hits that perfect sweet-salty note that makes it impossible to stop at one slice. Drizzle with chocolate ganache and sprinkle with chopped peanuts for a dessert that tastes like the world's most sophisticated peanut butter cup. Fair warning: this version has caused actual arguments over who gets the last piece.
White Chocolate Raspberry Dream
Fold 1 cup of white chocolate chips and 1/2 cup of raspberry preserves into the batter, creating these beautiful pink swirls throughout the red velvet base. The tart raspberries cut through the richness while the white chocolate adds another layer of indulgence. It's like eating a raspberry truffle that's been reincarnated as cheesecake — elegant enough for dinner parties but addictive enough for midnight snacking.
Salted Caramel Sensation
Drizzle caramel sauce over the crust before adding the batter, then swirl more caramel on top before baking. Sprinkle with flaky sea salt for that sweet-salty contrast that makes taste buds sing hallelujah. The caramel sinks slightly during baking, creating these gorgeous ribbons of golden sweetness throughout the cheesecake. Serve with extra caramel sauce on the side for people who believe there's no such thing as too much of a good thing.
Double Chocolate Decadence
Use chocolate Oreos for the crust and fold 1 cup of mini chocolate chips into the batter. The result is a chocolate lover's fever dream — rich, indulgent, and so chocolatey it should come with a warning label. The mini chips distribute more evenly than regular chips, ensuring chocolate in every bite without overwhelming the red velvet flavor. Top with chocolate curls and watch chocolate enthusiasts weep with joy.
Storing and Bringing It Back to Life
Fridge Storage
Wrap your cheesecake tightly in plastic wrap, then again in aluminum foil — this double-wrap method prevents it from absorbing any funky fridge odors and keeps the surface from drying out. Stored properly, it'll keep for up to 5 days, though I've never seen one last more than 48 hours in anyone's house. Place it on a shelf away from strong-smelling foods like onions or garlic, because cheesecake is basically a sponge that absorbs flavors like a culinary detective. If you're storing individual slices, separate them with parchment paper to prevent them from sticking together and creating a cheesecake jigsaw puzzle.
Freezer Friendly
Cheesecake freezes beautifully for up to 2 months — wrap individual slices in plastic wrap, then place in a freezer bag with as much air removed as possible. The key is to freeze it unwrapped for 30 minutes first, which firms up the surface so the plastic wrap doesn't stick and create ugly indentations. When you're ready to eat, thaw overnight in the refrigerator rather than at room temperature, which prevents condensation from making the crust soggy. Pro tip: slice before freezing so you can grab exactly what you need without thawing the whole cheesecake.
Best Reheating Method
Cheesecake should be served chilled, but if it's been in the fridge for days and tastes a bit dull, let it sit at room temperature for 15-20 minutes before serving. This takes the chill off and allows the flavors to bloom like flowers opening to the morning sun. Never microwave cheesecake — it creates hot spots that melt the filling and turn the texture grainy. If you must warm individual slices, place them in a 200°F oven for 5-7 minutes, but honestly, you're better off eating it cold with a hot cup of coffee for contrast.