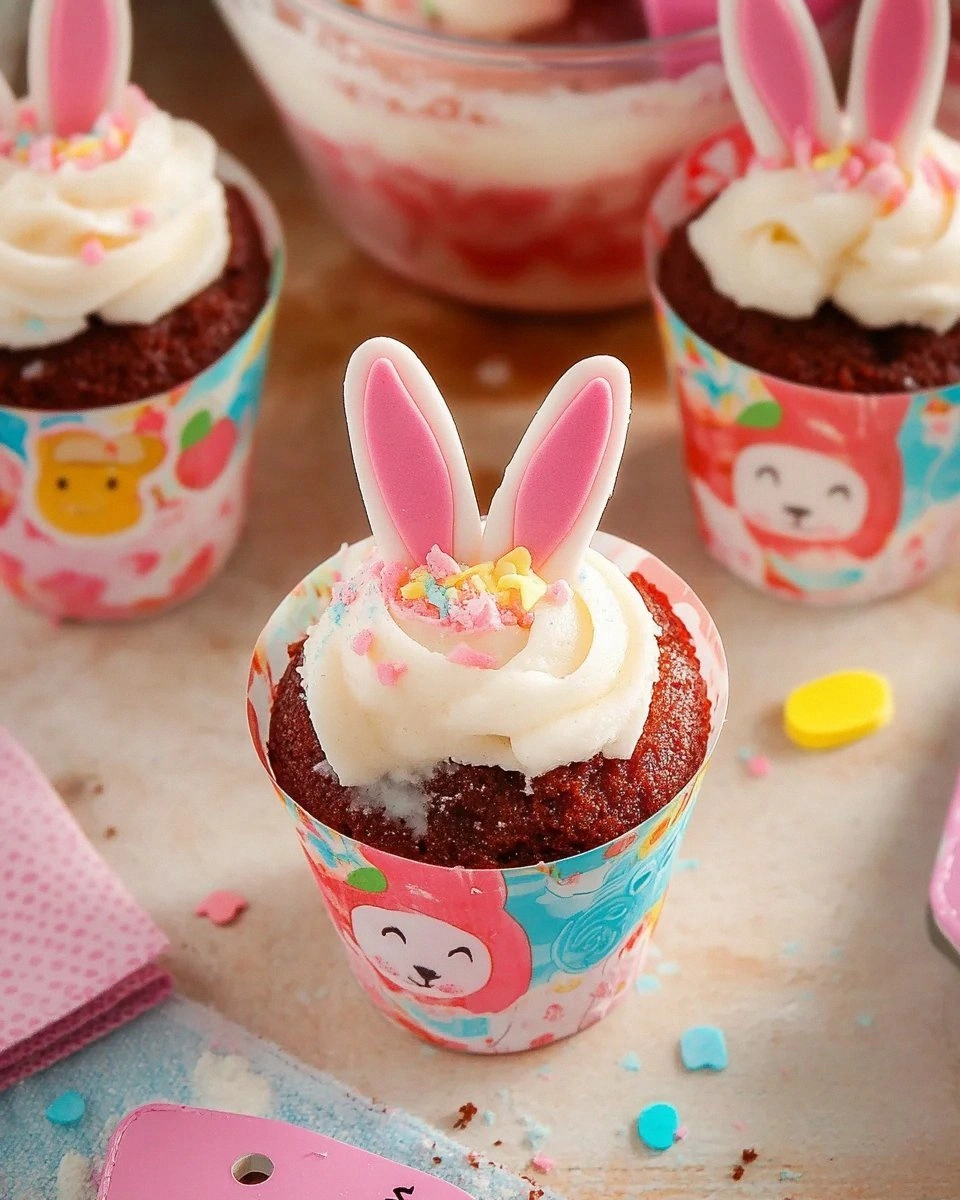
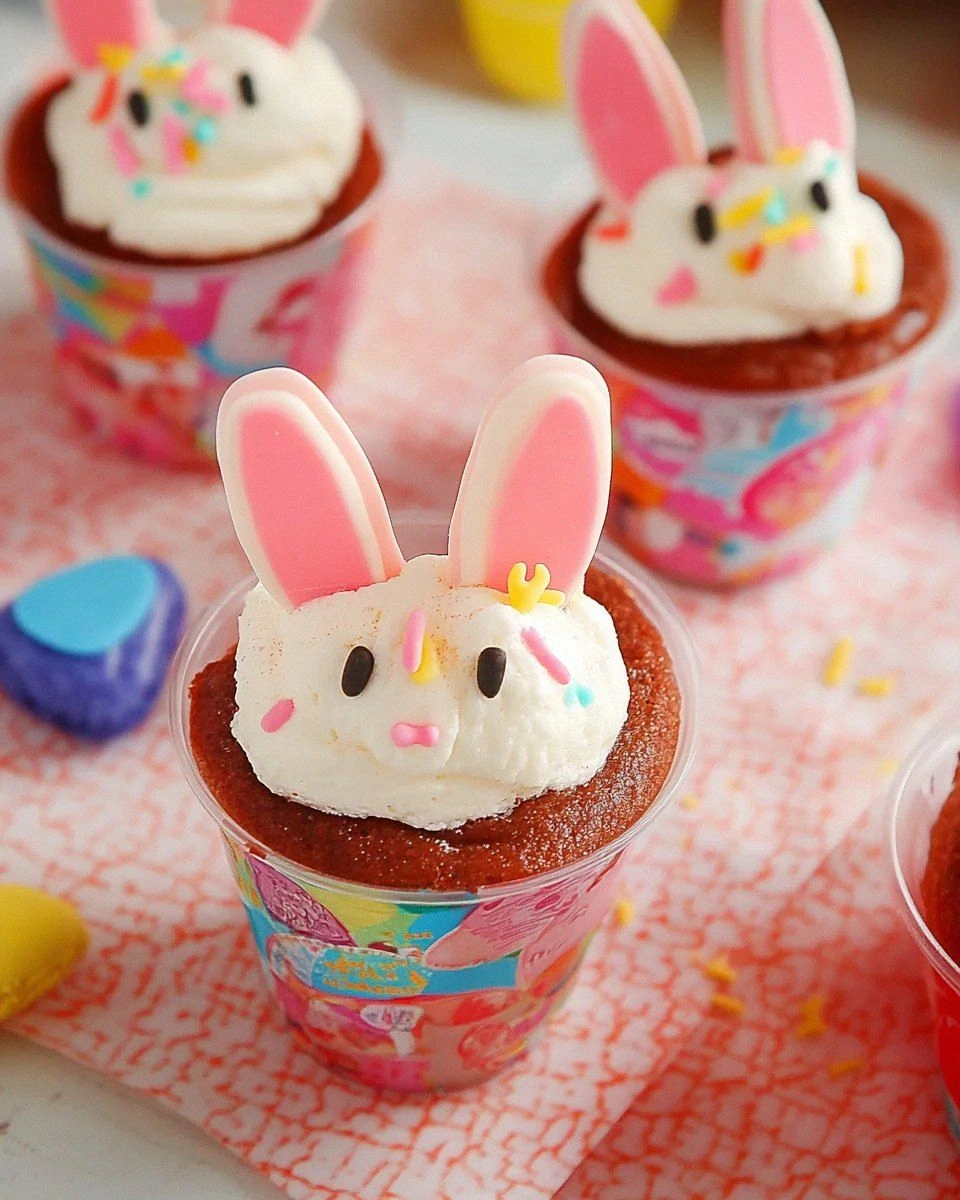
Okay, picture this: I’m standing in my kitchen, a half‑finished birthday cake collapsed into a sad, soggy pancake, and my best friend is daring me to “make something that looks like a bunny but actually tastes like a party.” I stared at the mess, inhaled the sweet, lingering vanilla perfume, and thought, “If I can’t rescue this disaster, I’ll turn it into something even cuter.” That moment sparked the birth of the Mini Bunny Cake Cups, a bite‑size marvel that turned a kitchen catastrophe into a crowd‑pleasing showstopper. I’m about to spill every secret, from the exact moment the batter hits the cup to the final flourish of pink sanding sugar that makes these little bunnies look Instagram‑ready.
The first time I tried these, the oven filled the house with a perfume that reminded me of a spring fair—sweet strawberries dancing with a hint of buttery vanilla, and a faint whisper of marshmallow melt that made my nose do a little happy dance. The texture? Imagine a fluffy cloud that’s been lightly kissed by a crisp, caramelized edge, each bite exploding with a burst of jam that’s as bright as sunrise. I’ll be honest — I ate half the batch before anyone else got a chance to try them, and that’s because the flavor combo is so addictive it practically pulls you back for seconds. I dare you to taste this and not go back for seconds; the combination of Funfetti cake, strawberry jam, and marshmallow ears is a love affair you won’t want to end.
What truly sets this version apart is a sneaky ingredient that most recipes overlook: a single large marshmallow placed on top of each cup before baking. As the heat works its magic, the marshmallow transforms into a soft, pillowy “ear” that adds a subtle chewiness and a hint of caramelized sugar that pairs perfectly with the bright strawberry jam. Most recipes get this completely wrong, either skipping the marshmallow or adding it after baking, which results in a soggy mess. This next part? Pure magic. The marshmallow not only adds texture but also acts as a natural “glue” for the frosting, keeping everything in place for that flawless bunny silhouette.
If you’ve ever struggled with getting a neat, uniform cupcake shape without a fancy muffin tin, you’re not alone — and I’ve got the fix. By using small plastic cups instead of a traditional tin, you get a perfect, portable canvas that makes decorating a breeze and ensures each bunny gets its own stage. Picture yourself pulling this out of the oven, the whole kitchen smelling incredible, and the sight of those pink‑sanded bunnies lined up like a brigade of adorable soldiers ready for a photo shoot. Okay, ready for the game‑changer? Let me walk you through every single step — by the end, you’ll wonder how you ever made it any other way.
What Makes This Version Stand Out
- Taste: The Funfetti strawberry cake mix brings a burst of fruity confetti that’s balanced by the creamy vanilla frosting, creating a flavor duet that sings on the palate.
- Texture: A soft, cake‑like interior meets a caramelized marshmallow ear and a crisp edge that pulls away just enough to give that satisfying bite.
- Simplicity: You only need a box of mix, a few pantry staples, and a handful of decorative touches—no fancy equipment or obscure ingredients.
- Uniqueness: The marshmallow “ears” are a surprise that most bunny cupcakes lack, turning a simple cupcake into an interactive, whimsical treat.
- Crowd Reaction: Guests instantly light up; kids point, adults smile, and the “wow” factor is off the charts—perfect for parties, brunches, or a quiet afternoon indulgence.
- Ingredient Quality: Using Pillsbury™ Funfetti® ensures consistent flavor and texture, while the vanilla frosting adds that buttery richness you crave.
- Cooking Method: Baking in small plastic cups guarantees even heat distribution, preventing the dreaded soggy bottom and giving each bunny a perfect dome.
- Make‑Ahead Potential: These cupcakes freeze beautifully, and the frosting holds up, so you can prep them days ahead and still serve fresh‑looking bunnies.
Inside the Ingredient List
The Flavor Base
The star of the show is the Pillsbury™ Funfetti® Strawberry Cake & Cupcake Mix. This mix already contains a perfect balance of flour, sugar, leavening agents, and those iconic rainbow sprinkles that give every bite a subtle crunch. If you skip this mix and try to craft a homemade version, you’ll miss the precise chemistry that makes the cake rise evenly and stay moist. For the best results, use the mix exactly as directed, and don’t be tempted to add extra flour—trust the formula.
The Texture Crew
Enter the large marshmallows. When baked, they transform into caramelized “ears” that add a chewy contrast to the tender cake crumb. If you substitute mini marshmallows, they’ll melt into the batter and lose that distinct ear shape. The marshmallows also release a subtle caramel aroma that elevates the overall scent profile, making the kitchen smell like a spring fair.
The Unexpected Star
Strawberry jam is the secret weapon that injects a burst of fresh fruit flavor into each bite. A dollop in the center creates a hidden pocket of jam that surprises the palate, turning each mouthful into a mini treasure hunt. If you’re allergic to strawberries or want a different twist, raspberry or apricot preserves work just as well, but the classic strawberry keeps the theme playful and bright.
The Final Flourish
No bunny is complete without a fluffy coat, and that’s where Pillsbury™ Funfetti® Vanilla Frosting steps in. This frosting spreads like silk, its sweet vanilla notes marrying perfectly with the strawberry jam and cake. If you prefer a lighter coating, you can whisk in a splash of milk to achieve a softer, spreadable consistency. The pink sanding sugar adds that final pop of color, making each bunny look like it just hopped out of a candy shop.
Everything's prepped? Good. Let's get into the real action...
The Method — Step by Step
Preheat your oven to 350°F (175°C) and line each small plastic cup with a silicone liner. The moment the oven clicks on, you’ll hear that comforting hum that tells you a bake is about to happen. While the oven warms, gather your mixing bowl, and give the Funfetti mix a quick shake to redistribute the sprinkles—this ensures an even color burst in every bite. This is the moment of truth: the kitchen smells like a candy store, and you’re already half‑way to bunny bliss.
In a large bowl, combine the Funfetti mix with the additional ingredients called for on the box (usually water, oil, and eggs). Beat on medium speed until the batter is smooth, glossy, and free of lumps. I dare you to watch the batter swirl; it should look like a pastel storm ready to burst. Once the batter is ready, set it aside—don’t over‑mix, or you’ll lose that tender crumb.
Kitchen Hack: Add a tablespoon of sour cream to the batter for an extra moist crumb that stays fluffy even after cooling.Spoon the batter into each prepared cup, filling them about three‑quarters full. The batter should sit just below the rim, leaving space for the marshmallow “ear” to sit on top without spilling over. As you fill, you’ll notice the batter’s pink hue deepening—this is the visual promise of a vibrant, festive treat. Give each cup a gentle tap on the counter to release any air bubbles, ensuring a uniform rise.
Place one large marshmallow on top of the batter in each cup, pressing it down just enough so it’s partially submerged. This is where the magic begins: the marshmallow will melt slightly, forming a soft dome that becomes the bunny’s ear. If you’re nervous about the marshmallow sinking too far, a quick skewer can hold it in place for the first two minutes of baking.
Slide the tray into the preheated oven and bake for 12‑15 minutes, or until a toothpick inserted into the side of the cake (away from the marshmallow) comes out clean. You’ll know they’re done when the edges start to pull away from the cup and the marshmallow ears turn a light golden‑brown. The kitchen will fill with a sweet, toasted aroma that makes you want to peek inside the oven—resist the urge, or you’ll end up with over‑baked tops.
Watch Out: Over‑baking will cause the marshmallow ears to become hard and brittle, losing their chewiness. Keep a close eye after the 12‑minute mark.While the cupcakes are cooling for about 5 minutes, melt the strawberry jam in a microwave‑safe bowl for 15‑20 seconds, just until it becomes a pourable syrup. This step intensifies the jam’s flavor and makes it easier to pipe a perfect little heart or dot onto each bunny’s forehead. If you prefer a thicker jam, skip the melt and use a spoon to dollop it directly.
Once the cupcakes are cool enough to handle, use a piping bag fitted with a small round tip to pipe a swirl of vanilla frosting around the rim of each cup, creating a fluffy “fur” border. Then, pipe a generous dollop of frosting onto the top of each marshmallow ear, shaping it into a soft “tail.” The frosting should be airy, almost cloud‑like—if it’s too stiff, add a splash of milk and whip it again.
Kitchen Hack: Chill the frosting for 5 minutes before piping; it will hold its shape better and give you sharper lines.Finally, sprinkle a pinch of pink sanding sugar over each bunny’s ear and tail for that final sparkle. The sanding sugar adds a subtle crunch and a pop of color that makes the cupcakes look like they’ve been dusted with fairy dust. Step back, admire your handiwork, and get ready for the inevitable “oohs” and “aahs” from anyone lucky enough to see them. That’s it — you did it. But hold on, I’ve got a few more tricks that'll take this to another level...
Insider Tricks for Flawless Results
The Temperature Rule Nobody Follows
Never bake these cupcakes at a temperature higher than 350°F. Higher heat will cause the marshmallow ears to puff up too quickly and then collapse, leaving a sunken center. I once tried 375°F in a rush and ended up with a flat, gummy mess that no one wanted to touch. Keep the oven steady, and you’ll get a uniform rise and perfectly caramelized ears every time.
Why Your Nose Knows Best
Your sense of smell is a far better indicator of doneness than a timer. When the cupcakes are ready, a sweet, toasted scent will fill the kitchen, and the edges will start pulling away from the cup. If you’re ever unsure, trust that aroma—it’s the olfactory equivalent of a green light. I’ve saved many a batch by listening to my nose instead of the clock.
The 5‑Minute Rest That Changes Everything
After removing the cupcakes from the oven, let them rest in the pan for exactly five minutes before transferring them to a wire rack. This short rest lets the steam finish the cooking process gently, preventing a soggy bottom. A friend tried skipping this step once and ended up with cupcakes that were too soft to hold the frosting. That five‑minute pause is a tiny commitment for a massive texture upgrade.
Frosting Consistency Hack
If your frosting feels too thick to pipe, add a tablespoon of milk and beat it on low speed for 15 seconds. This creates a smoother, silkier texture that spreads easily without breaking the delicate marshmallow ears. I once over‑whipped the frosting, turning it grainy, but a splash of milk rescued it instantly. Remember, a little liquid goes a long way toward a flawless finish.
The Secret of the Pink Sanding Sugar
Don’t just sprinkle the pink sanding sugar—lightly tap the cup after sprinkling to let the sugar settle into the frosting’s crevices. This ensures an even coating and prevents clumping. I once tried a heavy hand and ended up with a sugary crust that overpowered the delicate flavors. A gentle tap gives you that perfect sparkle without overwhelming the palate.
Marshmallow Placement Precision
Place the marshmallow exactly in the center of each cup; off‑center ears make the bunny look lopsided. If you’re a visual perfectionist, use a small spoon to position the marshmallow before the batter sets. A friend once placed them too close to the edge, and the marshmallow melted into the side, ruining the ear shape. Precision here is the difference between a cute bunny and a lopsided pastry.
Creative Twists and Variations
This recipe is a playground. Here are some of my favorite ways to switch things up:
Chocolate Bunny Delight
Swap the Funfetti mix for a chocolate cake mix, and use chocolate frosting instead of vanilla. Add a drizzle of caramel on top of the marshmallow ear for a decadent finish. Kids will love the darker hue, and adults will appreciate the richer flavor profile.
Citrus Surprise
Replace strawberry jam with orange marmalade and add a zest of lemon to the frosting. The bright citrus notes give the cupcakes a fresh, tangy twist that’s perfect for spring brunches. The pink sanding sugar can be swapped for orange or yellow sugar for a cohesive look.
Berry Blast
Use a mixed berry jam (raspberry, blueberry, blackberry) for a deeper, more complex fruit center. Pair it with a light cream cheese frosting for a subtle tang that balances the sweetness. Top with fresh berries for an extra pop of color and freshness.
Nutty Crunch
Fold finely chopped toasted almonds or hazelnuts into the batter before baking. The nuts add a pleasant crunch that contrasts beautifully with the soft cake and marshmallow ear. Finish with a drizzle of honey for a sweet‑nutty glaze.
Vegan Bunny Cups
Swap the eggs for flax‑egg (1 tbsp ground flaxseed + 3 tbsp water) and use a plant‑based butter substitute. Choose a dairy‑free vanilla frosting and a fruit jam without added gelatin. The result is a cruelty‑free version that still looks and tastes like the original.
Storing and Bringing It Back to Life
Fridge Storage
Place the cooled cupcakes in an airtight container and store them in the refrigerator for up to three days. The frosting will stay firm, and the cake will retain its moist crumb. If the frosting seems a bit stiff after chilling, let the cupcakes sit at room temperature for 10 minutes before serving.
Freezer Friendly
Wrap each cupcake individually in plastic wrap, then place them in a zip‑top freezer bag. They’ll keep for up to two months. To reheat, remove the wrap, place the cupcake on a microwave‑safe plate, and heat for 20‑30 seconds, adding a tiny splash of water to the plate to create steam and revive the softness.
Best Reheating Method
For a crispier edge, reheat the cupcakes in a preheated 300°F (150°C) oven for 5‑7 minutes. This method restores the slight caramelized crust while keeping the interior fluffy. Remember to add a small pan of water in the oven to maintain humidity and prevent the cake from drying out.