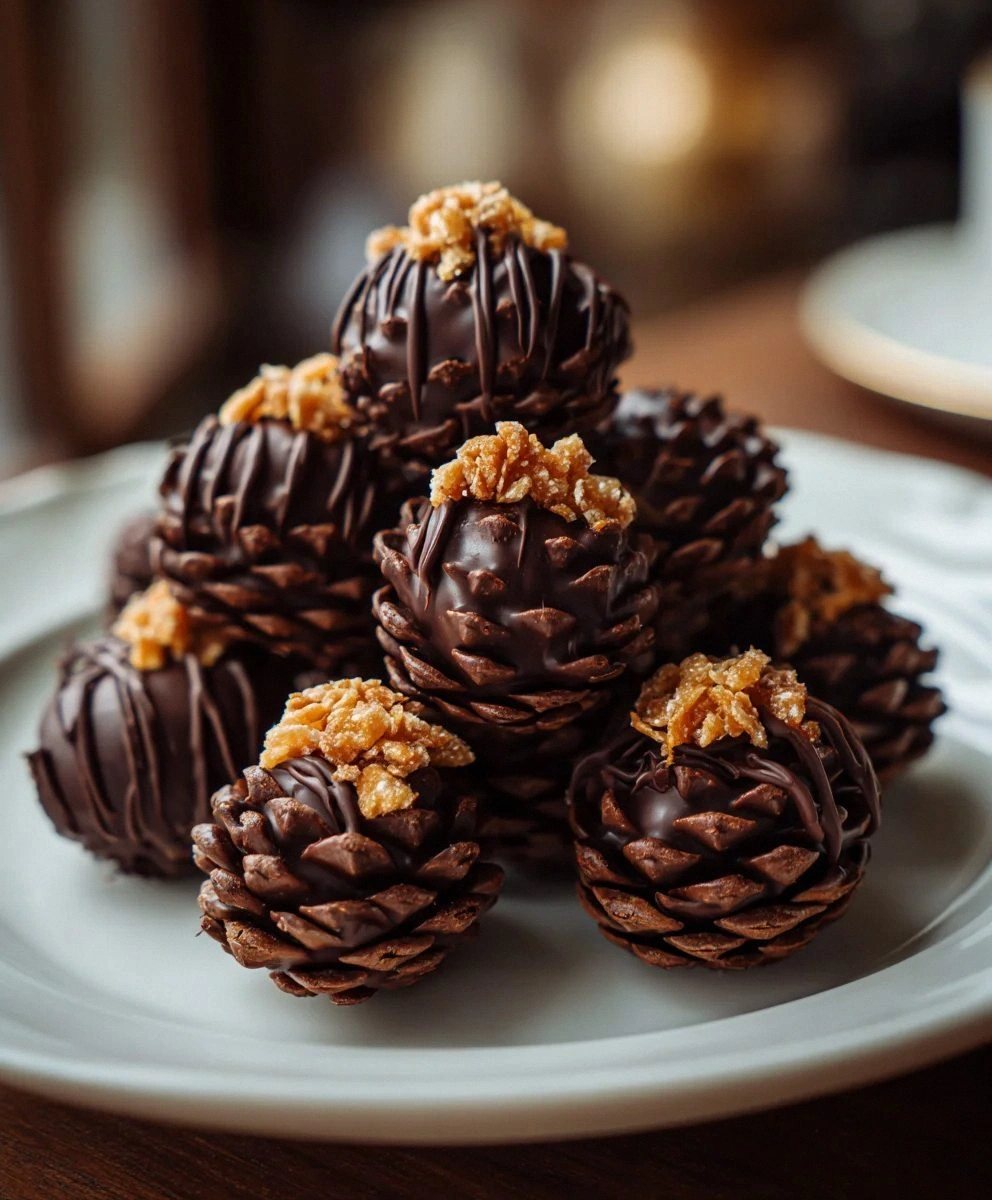
Last Tuesday, my oven staged a full-blown rebellion. One second it was humming along like a loyal kitchen companion, the next it was flashing cryptic error codes and refusing to heat past 180°F—basically a glorified paperweight. I had promised my book-club crew a show-stopping dessert, the kind that makes people stop mid-sentence to ask, “Wait, you MADE this?” and now I had zero oven, zero backup plan, and exactly ninety minutes before the doorbell rang. Panic? Absolutely. But panic is also the mother of invention. I tore through my pantry, spotted a half-empty box of cornflakes, a stash of chocolate biscuits left over from a holiday care package, and a tub of dairy-free cream cheese that had “use me or lose me” written all over its foil lid. Twenty experimental minutes later, I was rolling truffle混合物 that looked suspiciously like tiny pinecones, complete with shaggy, nut-brown “scales.” One bite and I forgot my oven even existed. These truffles are pure woodland magic—crunchy, creamy, fudgy, and so adorable they’ll make your guests squeal like they just spotted a baby deer. Best part? No heat, no bake, no stress. The chocolate coating crackles like thin ice over a silky center, while the cornflake shards give you that satisfying crunch that echoes in your skull like a drumroll. I’ll be honest: I ate half the batch before anyone else got to try them, standing over the sink in my pajamas, swearing I’d stop at three and then reaching for a fourth “just to make sure they were good.” If you’ve ever struggled with finicky tempered chocolate or dreaded the moment you have to peel parchment paper off a cake that refuses to release, you’re not alone—and I’ve got the fix. Picture yourself pulling these out of the fridge, the whole kitchen smelling like a cocoa wonderland, your friends circling like festive sharks. Let me walk you through every single step—by the end, you’ll wonder how you ever made dessert any other way.
What sets these truffles apart is their ability to feel simultaneously rustic and elegant, like something you’d find in a Parisian pâtisserie run by woodland elves. They’re vegan by accident, gluten-free friendly, and they keep for days—though they’ll vanish long before that. The secret weapon is the cornflake coating: each flake gets hand-pressed into the soft chocolate shell so it stands up like a tiny scale, catching the light and making the whole thing look like it belongs on the forest floor next to a hedgehog. The filling is a cloud of biscuit-studded cream cheese ganache that melts on your tongue faster than snow on a radiator. You don’t need candy thermometers, stand mixers, or any gadget more sophisticated than a cereal spoon. And if you’ve ever cursed a recipe that required you to chill dough for four hours while your life crumbled around you, rejoice: these set in twenty flat minutes in the freezer. Okay, ready for the game-changer?
Before we dive in, let’s set expectations: this will become your new go-to for potlucks, teacher gifts, last-minute hostess offerings, and midnight cravings. They travel like champions—no smudging, no weeping, no sad puddles in the Tupperware. Kids can help roll and spike the flakes, which turns the process into edible arts-and-crafts, and adults will swear you bought them at some boutique chocolatier. I dare you to taste one and not go back for seconds. Stay with me here—this is worth it.
What Makes This Version Stand Out
No-Bake Brilliance: You literally never turn on the oven, which means summertime dessert glory without turning your kitchen into a sauna. It also means you can whip these up in a dorm room, office break area, or that Airbnb with the sketchy stove.
Texture Tango: Creamy centers, crackly chocolate jackets, and cornflake crunch that shatters like thin ice—every bite is a three-act play of contrast. Most recipes get this completely wrong by using only one texture; we go full symphony.
Instagram Gold: These look like adorable woodland artifacts, so your feed gets instant cozy vibes without any fancy piping bags or edible gold leaf. Friends will DM you asking which boutique sold them.
Make-Ahead Magic: They keep for a week in the fridge and a month in the freezer, flavor actually improving as the cocoa blooms. Translation: you are always fourteen minutes away from hero status.
Crowd Shock Factor: Bring a plate of these and watch vegans, celiacs, and die-hard butter fiends form an alliance. They disappear faster than free Wi-Fi passwords.
Ingredient Simplicity: Six grocery staples, zero specialty shops. If you’ve got a box of cereal and some chocolate biscuits, you’re halfway to glory.
Speed Demon: From pantry to plate in under forty minutes, including the frantic freezer stint. Most truffle recipes demand overnight setting; we laugh in the face of patience.
Inside the Ingredient List
The Flavor Base
Vegan chocolate biscuits are the soul of the truffle, delivering deep cocoa notes and a whisper of sweetness that keeps the whole affair from turning into a sugar bomb. Blitz them into fine crumbs and they act like edible sand, soaking up the cream cheese and turning into a fudgy dough that tastes like the inside of an Oreo cloud. Skip them and you’ve got sad, gummy blobs; choose a high-cocoa brand and you’ll taste the difference like night and day. If gluten is an issue, grab a gluten-free version—every supermarket carries at least one these days, and they work identically.
The Texture Crew
Dairy-free cream cheese is the unsung hero, the silky binder that transforms dry crumbs into truffle velvet. I tested with coconut-oil based and almond-milk based versions; both whip up like a dream, but avoid the super-crumbly varieties meant for bagels—they won’t emulsify. The goal is a mixture that rolls between your palms like Play-Doh, not one that cracks like desert earth. If you only have the firm kind, beat it first with a spoon until it loosens and shines; your truffles will thank you by holding perfect spheres.
The Crunch Factor
Vegan cornflakes bring the pinecone illusion to life. Lightly crush them so the flakes stay shaggy and architectural; pulverized dust just looks like sad breadcrumbs. Press them into the truffle right after dipping so they adhere like barnacles. Gluten-free cornflakes taste identical, so nobody gets left out of the crunch party. And if you’re feeling rebellious, try puffed rice or even crushed potato chips for a salty-sweet curveball.
The Final Flourish
Dairy-free dark chocolate for dipping needs to be at least 60% cacao so it sets snappy and glossy, but not so bitter that it bullies the mellow filling. Melt it in short bursts, stirring like your life depends on it—overheated chocolate seizes faster than you can say “bain-marie.” A tablespoon of neutral coconut oil swirled in at the end gives that professional sheen you thought only chocolatiers could achieve. And the icing sugar snow? Just a whisper through a tea strainer; too much and you’ll look like you dumped the truffles in a snowdrift.
Everything’s prepped? Good. Let’s get into the real action...
The Method — Step by Step
- Blitz your chocolate biscuits into fine, even crumbs using a food processor or the old zip-bag-and-rolling-pin bash-a-thon. You want uniform sand, not chunky pebbles—those bigger pieces will create cracks when you roll. Pause to inhale; that dust cloud smells like childhood lunchboxes and secret midnight snacking. Transfer the crumbs to a mixing bowl big enough to let you go wild with a spatula without decorating the counter.
- Scoop in the dairy-free cream cheese and add the cocoa powder. Start with a spoon, then switch to clean hands once the mixture stops being polite. You’re aiming for a dough that feels like cool playdough: pliable, glossy, and just slightly tacky. If it sticks like bubblegum, dust in another teaspoon of cocoa; if it cracks like dry earth, knead in a teaspoon of plant milk. This next part? Pure magic.
- Portion the dough using a mini cookie scoop or a heaping teaspoon. Roll between your palms into tight, ping-pong-sized spheres. Don’t be shy—pressure equals smoothness, and smoothness equals professional vibes. Line them on a parchment sheet and pop the tray into the freezer for ten minutes. That quick chill firms the fat so the truffles hold their shape when dipped; skip it and you’ll watch them slump like sad snowmen.
- While the truffles chill, melt your dark chocolate. Chop it first so it melts evenly—big chunks scorch at the edges while the centers stay stubbornly solid. Microwave in 20-second bursts, stirring like you’re whisking away bad memories. When only tiny lumps remain, let residual heat finish the job; this prevents the scorched, bitter edge that screams amateur hour.
- Now the fun part: spike your cornflakes. Pour them into a wide bowl and lightly crush by pressing your palms down—think “confetti,” not “powder.” You want irregular shards that will stand up like dragon scales. Keep the flakes close to your chocolate so you can move fast; chocolate sets quicker than you can say “Instagram.”
That’s it—you did it. But hold on, I’ve got a few more tricks that’ll take this to another level...
Insider Tricks for Flawless Results
The Temperature Rule Nobody Follows
Room-temperature cream cheese blends without lumps, but room-temperature chocolate seizes into gritty misery. Keep the cheese cozy and the chocolate cool until the moment they need to switch places. If your kitchen feels like August in New Orleans, chill the melted chocolate bowl for thirty seconds between dipping sessions; it rewards you with glassy shells that snap like a winter twig.
Why Your Nose Knows Best
When the cocoa aroma hits you first, sharp and earthy, the biscuits are blitzed just right. If you smell toasted nuts, you’ve crossed into over-processed territory where the crumbs start releasing oils and your truffles will grease out later. Trust the sniff test; it’s saved me from more kitchen fails than any timer.
The 5-Minute Rest That Changes Everything
After rolling the truffles but before freezing, let them sit uncovered for five minutes. This brief skin-dry prevents condensation, which can turn your chocolate coat cloudy. A friend tried skipping this step once—let’s just say her pinecones looked like they’d been through a hailstorm.
Scale Like a Pro
Double the batch? Triple? No problem—just work in shallow bowls so the chocolate stays fluid. Deep, narrow vessels trap heat and can scorch the edges while the center cools. Think pasta plate, not cereal bowl, and you’ll dip faster than the chocolate can misbehave.
Creative Twists and Variations
This recipe is a playground. Here are some of my favorite ways to switch things up:
Orange-Cardamom Forest
Add half a teaspoon of orange zest and a pinch of ground cardamom to the biscuit crumbs. The citrus lifts the chocolate, while the spice whispers of Scandinavian forests. Dip in 70% chocolate and spike with crushed candied orange peel for extra glam.
Salted Caramel Crunch
Swap cocoa powder for a tablespoon of vegan caramel sauce and a fat pinch of flaky salt. The caramel loosens the dough, so dust in an extra teaspoon of biscuit crumbs if it feels too soft. Roll in crushed pretzel sticks instead of cornflakes for a salty-sweet double punch.
Mocha Hazelnut Snowcaps
Blend a teaspoon of espresso powder into the cream cheese and fold in chopped toasted hazelnuts. After dipping, roll in finely grated vegan white chocolate shavings so they look like snow-dusted pinecones kissed by moonlight.
Spiced Pumpkin Patch
Stir in half a teaspoon of pumpkin spice and a tablespoon of pumpkin purée. The purée adds moisture, so compensate with an extra spoon of biscuit crumbs. Finish with a whisper of cinnamon in the icing sugar snow.
Coconut-Almond Beachcones
Use coconut cream cheese, swap cocoa powder for toasted coconut flour, and roll in crushed toasted almonds. The tropical vibe tastes like a truffle vacation, and the almonds mimic tiny driftwood shards—perfect for summer potlucks.
White Chocolate Wonderland
Dip in melted vegan white chocolate tinted with matcha for a mossy green hue. Spike with puffed quinoa instead of cornflakes so they look like miniature pinecones dusted with emerald snow. Kids lose their minds over the color; adults lose their minds over the crunch.
Storing and Bringing It Back to Life
Fridge Storage
Line an airtight tin with parchment, layer truffles in a single layer, and slip in a silica packet if you’re fancy (or just a pinch of rice wrapped in muslin to absorb rogue moisture). They’ll keep seven days without flavor fade; after that the cornflakes start to sag, but the truffle center stays luscious. Add a tiny splash of water? Nope—water is the enemy of crunch. Instead, revive tired flakes by blasting the truffles under a hair-dryer on cool for ten seconds right before serving. The heat re-crispies without melting the chocolate.
Freezer Friendly
Flash-freeze on a tray until solid, then tumble into a zip bag with as much air sucked out as your lungs allow. They’ll keep a month, though I dare you to forget them that long. Thaw five minutes at room temp; any longer and condensation spots the shells. For a texture twist, eat them half-frozen—like truffle gelato bonbons.
Best Reheating Method
There’s no reheating, per se, but if they’ve been in a chilly car and the chocolate has bloomed streaky, set the tin on top of the radiator while you make coffee. The gentle warmth restores sheen without melting the spikes. Serve on a chilled slate board so they stay snappy through the last bite.