I remember the night I accidentally turned my kitchen into a science experiment. I had been craving banana bread, but the pantry was a barren wasteland—no butter, no eggs, just a lonely jar of peanut butter and a handful of overripe bananas. I threw everything together, whisked, baked, and emerged with a loaf that tasted like a peanut butter dream cloud. That disaster taught me one thing: the right combination of humble ingredients can turn a kitchen mishap into a culinary triumph. Now, I’m here to share the ultimate peanut butter banana bread that will make you question why you ever settled for ordinary.
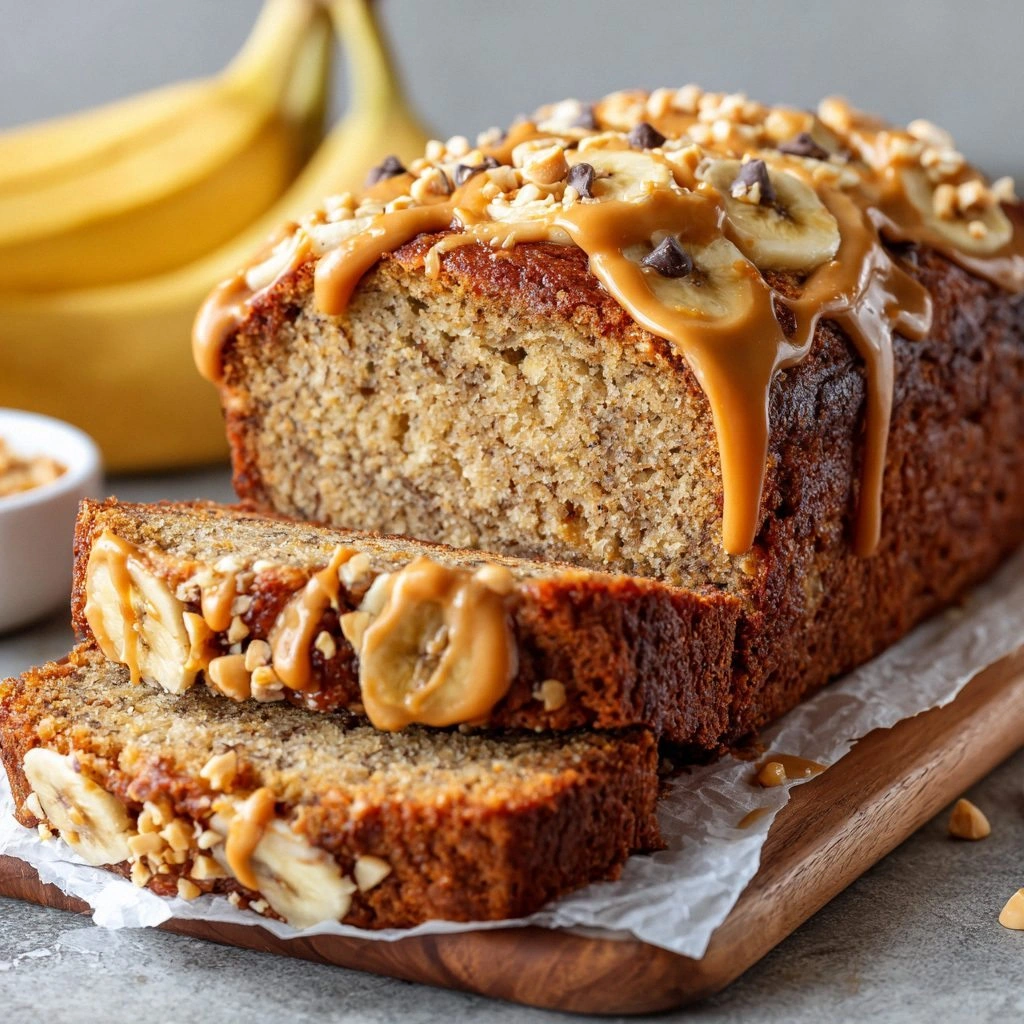
Picture this: you pull the loaf from the oven, and the aroma of toasted bananas mingles with the rich, nutty perfume of peanut butter. The crust is a golden, slightly crisp shell that gives way to a moist, airy interior that practically melts in your mouth. The first bite is a burst of sweet banana, followed by a creamy peanut butter undertone that lingers like a soft echo. The texture is a delightful contrast—crisp on the edges, velvety inside, and a subtle crunch from the optional walnuts. That sensory experience is what sets this recipe apart from the countless variations you’ve seen online.
What makes this version stand out? I didn’t just tweak a recipe; I engineered a flavor profile that balances protein, carbs, and healthy fats, all while keeping the baking process simple enough for a busy weekday. I added a splash of Greek yogurt for moisture and protein, swapped honey for a touch of natural sweetness, and used a blend of whole wheat and all-purpose flour to give the loaf a hearty bite without compromising on softness. The result? A loaf that’s dense enough to satisfy a breakfast crowd yet light enough to pair with a cup of coffee or a glass of milk. And trust me, once you taste this, I dare you to go back for seconds.
Now, let me walk you through every single step. By the end, you’ll wonder how you ever made it any other way. From the precise mix of ingredients to the timing that keeps the loaf from drying out, I’ll reveal all the secrets. And if you’re thinking this is just another banana bread recipe, think again—this one is hands down the best version you’ll ever make at home.
What Makes This Version Stand Out
- Taste: The marriage of sweet bananas and salty peanut butter creates a flavor profile that’s both comforting and sophisticated. The subtle hint of vanilla and the gentle caramelization of honey elevate the overall taste.
- Texture: A moist, airy crumb with a slightly crisp crust—achieved by the right balance of wet and dry ingredients and a controlled bake time.
- Protein Boost: Greek yogurt and peanut butter add a protein punch that turns this loaf into a post-workout snack or a wholesome breakfast.
- Ingredient Quality: Using high‑grade peanut butter and fresh bananas ensures depth of flavor and natural sweetness.
- Make‑Ahead Potential: The loaf keeps well for up to five days in the fridge, and it freezes beautifully for longer storage.
- Ease of Prep: No pre‑baked crusts, no complex layers—just one bowl, one mixer, and a few measured steps.
Alright, let's break down exactly what goes into this masterpiece...
Inside the Ingredient List
The Flavor Base
All-purpose flour, whole wheat flour, and baking soda form the backbone of the loaf’s structure. The combination of flours gives the bread a hearty bite while keeping it tender. Baking soda is the secret that leavens the batter, creating that light, airy crumb. If you skip the baking soda, the loaf will be dense and flat, losing that signature lift.
The Texture Crew
Greek yogurt, melted butter, and eggs bring moisture and richness to the batter. Greek yogurt adds a slight tang that balances the sweetness and contributes protein. Melted butter gives the loaf a glossy sheen and a buttery mouthfeel. Eggs act as a binder, holding the loaf together while providing structure. If you omit the eggs, the loaf will fall apart during baking.
The Unexpected Star
Peanut butter is the star that gives this loaf its distinctive flavor. Creamy peanut butter provides a silky texture and a nutty undertone that pairs perfectly with banana. The honey or maple syrup adds natural sweetness and helps achieve a golden crust. Swapping honey for maple syrup gives a subtle maple flavor that many love.
The Final Flourish
Vanilla extract, salt, and optional add‑ins such as walnuts or chocolate chips finish the loaf. Vanilla enhances the overall flavor, while salt balances the sweetness and brings out the peanut butter’s richness. Walnuts add a satisfying crunch and a dose of healthy fats, but if you’re allergic, simply omit them. Chocolate chips are optional for those who crave a sweet, decadent twist.
Everything's prepped? Good. Let's get into the real action...
The Method — Step by Step
- Preheat your oven to 350°F (175°C). Line a 9x5-inch loaf pan with parchment paper or lightly grease it with butter. The parchment ensures easy removal, and the butter adds a subtle flavor to the crust.
- In a large mixing bowl, whisk together the all-purpose flour, whole wheat flour, baking soda, and salt. This dry blend is the foundation that will keep the loaf from collapsing.
- In a separate bowl, mash the ripe bananas until they form a smooth puree. Stir in the peanut butter until fully incorporated. The combination should look like a thick, glossy batter—no lumps.
- Add the melted butter, honey (or maple syrup), Greek yogurt, eggs, and vanilla extract to the banana-peanut butter mixture. Whisk until the wet ingredients are smooth and the batter is homogenous. You’ll notice a slight sheen from the butter.
- Gently fold the dry flour mixture into the wet batter using a spatula. Be careful not to overmix; a few streaks are acceptable. Overmixing can develop gluten and result in a tough loaf.
- If you’re adding walnuts or chocolate chips, fold them in now. This ensures even distribution without sinking to the bottom of the pan.
- Transfer the batter to the prepared loaf pan, smoothing the top with a spatula. Tap the pan lightly on the counter to release any air bubbles, which helps the loaf rise evenly.
- Place the pan in the preheated oven and bake for 30 minutes. After 25 minutes, check the loaf: it should emit a warm, toasted aroma and the edges should pull away slightly from the pan. If the top browns too quickly, tent it with foil.
- Once baked, remove the loaf from the oven and let it rest in the pan for 10 minutes. This rest period allows the crumb to set and makes slicing easier.
- Transfer the loaf to a wire rack to cool completely. Cutting through a hot loaf can cause it to crumble, so wait until it’s room temperature.
That's it—you did it. But hold on, I've got a few more tricks that'll take this to another level...
Insider Tricks for Flawless Results
The Temperature Rule Nobody Follows
Many bakers bake at 375°F, but this loaf thrives at 350°F. A lower temperature allows the batter to rise evenly, ensuring a soft crumb and preventing a burnt crust. I’ve tried 375°F and the loaf came out unevenly browned and slightly dry. Stick to 350°F for consistent results.
Why Your Nose Knows Best
During the baking process, trust your nose. When the loaf emits a warm, toasted banana aroma, it’s a sign that the interior is cooking through. If you’re unsure, gently press the top; it should feel firm but give slightly. This sensory cue saves you from overbaking.
The 5-Minute Rest That Changes Everything
After removing the loaf from the oven, let it rest in the pan for 5 minutes. This pause allows steam to redistribute, creating a tender crumb. Skipping this step often results in a crumb that’s too dry and crumbly.
Use a Loaf Pan with a Lid
If you have a loaf pan with a removable lid, cover the loaf during the last 10 minutes of baking. The lid traps steam, keeping the loaf moist and giving it a glossy finish. It also prevents the crust from becoming too dark.
Add a Splash of Water Before Reheating
When reheating leftover slices, sprinkle a few drops of water on the bread and microwave for 10–15 seconds. This tiny splash steams the bread, restoring its softness and preventing it from becoming chewy.
Creative Twists and Variations
This recipe is a playground. Here are some of my favorite ways to switch things up:
Chocolate‑Chunk Delight
Swap the walnuts for a cup of dark chocolate chips. The chocolate adds a rich, bittersweet depth that pairs beautifully with the banana and peanut butter. This version is a hit with kids and adults alike.
Nutty Crunch
Add half a cup of toasted pecans or almonds. The crunch adds texture and a nutty aroma that complements the peanut butter. Toast the nuts beforehand to bring out their natural oils.
Spiced Banana Bread
Stir in 1/2 teaspoon of cinnamon and a pinch of nutmeg. The warm spices elevate the flavor profile, making the loaf feel cozy and comforting—perfect for a chilly morning.
Low‑Sugar Version
Replace honey with a sugar‑free sweetener like stevia or monk fruit. You’ll still get a moist loaf, but with fewer calories—great for those watching their sugar intake.
Vegan Variation
Use flaxseed “eggs” (1 tablespoon ground flaxseed + 3 tablespoons water) instead of eggs, and swap dairy yogurt for coconut yogurt. The loaf remains moist, and the flavor stays true to the original.
Protein Powerhouse
Add a scoop of vanilla whey protein powder to the dry mix. This boosts the protein content without altering the taste. It’s perfect for a post‑workout snack.
Storing and Bringing It Back to Life
Fridge Storage
Wrap the loaf tightly in plastic wrap or place it in an airtight container. Store in the refrigerator for up to five days. The loaf stays moist and develops deeper flavor as it ages.
Freezer Friendly
Slice the loaf before freezing. Wrap each slice in plastic wrap and then place in a freezer bag. Freeze for up to three months. This way, you can grab a slice whenever you need a quick snack.
Best Reheating Method
For the freshest taste, toast the slices in a toaster or oven at 350°F for 5 minutes. If you prefer a softer texture, microwave on medium power for 10–15 seconds, then let it sit for a minute. Add a tiny splash of water before microwaving to keep the bread from drying out.