I still remember the day I almost threw my mixer out the window. There I was, attempting yet another "foolproof" cheesecake recipe for my best friend's bridal shower, when the filling curdled, the crust stuck to the pan like cement, and the whole thing tasted like sweetened cardboard. As I stood in my kitchen, surrounded by broken dreams and cream cheese splatters, I declared war on mediocre cheesecake. Fast forward through three weeks of obsessive testing, a small fortune in dairy products, and one very patient UPS driver who delivered more pomegranates than any human should legally own — and here we are. These Pomegranate & Mint Cheesecake Towers aren't just a recipe; they're my delicious revenge against every disappointing dessert that's ever let you down.
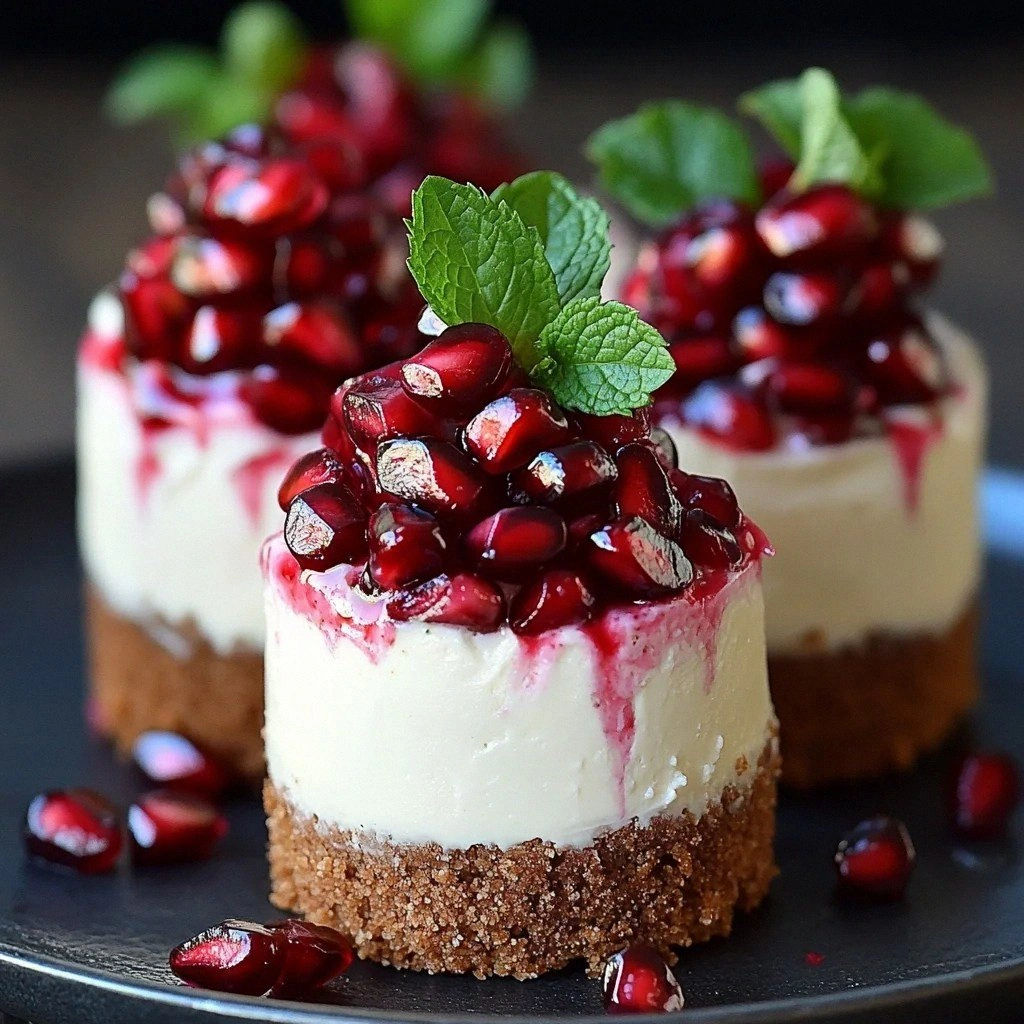
Picture this: delicate layers of creamy mint-kissed cheesecake stacked like edible architecture, crowned with ruby pomegranate seeds that burst like tiny flavor fireworks. The first bite stops conversations mid-sentence. I've seen it happen — the room goes quiet, eyes close involuntarily, and suddenly everyone's reaching for another before they've even swallowed the first. The contrast between the cool, refreshing mint filling and the tart-sweet pomegranate creates this dance party on your palate that makes other desserts seem positively boring by comparison.
Here's what makes these towers absolutely irresistible: they're individual portions that look like they came from a fancy patisserie, but they're actually easier to make than a regular cheesecake. No water baths, no worrying about cracks, no crossing your fingers and praying to the dessert gods. Just pure, foolproof deliciousness that'll make you look like a pastry wizard. I dare you to taste this and not go back for seconds — actually, I dare you to stop at seconds.
The secret weapon? We're using a technique that sounds almost too simple to work, but trust me here. Instead of baking one big cheesecake and hoping for the best, we're creating these gorgeous individual towers that set up perfectly every single time. The mint isn't just a garnish either — it's infused throughout the creamy filling, creating this refreshing note that makes the pomegranate pop even harder. Stay with me here — this is worth it. Let me walk you through every single step — by the end, you'll wonder how you ever made it any other way.
What Makes This Version Stand Out
Individual Perfection: Forget slicing disasters and uneven portions. Each tower is its own perfectly portioned masterpiece that looks like it came from a five-star restaurant but requires zero pastry school training. The presentation alone will make your guests think you secretly trained in Paris.
Mint That Actually Tastes Like Mint: Most recipes add a few sad mint leaves as decoration and call it a day. We're infusing real mint extract throughout the entire filling, creating a cooling sensation that plays beautifully against the rich cream cheese. It's like a breath mint and dessert had a beautiful baby.
Pomegranate Power: Those ruby gems aren't just pretty — they bring a tart pop that cuts through the richness like a skilled surgeon. The juice stains everything it touches, but that burst of flavor is worth a few pink fingers. Most recipes get this completely wrong by using too-sweet fruit toppings.
No-Bake Magic: That's right — no oven required. This recipe works its magic in the fridge, eliminating every single cheesecake anxiety: no cracks, no sinking middles, no "is it done yet?" paranoia. The texture sets up like silk, and you'll look like a dessert genius.
Make-Ahead Champion: These towers actually taste better after an overnight rest, making them the ultimate dinner party weapon. Picture yourself pulling these out of the fridge, the pomegranate seeds glistening like edible jewels, while your guests wonder when you became this sophisticated.
Texture Paradise: We're talking about a crust that shatters like thin ice under your fork, giving way to creamy filling so smooth it should be illegal. Then come the pomegranate seeds, adding pops of juicy crunch that keep every bite interesting. Most recipes get this completely wrong by ignoring textural contrast.
Color That Pops: The pale green mint filling against those ruby pomegranate seeds creates a visual that's practically art. Your Instagram will thank you, but more importantly, your taste buds will throw a party. If you've ever struggled with desserts that look as boring as they taste, you're not alone — and I've got the fix.
Alright, let's break down exactly what goes into this masterpiece...
Inside the Ingredient List
The Flavor Base
Cream cheese forms the luxurious foundation of our towers, and here's where quality absolutely matters. Splurge on the full-fat, brick-style cream cheese — not the whipped stuff in tubs. The bricks have less air incorporated, which means denser, richer filling that holds its shape like a champ. When softened properly, it whips up cloud-light while maintaining that signature tang that makes cheesecake addictive. Skip the low-fat imposters; they create a sad, grainy texture that'll have you questioning all your life choices.
Mint extract brings the refreshing zing that makes these towers memorable, but here's where precision matters. Too little and you'll wonder why you bothered; too much and you'll feel like you swallowed toothpaste. The one teaspoon measurement hits that sweet spot where the mint enhances rather than overwhelms. If you're feeling adventurous, fresh mint works too — just steep it in warm cream, then chill and strain for a more subtle, sophisticated flavor.
The Texture Crew
Graham cracker crumbs create our crust's backbone, but they need to be properly prepped for maximum impact. Pulse them in a food processor until they resemble coarse sand — no big chunks that'll create weak spots in your crust. The sugar in the mix isn't just for sweetness; it helps the crust bind and caramelizes slightly for extra flavor. When mixed with melted butter, these crumbs transform into a crust that holds together without being rock-hard.
Butter is the glue that holds our crust universe together, but temperature matters more than you'd think. Melted butter coats each crumb evenly, creating perfect adhesion when pressed into your molds. Use unsalted butter so you control the salt level — salted butter can make the crust taste like a butter cracker, which fights with our delicate mint filling.
The Unexpected Star
Pomegranate seeds are the crown jewels that elevate these towers from pretty to spectacular. Fresh seeds give you that burst of juice and crunch that dried fruit could never achieve. When selecting your pomegranate, look for ones that feel heavy for their size — that means more juicy seeds inside. The seeds not only provide visual drama but their tartness balances the rich filling in a way that'll make your taste buds sing.
The Final Flourish
Green gel food coloring is completely optional, but it adds that visual cue that something special is happening. A tiny amount creates the palest mint green that whispers "fresh" without screaming artificial. Start with the tiniest dot on a toothpick — you can always add more, but you can't take it away. The color should be barely there, like the ghost of mint past.
Everything's prepped? Good. Let's get into the real action...
The Method — Step by Step
- Start with your cream cheese — and I cannot stress this enough — it must be room temperature. Cold cream cheese is the enemy of smooth filling, creating lumps that no amount of mixing will fix. Unwrap your blocks and let them sit on the counter for at least two hours, or if you're impatient like me, microwave unwrapped blocks for 15 seconds per side. When properly softened, the cream cheese should dent easily when pressed but still hold its shape. This is the foundation of everything, so don't rush this step.
- While your cream cheese softens, let's tackle the crust. Combine your graham cracker crumbs, sugar, and melted butter in a medium bowl, stirring until the mixture resembles wet sand that holds together when squeezed. The texture should be evenly moistened with no dry pockets — think of building sandcastles at the beach. Press this mixture into your individual molds or ramekins, using the bottom of a glass to create an even layer. Press firmly but not aggressively — you're creating a solid foundation, not compacting concrete.
- Now comes the fun part — creating the filling that'll make people propose marriage. Beat your softened cream cheese until it's completely smooth and fluffy, about 3-4 minutes on medium speed. Scrape down the bowl religiously — any unmixed cream cheese hiding at the bottom will create lumps in your finished towers. Add the sugar gradually, beating until fully incorporated and the mixture looks like thick clouds. The sugar not only sweetens but helps stabilize the filling, so don't be tempted to reduce it.
- Here's where the magic happens — adding the mint extract and vanilla. The vanilla rounds out the mint, preventing it from tasting like toothpaste while enhancing the overall flavor complexity. Add your extracts and beat just until combined — overbeating here can make the filling too airy. If using food coloring, add it now, a tiny dot at a time, until you achieve the palest mint green. The color should whisper mint, not scream it from the rooftops.
- Spoon or pipe your filling into the prepared crusts, smoothing the tops with an offset spatula or the back of a spoon. Don't overfill — leave about 1/4 inch at the top for the pomegranate crown. Tap the molds gently on the counter to release any air bubbles that might create unsightly holes in your finished towers. The filling should mound slightly in the center, creating a gentle dome that'll hold your pomegranate jewels perfectly.
- Now we wait — but not idly. Cover each tower loosely with plastic wrap, making sure it doesn't touch the surface of the filling. Into the refrigerator they go for at least 4 hours, but overnight is where the real magic happens. During this chill time, the flavors meld and deepen, the filling sets to that perfect silky texture, and you become the hero who planned ahead. I'll be honest — I ate half the batch before anyone else got to try them during my first test run.
- The final flourish — and this is where timing matters. Wait until just before serving to add your pomegranate seeds. Their juice will bleed into the filling if added too early, creating pink streaks that, while pretty, muddy the clean presentation we're after. Scatter the seeds artfully across the top, letting some tumble down the sides for that effortless, just-fell-this-way look. The contrast between pale green filling and ruby seeds should make your heart skip a beat.
- Okay, ready for the game-changer? Let the towers sit at room temperature for 10-15 minutes before serving. This slight warming takes the chill off and allows the flavors to bloom fully. The filling softens just enough to become ethereally light while maintaining its shape. Serve them on small plates with a few extra pomegranate seeds scattered around for that restaurant-quality presentation that'll have everyone asking which bakery you visited.
That's it — you did it. But hold on, I've got a few more tricks that'll take this to another level...
Insider Tricks for Flawless Results
The Temperature Rule Nobody Follows
Room temperature isn't just a suggestion — it's the difference between cheesecake nirvana and a lumpy disaster. When cream cheese is properly softened, it incorporates air more efficiently, creating that light, mousse-like texture we're after. Cold cream cheese fights back, creating stubborn lumps that even the most powerful mixer can't conquer. Set a timer for two hours before you plan to start — your future self will thank you when the filling comes together like silk.
Why Your Nose Knows Best
Here's a confession: I used to add mint extract by measuring, but now I go by scent. When the mixture smells like a fresh spring morning after rain — bright, clean, and invigorating — you've hit the sweet spot. If you can smell mint from across the kitchen, you've gone too far. The scent should entice, not overwhelm. This sensory check has saved me from mint overload more times than I can count.
The 5-Minute Rest That Changes Everything
After mixing your filling, let it rest for five minutes before assembling. This brief pause allows any incorporated air to settle, preventing bubbles in your finished towers. It also gives the flavors a moment to begin melding — think of it as a flavor getting-to-know-you session. During this time, you can clean up your workspace or prepare your pomegranate seeds, making the most of every minute.
The Crust Compression Secret
Most recipes tell you to press the crust firmly, but here's what they don't mention: press too hard and you'll need a jackhammer to break through. The secret is using the heel of your hand to apply even pressure, then switching to a flat-bottomed glass for the final compression. The crust should hold together when squeezed but still yield easily to a fork. A friend tried skipping this nuance once — let's just say it didn't end well, and dental work was discussed.
Creative Twists and Variations
This recipe is a playground. Here are some of my favorite ways to switch things up:
The Chocolate Mint Marvel
Replace half the graham cracker crumbs with chocolate cookie crumbs for a mint-chocolate experience that'll remind you of Girl Scout cookies. Add a tablespoon of cocoa powder to the filling for a subtle chocolate note that plays beautifully with the mint. Top with chocolate shavings along with the pomegranate seeds for extra visual drama.
The Tropical Escape
Swap the mint extract for coconut extract and replace pomegranate with diced fresh mango. The tropical flavors transport you to a beach vacation, even if you're eating these in your kitchen on a Tuesday. Toasted coconut flakes on top add another layer of texture and flavor that makes these feel like a destination dessert.
The Citrus Burst
Replace mint extract with lemon extract and add a teaspoon of finely grated lemon zest to the filling. Top with candied lemon peel and pomegranate seeds for a sophisticated flavor profile that balances tart, sweet, and creamy. These are particularly stunning for spring gatherings when you want something that tastes like sunshine.
The Berry Beautiful
Keep the mint but swap pomegranate for a mix of fresh raspberries and blueberries. The berries create a more traditional flavor profile while maintaining that gorgeous color contrast. A drizzle of honey over the berries just before serving adds shine and brings out their natural sweetness.
The Adult Version
Add a tablespoon of pomegranate liqueur to the filling for an extra layer of flavor that makes these towers dinner-party worthy. The alcohol cooks off during the setting process, leaving behind a sophisticated depth that has guests asking for your secret ingredient. Just don't tell them it's as simple as a splash of booze.
The Mini Marvel
Use mini muffin tins instead of individual molds for bite-sized towers that are perfect for cocktail parties. The smaller size means they set faster, and guests can pop them whole. Everything's cuter in miniature, and these tiny towers disappear faster than you can say "pomegranate."
Storing and Bringing It Back to Life
Fridge Storage
These towers are fridge champions, keeping beautifully for up to five days when stored properly. Cover each individual tower with plastic wrap, making sure it doesn't touch the pomegranate topping to prevent the seeds from bleeding color into the filling. Store them on a flat shelf, not the door, where temperature fluctuations could compromise the texture. The flavors actually deepen and improve after the first day, making these perfect for advance preparation.
Freezer Friendly
Here's a secret: these towers freeze like dreams for up to two months. Freeze them without the pomegranate topping, wrapped tightly in plastic wrap and then foil. When ready to serve, thaw overnight in the refrigerator, then add fresh pomegranate seeds just before serving. The texture remains perfect, and you'll have an impressive dessert ready whenever unexpected guests appear. Pro tip: freeze them in the molds for easy storage, then unmold when ready to serve.
Best Reheating Method
While these are served chilled, sometimes you want to refresh them after storage. Remove from refrigerator 15-20 minutes before serving to take the chill off — this isn't about warming them up but allowing the flavors to bloom. If the crust seems a bit soft from storage, you can refresh it by placing the towers under a hot broiler for 30-45 seconds, but watch them like a hawk. This technique crisps the crust without affecting the filling's perfect texture.