I was in the middle of a frantic holiday prep when a batch of burnt chocolate cookies turned into a crisis I could have sworn would ruin my reputation as the “dessert queen” of my friend group. The kitchen smelled like smoke, the timer had gone off with a shriek, and I was staring at a pan of charcoal that could have doubled as a makeshift charcoal grill. In that moment I swore I’d never touch chocolate again, but then a stray peppermint candy cane fell into the mess, and the scent of mint cut through the burnt bitterness like a cool breeze on a scorching day. I thought, “What if I could harness that minty spark and turn this disaster into something unforgettable?” That thought sparked the birth of the ultimate Chocolate Peppermint Cookie Cups that melt in your mouth.
Picture this: a warm, glossy chocolate shell that gives way to a silky, peppermint‑kissed cream that slides across your tongue as if it were a velvet curtain. The aroma that fills the kitchen is a heady mix of deep cocoa, buttery richness, and a hint of wintery mint that makes you feel like you’ve stepped into a cozy cabin after a fresh snowfall. You’ll hear the faint crackle of the cookie edges pulling away from the pan, see the glossy sheen of the melted chocolate, feel the coolness of the cream as you slice into the cup, and taste a symphony of sweet, bitter, and minty notes that dance together in perfect harmony. It’s a sensory overload that will make you gasp, grin, and immediately reach for another.
Most cookie cup recipes I’ve tried either end up soggy, too sweet, or lacking that “melt‑in‑your‑mouth” magic. The secret here is a combination of two types of cocoa powder—Dutch‑processed for a smooth, mellow base and black cocoa for an intense, almost espresso‑like depth—plus a carefully balanced ratio of butter and sugars that creates a crisp yet tender shell. The peppermint isn’t just a garnish; it’s woven into the cream cheese filling, giving each bite a refreshing punch that cuts through the richness without overpowering it. And the candy cane shards on top? They add a satisfying crunch that’s like tiny fireworks exploding in your mouth.
I’ll be honest — I ate half the batch before anyone else got a chance to try it, and I’m still not over it. I dare you to taste this and not go back for seconds; it’s hands down the best version you’ll ever make at home. Okay, ready for the game‑changer? Let me walk you through every single step — by the end, you’ll wonder how you ever made it any other way.
What Makes This Version Stand Out
- Texture: The cookie shell cracks like delicate ice when you bite in, while the interior stays soft enough to melt on contact. This contrast is the hallmark of a truly indulgent treat.
- Flavor Depth: Using both Dutch‑processed and black cocoa creates a layered chocolate profile that’s richer than any single‑cocoa recipe.
- Mint Integration: Peppermint extract is folded into the cream cheese filling, ensuring every bite carries that cool, refreshing note without feeling artificial.
- Simplicity: Despite the sophisticated taste, the ingredient list is short and the steps are straightforward—no fancy equipment required.
- Crowd Reaction: Guests constantly ask for the “secret” and end up begging for the recipe; it’s a guaranteed conversation starter at any gathering.
- Ingredient Quality: High‑fat butter and real cream cheese give the cookies a luxurious mouthfeel that shortcuts can never mimic.
- Bake‑And‑Hold: These cups freeze beautifully, so you can make them ahead of time and still enjoy that fresh‑baked crunch later.
- Visual Appeal: The candy‑cane shards on top add a festive pop of color that makes them Instagram‑ready without any extra effort.
Inside the Ingredient List
The Flavor Base
All‑Purpose Flour is the structural backbone of the cookie, providing just enough gluten to hold the cup together without making it tough. If you substitute cake flour, the cups become crumbly; if you go for whole‑wheat, you’ll introduce a nutty undertone that competes with the chocolate. I always reach for a brand that’s bleached, because the lighter color helps the cocoa pigments shine through. When measuring, spoon the flour into the cup and level it off; packing it can lead to dense, heavy cups.
Cocoa Powder (Dutch‑processed) offers a mellow, less acidic chocolate flavor that blends seamlessly with butter and sugar. It’s the reason the shells have that glossy, deep‑brown hue. If you only have natural cocoa, add a pinch of baking soda to neutralize acidity, but expect a slightly brighter color. For the black cocoa, think of it as the espresso shot of the chocolate world—just a quarter cup adds a bold, almost smoky note that makes the flavor feel adult‑sophisticated.
The Texture Crew
Unsalted Butter, softened but not melted, creates a tender crumb that spreads just enough to form a thin, crisp edge. Using salted butter would throw off the delicate balance, making the cookies taste oddly briny. Granulated Sugar and Brown Sugar work together: the white sugar caramelizes for crunch, while the brown sugar adds moisture and a subtle molasses undertone. If you prefer a less sweet version, you can reduce each by a tablespoon, but the texture will be slightly drier.
Eggs act as the binder, giving the dough elasticity and helping the cups rise just enough to form a shallow dome. Large eggs are ideal; if you only have medium, add a splash of milk to make up the volume. The combination of Baking Soda and Salt is the leavening duo that ensures the cups puff just enough without becoming cake‑like. Too much soda and you’ll get a metallic aftertaste; too little and the cups stay flat.
The Unexpected Star
Heavy Cream is the secret weapon in the filling, turning the cream cheese into a luxuriously smooth mousse. It also adds a buttery richness that balances the peppermint’s cool bite. If you’re out of heavy cream, you can substitute half‑and‑half, but the filling won’t be as airy. The Cream Cheese must be at room temperature; cold cheese will clump and ruin the silky texture.
Peppermint Extract is the flash of winter that cuts through the chocolate’s depth. A teaspoon is enough to perfume the entire batch without overwhelming the palate. If you’re wary of artificial flavors, look for a pure oil‑based extract or even crush a few fresh peppermint leaves—just be careful with the potency.
The Final Flourish
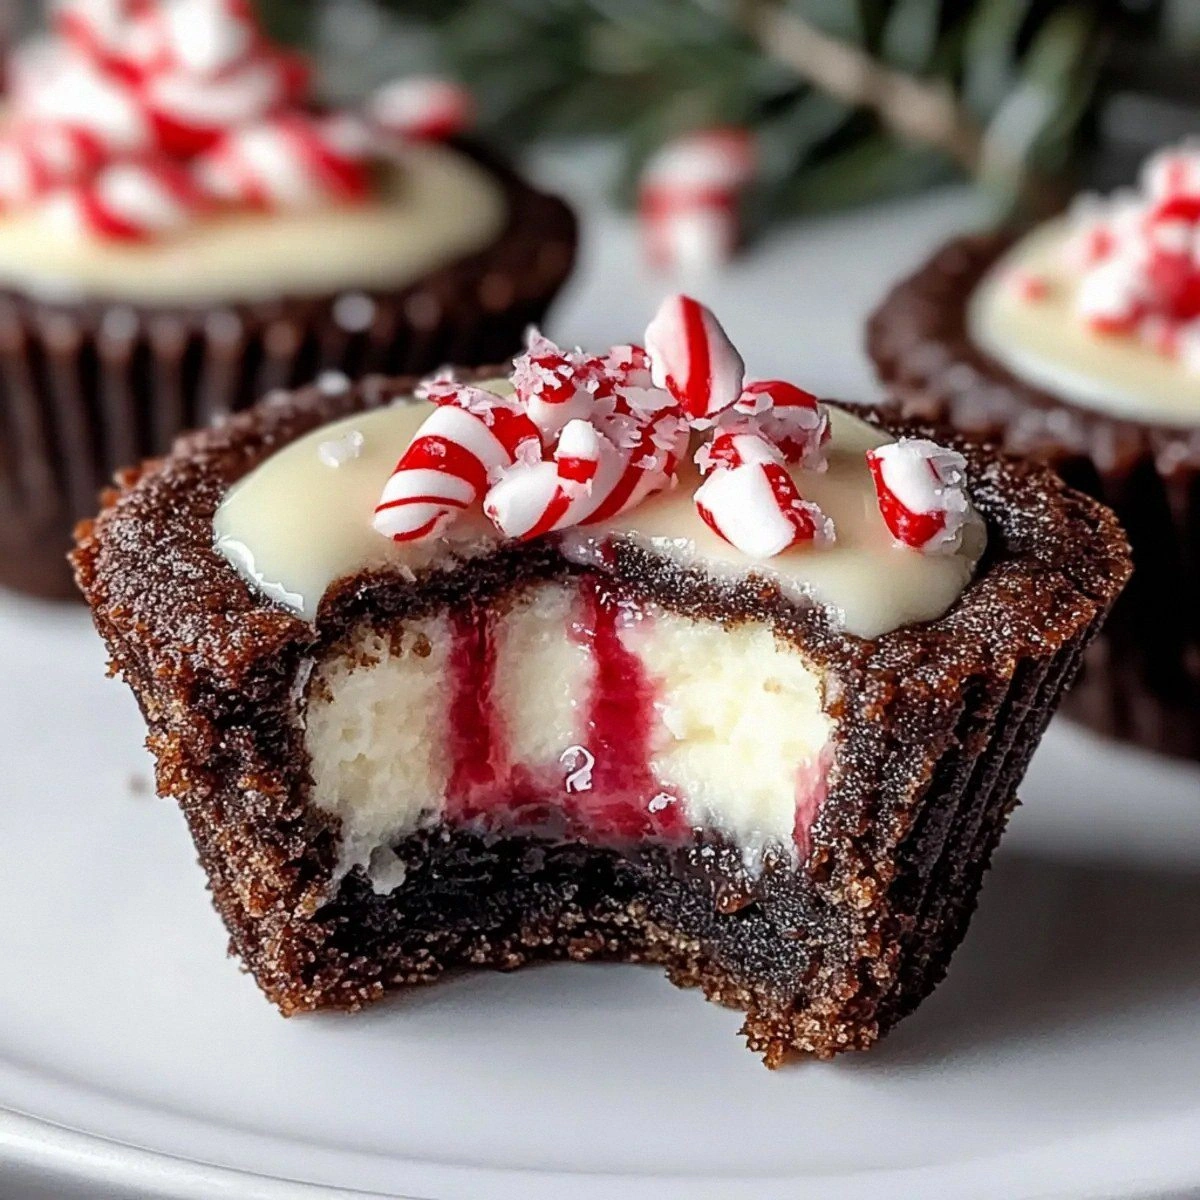
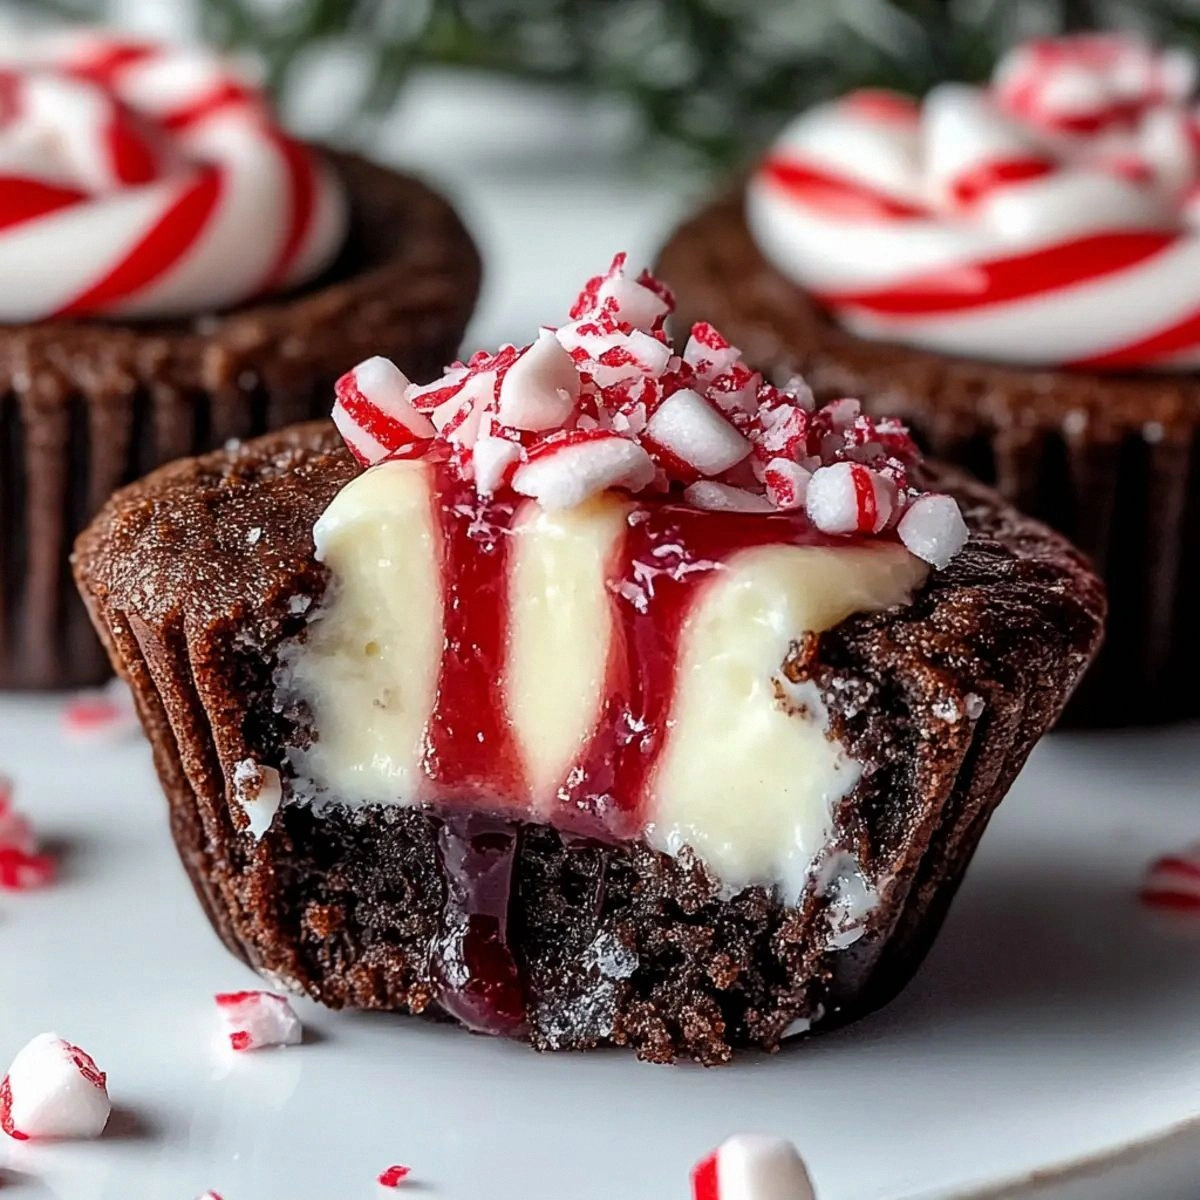
Candy Canes, finely crushed, serve both as garnish and as a crunchy surprise hidden inside the cup. Their red and white speckles add visual drama, while the peppermint crystals amplify the minty aroma with each bite. For a non‑holiday version, substitute crushed white chocolate or toasted almond slivers.
Everything's prepped? Good. Let’s get into the real action…
The Method — Step by Step
Preheat your oven to 350°F (175°C) and line a standard muffin tin with parchment paper or silicone liners. The heat should be steady; any fluctuation will cause the cups to crack unevenly. When the oven door shuts, you’ll hear a faint “whoosh” as the hot air circulates—trust that sound, it’s the first sign of success.
Kitchen Hack: Place the muffin tin on a baking sheet; this prevents the pan from warping and makes it easier to slide the cups out later.In a large bowl, whisk together the flour, both cocoa powders, baking soda, and salt. The dry mixture should look like a dark, velvety sand. Sift it once to eliminate any lumps; this ensures the cups will have a uniform texture.
In a separate bowl, beat the softened butter with the granulated and brown sugars until the mixture is light, fluffy, and pale in color—about 3 minutes on medium speed. You’ll notice the mixture thickening and the scent of caramel starting to emerge; that’s the sugar caramelizing just enough.
Watch Out: Over‑beating can incorporate too much air, causing the cups to puff up then collapse. Stop once the mixture looks smooth and glossy.Add the eggs one at a time, beating well after each addition, then stir in the vanilla and peppermint extracts. The batter should become glossy and slightly thick, with a faint mint aroma that makes your kitchen feel like a candy shop.
Gradually fold the dry ingredients into the wet mixture using a spatula. Mix just until you see no streaks of flour; over‑mixing will develop gluten and make the cups tough. The dough will be thick, almost like a brownie batter, and that’s exactly what we want.
Scoop about two tablespoons of dough into each muffin cup, pressing the dough up the sides to form a sturdy shell. Use the back of a spoon to smooth the tops; they should be slightly domed. This step is crucial—if the walls are too thin, the cups will break when you fill them later.
Bake for 10‑12 minutes, or until the edges start to pull away from the pan and the tops have a faint crackle. The scent will shift from raw chocolate to a toasted, buttery perfume. Do not open the oven door early; the sudden temperature drop can cause the cups to collapse.
While the shells are cooling, whip the cream cheese, heavy cream, and peppermint extract together until light and airy—about 2 minutes on high speed. The mixture should double in volume and form soft peaks that hold their shape when the whisk is lifted.
Once the shells are completely cool (touch them; they should feel firm, not warm), pipe or spoon the peppermint cream into each cup, filling them to the brim. Sprinkle crushed candy cane pieces over the top while the filling is still soft; the mint will melt slightly, creating a glossy finish.
Kitchen Hack: Chill the filled cups for 15 minutes before serving; this firms the cream and makes the cups easier to lift without breaking.Serve immediately or store as directed below. When you bite into a cup, the chocolate shell should give a delicate snap, the cream should melt like silk, and the candy cane crunch should surprise you like fireworks. And now the fun part—watch your guests devour them in seconds.
That's it — you did it. But hold on, I've got a few more tricks that'll take this to another level...
Insider Tricks for Flawless Results
The Temperature Rule Nobody Follows
Never bake cookie cups straight from a cold fridge. Let the dough sit at room temperature for 10 minutes before filling the tin; this prevents the edges from shrinking too fast, which can cause cracks. I once tried the “cold‑dough” shortcut and ended up with cup walls that collapsed like a house of cards. The right temperature gives you that perfect, even rise.
Why Your Nose Knows Best
Your sense of smell is a more reliable indicator than a timer when it comes to the perfect bake. When the edges start to emit a toasted, nutty aroma and you can hear a faint sigh as the heat escapes, the cups are ready. Trust that scent; it’s the secret handshake between a baker and a perfect cookie.
The 5‑Minute Rest That Changes Everything
After baking, let the shells rest on a wire rack for exactly five minutes before filling. This short pause lets the steam escape, preventing the interior from becoming soggy. A friend once skipped this step and complained that the cups were “soggy on the inside.” Don’t make that mistake.
The Cream Whisper
When whipping the cream cheese filling, start on low speed to combine ingredients, then finish on high. This prevents the cream from separating and ensures a cloud‑like texture. If you over‑whip, you’ll get a grainy consistency that feels more like butter than mousse.
Candy Cane Crunch Control
Crush candy canes just before using them. The longer they sit crushed, the more moisture they absorb, losing their crunch. A quick pulse in a zip‑top bag does the trick and keeps the shards crisp until they meet the creamy filling.
Creative Twists and Variations
This recipe is a playground. Here are some of my favorite ways to switch things up:
Mocha Madness
Swap half of the black cocoa for finely ground espresso powder and add a splash of coffee liqueur to the filling. The result is a sophisticated coffee‑chocolate combo that will impress even the most discerning caffeine addicts.
White Chocolate Wonderland
Replace the cocoa powders with an equal amount of white chocolate chips melted into the butter mixture. Add a few drops of almond extract to the filling for a nutty twist. The final product looks like a snow‑capped mountain of minty goodness.
Spicy Peppermint
Add a pinch of cayenne pepper to the dry ingredients and a dash of chili‑infused chocolate to the batter. The heat pairs unexpectedly well with the cool peppermint, creating a flavor roller‑coaster that’s both daring and delicious.
Nutty Noel
Fold finely chopped toasted hazelnuts into the dough and sprinkle extra hazelnut pieces on top of the filling. The nutty crunch complements the mint and adds an earthy depth that feels like a holiday market in your mouth.
Vegan Velvet
Swap butter for coconut oil, use coconut cream instead of heavy cream, and replace cream cheese with a vegan cream cheese alternative. The texture changes slightly but the mint‑chocolate harmony remains intact, making it suitable for plant‑based guests.
Storing and Bringing It Back to Life
Fridge Storage
Place the cooled cups in an airtight container and store them in the refrigerator for up to 5 days. The chocolate shell stays crisp, and the peppermint cream firms up, making each bite even more melt‑in‑your‑mouth.
Freezer Friendly
Wrap each cup individually in parchment paper, then seal them in a zip‑top freezer bag. They’ll keep for up to 2 months. When you’re ready to serve, let them thaw in the fridge for an hour, then let them sit at room temperature for 15 minutes before enjoying.
Best Reheating Method
To revive that fresh‑baked snap, pop the cups on a low oven rack at 300°F (150°C) for 5‑7 minutes. Add a tiny splash (about a teaspoon) of water to the bottom of the tray; the steam will re‑moisturize the shell without making it soggy, and the filling will become luxuriously soft again.