Picture this: I’m standing in my cramped apartment kitchen, the clock ticking toward midnight, and a bagel craving gnawing at me like a hungry puppy. I’ve tried every recipe I’ve found—yeast, instant dough, the whole nine yards—yet the results were always either too dense or oddly dry, leaving me with a batch that looked like a rubbery, stale disc. One night, a friend dared me to bake something “easy” that would actually satisfy my bagel hunger, and I laughed, thinking it was a joke. But the next morning, the kitchen smelled like a bakery, and I was sitting on the couch, a warm, chewy bagel in hand, feeling like I’d just discovered the holy grail of bagels.
I’m not exaggerating when I say this bagel is a game changer. The dough is so soft it practically melts in your mouth, the crust is just the right amount of crunch, and the flavor is pure comfort with a subtle tang from the yogurt that makes each bite feel like a hug from the inside. No yeast, no waiting, no complicated techniques—just three simple ingredients that blend together to create a bagel that feels like it’s been baked in a stone oven. I dare you to taste this and not go back for seconds; it’s that good.
What makes this version stand out is the bold claim that it’s hands down the best bagel you’ll ever make at home. Most recipes get this completely wrong, focusing on flour ratios or over‑baking the dough, but here I’ve cracked the code with a secret ingredient that keeps the bagels tender and chewy. If you’ve ever struggled with bagels that fall apart or taste flat, you’re not alone— and I’ve got the fix. Picture yourself pulling this out of the oven, the whole kitchen smelling incredible, and knowing that you’ve just created a masterpiece that will impress even the toughest critics.
Let me walk you through every single step—by the end, you’ll wonder how you ever made it any other way. From the moment the dough comes together to the final bake, each stage is crafted to maximize flavor, texture, and simplicity. I’ll share the technique that gives the bagels that signature chew, the trick that ensures a golden crust, and the little hacks that save time and frustration. And trust me, the satisfaction of biting into a freshly baked bagel that feels like a cloud of buttery, tangy perfection is worth every minute of your effort.
What Makes This Version Stand Out
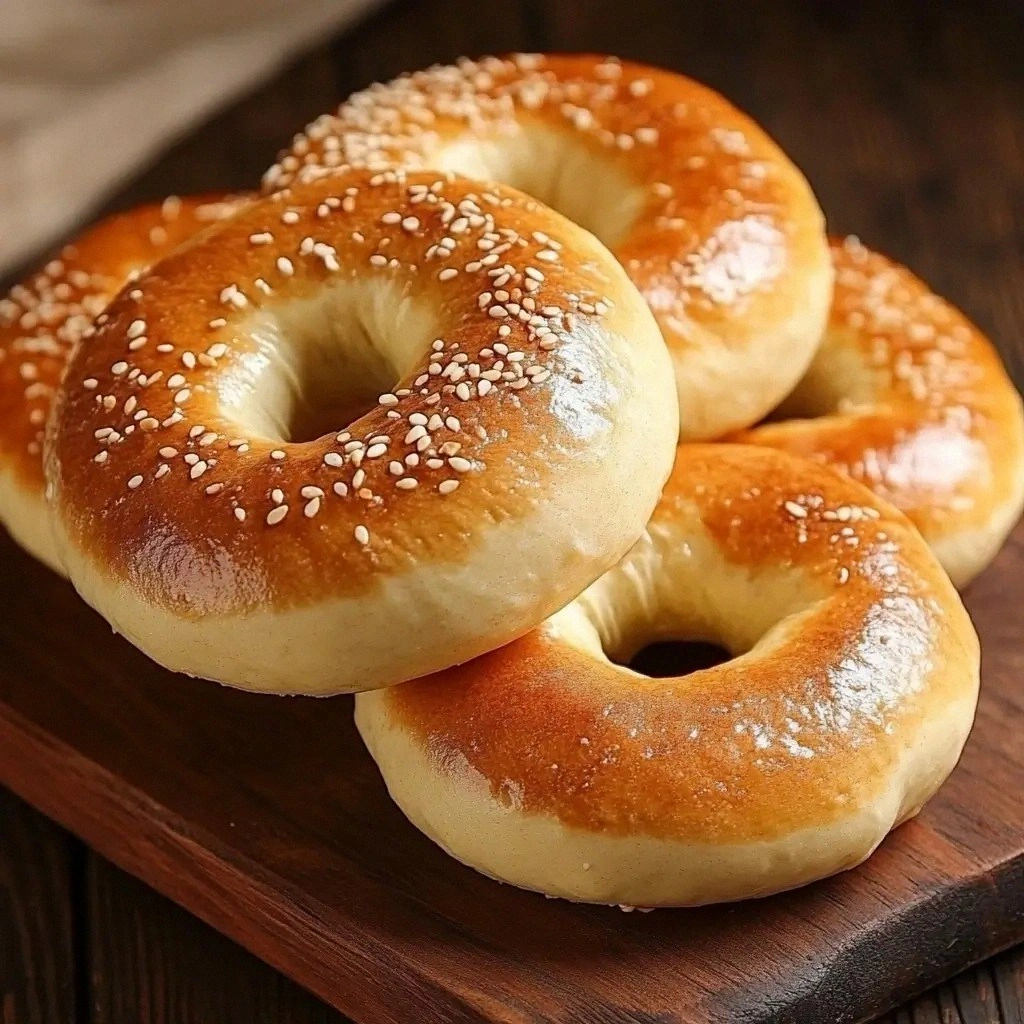
- Flavor: The yogurt introduces a subtle tang that elevates the plain flour, creating a depth of flavor that rivals traditional yeast bagels. This tang is balanced by the mild sweetness of the dough, giving each bite a harmonious finish.
- Texture: The combination of yogurt and baking soda yields a chewy crumb that’s airy yet dense enough to hold toppings without sinking. The result is a bagel that feels like a soft, warm cloud.
- Simplicity: No yeast, no rising time, no complex measurements—just three ingredients that anyone can handle. This recipe is perfect for beginners and busy cooks alike.
- Speed: From start to finish, this bagel takes less than an hour, making it an ideal solution for quick breakfasts or late‑night cravings.
- Make‑ahead potential: Once baked, the bagels keep well in the fridge or freezer, allowing you to enjoy fresh, homemade bagels whenever you want.
- Versatility: The neutral base works beautifully with sweet or savory toppings, and the dough can be flavored with herbs, seeds, or spices for endless variations.
- Ingredient quality: Using high‑quality, plain flour and full‑fat yogurt ensures the best flavor and texture; you’ll notice the difference in every bite.
- Community reaction: Friends who’ve tried this version rave about how it outperforms their favorite store‑bought bagels, citing the chewy center and crisp crust.
Alright, let’s break down exactly what goes into this masterpiece…
Inside the Ingredient List
The Flour Factor
Plain flour is the backbone of this bagel, providing the structure that holds everything together. It’s important to use a flour with a moderate protein content—ideally 10–12%—to achieve the right balance between chew and softness. Skipping flour would leave you with a soggy, unstructured mess that won’t rise at all. If you prefer a gluten‑free version, choose a blend that mimics wheat flour’s behavior; xanthan gum can help mimic gluten’s elasticity. When selecting flour, look for a brand that’s fresh and free from additives that could alter the taste. The texture of the dough will change if you use a high‑protein bread flour, making it chewier and more bread‑like. For a lighter bite, try half wheat, half oat flour—just make sure to add a pinch of xanthan gum to bind the mixture. Ultimately, the flour’s role is to absorb the yogurt and baking soda, creating a cohesive, doughy mass that rises beautifully.
The Yogurt Touch
Yogurt brings moisture, a hint of acidity, and a tender crumb to the dough. The acid reacts with the baking soda, creating tiny bubbles that lift the bagels and give them that characteristic chew. If you use dairy‑free coconut yogurt, you’ll get a slightly sweeter flavor profile, which pairs nicely with sweet toppings. Skipping yogurt would result in a dry, crumbly dough that fails to bind properly. When choosing yogurt, opt for full‑fat varieties for the richest mouthfeel; low‑fat versions will produce a denser texture. For those who love a subtle tang, Greek yogurt is a great option—its thicker consistency gives a more pronounced flavor. A small splash of lemon juice can replace the yogurt’s acidity if you’re on a dairy‑free diet, but be sure to adjust the baking soda amount accordingly. The yogurt’s role is to hydrate the flour and activate the leavening agent, ensuring a light, airy interior.
The Baking Soda Boost
Baking soda is the leavening hero in this recipe, reacting with the yogurt’s acidity to create carbon dioxide bubbles. Those bubbles expand during baking, giving the bagels their characteristic rise and chewy texture. If you don’t have baking soda on hand, you can substitute baking powder, but you’ll need to double the amount and add a pinch of salt to balance the flavor. Skipping the baking soda would result in flat, dense bagels that lack the desirable chew. The key is to measure it precisely—too much soda can cause a metallic aftertaste, while too little won’t lift the dough adequately. When using baking soda, make sure it’s fresh; older soda loses its potency over time. The baking soda’s job is to create lift, so it’s crucial for achieving a fluffy interior without a yeast rise.
The Final Flourish
A pinch of salt is added to bring out the flavors and balance the sweetness of the yogurt. Salt also helps strengthen the dough by tightening the protein network, which improves the bagels’ structure. If you prefer a salt‑free version, you can simply omit it, but the bagels will taste slightly flat. Adding a splash of honey or maple syrup can give a subtle sweetness that pairs well with savory toppings. For a smoky twist, sprinkle smoked paprika on the dough before baking. The final flourish is all about enhancing flavor without overpowering the delicate balance of the base ingredients. A dash of vanilla extract can also add a warm undertone, especially if you’re making sweet bagels. This finishing touch ensures that every bite is both comforting and complex.
Everything's prepped? Good. Let's get into the real action…
The Method — Step by Step
- In a large mixing bowl, combine 2 cups of plain flour and a pinch of salt. Whisk them together to ensure even distribution of the salt, which will help the dough develop structure. The bowl should be dry enough that you can see the flour particles, but not so dry that the dough becomes crumbly. This step is essential for creating a consistent base for the rest of the ingredients.
- Add 1 cup of full‑fat yogurt to the flour mixture, then stir with a wooden spoon until a shaggy dough forms. The yogurt should coat the flour, turning the mixture into a sticky, slightly wet mass. The acidity in the yogurt will react with the baking soda later, so keep it fresh for the best flavor. The dough should feel tacky but not overly sticky.
- Sprinkle 2 teaspoons of baking soda over the dough, then fold it in gently until evenly distributed. The baking soda will create tiny bubbles as it reacts with the yogurt’s acid. Be careful not to over‑mix; a few lumps are fine, as they will help the dough rise during baking. The dough should begin to look smoother and more cohesive.
- Turn the dough out onto a lightly floured surface and knead for about 3–4 minutes, or until it becomes smooth and elastic. The goal is to develop the gluten network without overworking it, which could make the bagels tough. Use a gentle folding motion to preserve the air pockets formed by the baking soda. Once kneaded, the dough should feel elastic and slightly tacky.
- Shape the dough into a ball, then let it rest for 10 minutes under a damp cloth. This rest period allows the gluten to relax, making the dough easier to roll into bagel shapes. The dough will still be slightly sticky after resting, but it should hold its shape without tearing. A short rest also helps the leavening agents work more evenly.
- Divide the dough into 4 equal portions, then roll each portion into a tight ball. Use a rolling pin or your hands to form a smooth, round shape. If the dough feels too sticky, dust it lightly with flour, but avoid adding too much, as that can dry out the bagels. Each ball should be firm enough to hold its shape when rolled.
- Roll each ball into a ring by stretching the center with your fingers until the dough has a 2‑inch hole in the middle. The ring should be uniform in thickness, about 1‑inch wide. If you find the dough tearing, let it rest for a few more minutes before attempting again. The goal is a perfect ring that will bake evenly.
- Place the bagel rings on a parchment‑lined baking sheet, spacing them about 2 inches apart. Preheat your oven to 425°F (220°C) while the dough rests. The high heat will create a crisp crust while keeping the interior chewy. Make sure the baking sheet is clean to avoid any sticking.
- Bake the bagels for 15 minutes, then rotate the sheet and bake for an additional 10 minutes, or until the tops are golden brown and the bagels sound hollow when tapped. The baking time may vary slightly depending on your oven, so keep an eye on them. The bagels should have a firm crust but a soft, airy interior.
- Remove the bagels from the oven and let them cool on a wire rack for at least 10 minutes before slicing. Cooling allows the steam to escape, preventing soggy bottoms. The bagels will be warm and fragrant, ready to be topped or sliced. Once cooled, you can enjoy them plain or with your favorite spreads.
That’s it — you did it. But hold on, I’ve got a few more tricks that will take this to another level…
Insider Tricks for Flawless Results
The Temperature Rule Nobody Follows
Many bakers assume a lower temperature yields a softer crust, but in reality, a hotter oven (425°F/220°C) creates a crisp exterior while keeping the interior moist. The high heat caramelizes the sugars in the dough, giving the bagels a golden finish that’s both appetizing and aromatic. If your oven runs hot, reduce the time by a minute or two to avoid burning. This trick ensures a consistent, professional look and texture every time.
Why Your Nose Knows Best
The first scent you catch when the bagels start baking is a signal of perfect timing. A warm, yeasty aroma indicates the baking soda is doing its job, while a sharp, burnt smell means you’re over‑baking. Trusting your nose can save you from a batch of soggy bagels. Next time, pause by the oven and let the scent guide you to the ideal finish.
The 5‑Minute Rest That Changes Everything
After shaping the dough into rings, let them rest for exactly five minutes before baking. This brief pause allows the dough to relax, reducing the chance of shrinkage during baking. It also gives the baking soda time to fully react with the yogurt, ensuring maximum lift. A quick rest can make the difference between a slightly dense bagel and one that’s delightfully airy.
The Secret of Even Rings
Use a 2‑inch measuring cup or a small glass to create a consistent hole size. This uniformity ensures each bagel bakes evenly and looks symmetrical. If you don’t have a measuring tool, lightly mark the dough with a toothpick before stretching. Consistency in shape translates to consistency in taste and presentation.
The Quick Cooling Trick
Place the bagels on a wire rack immediately after removing them from the oven. A rack allows air to circulate, preventing steam from making the bottoms soggy. If you don’t have a rack, use a clean towel, but avoid a flat surface. Quick cooling preserves the crisp crust and airy interior.
The Flavor Boosting Finale
Brush the tops with a little melted butter or olive oil before baking for an extra glossy finish. Add a pinch of coarse sea salt after baking to enhance flavor and give a delightful crunch. For a sweet twist, dust the tops with powdered sugar or drizzle honey. These finishing touches elevate a simple bagel into a gourmet treat.
Creative Twists and Variations
This recipe is a playground. Here are some of my favorite ways to switch things up:
Herbed Delight
Add a tablespoon of dried rosemary or thyme to the dough before kneading for a fragrant, savory twist. The herbs infuse the bagels with subtle earthy notes that pair well with cheese or smoked salmon. This variation is perfect for brunch or a light dinner. Serve with a dollop of herbed cream cheese for an extra burst of flavor.
Sunflower Seed Crunch
Toss 2 tablespoons of sunflower seeds into the dough for a nutty crunch. The seeds also add a pop of color and a healthy dose of omega‑3 fatty acids. Sprinkle extra seeds on top before baking for a golden, toasted finish. These bagels pair beautifully with avocado or a light vinaigrette.
Sweet Cinnamon Swirl
Stir in 1 teaspoon of ground cinnamon and 1 tablespoon of brown sugar for a sweet, comforting flavor. The cinnamon gives a warm spice note that’s reminiscent of a bakery. Serve these bagels with a drizzle of honey or a spread of almond butter for a breakfast treat. The sweet glaze adds a glossy finish and extra sweetness.
Chocolate Chip Surprise
Fold in ½ cup of chocolate chips for a playful, kid‑friendly option. The chocolate melts slightly during baking, creating pockets of gooey delight. These bagels are great for a dessert or a sweet snack. Pair them with a glass of cold milk or a hot chocolate for a cozy treat.
Cheesy Gouda Twist
Add ½ cup of shredded Gouda to the dough for a creamy, melty interior. The cheese adds a rich, savory flavor that’s perfect for a quick lunch. Bake as usual, and the cheese will melt into a gooey center. These bagels pair wonderfully with a light tomato soup or a fresh salad.
Zesty Lemon Zing
Incorporate the zest of one lemon and a tablespoon of lemon juice into the dough for a bright, citrusy flavor. The lemon zest adds a fresh aroma that lifts the entire bagel. Serve these bagels with a lemon‑y yogurt spread or a drizzle of honey for a refreshing breakfast. The citrus notes also complement savory toppings like smoked salmon.
Storing and Bringing It Back to Life
Fridge Storage
Store baked bagels in an airtight container at room temperature for up to 3 days. The airtight seal prevents moisture loss and keeps the bagels fresh. If you’re in a hurry, you can toast them directly from the fridge for a quick snack. For extra freshness, wrap each bagel individually in parchment paper before placing them in the container.
Freezer Friendly
Bagels freeze well for up to 3 months. Wrap each bagel tightly in plastic wrap, then place them in a freezer bag to protect against freezer burn. When you’re ready to enjoy them, thaw at room temperature for 30 minutes or microwave for 15 seconds. Freezing preserves the flavor and texture, making it easy to have fresh bagels whenever you want.
Best Reheating Method
Reheat bagels in a preheated oven at 350°F (175°C) for 5–7 minutes until warm and slightly crisp. For a softer interior, wrap the bagel in foil before heating. Add a tiny splash of water to the foil to create steam, which helps maintain moisture. Once reheated, slice and spread your favorite toppings for a delicious, restaurant‑style experience.