I was standing in a kitchen that smelled like burnt toast and regret, watching a pot of quinoa sputter on the stove. The moment I realized the quinoa was overcooked, I felt a pang of disappointment that could have turned into a culinary catastrophe. But then a friend tossed me a handful of fresh bell peppers and whispered, “Let’s turn that into something unforgettable.” That single dare sparked a recipe that would rescue the day and redefine what a vegetable pilaf could be. I was determined to prove that even a disaster can become a dish that wins hearts. And that’s where the journey to this gluten‑free quinoa & vege began.
The air was thick with the sweet aroma of caramelizing onions, the faint citrus of lemon, and the earthy scent of fresh parsley drifting from the cutting board. My ears rang with the sizzle of garlic in hot olive oil, a sound that promised transformation. The sight of the vibrant carrots, bright green zucchini, and ruby‑red peppers arranged like a painter’s palette sent a thrill through my fingertips. My tongue tingled at the promise of a tangy finish, and the texture of the quinoa, soft yet resilient, whispered of a satisfying bite. I could almost feel the crunch of the vegetables as they softened, the steam rising like a cloud of flavor. This sensory tapestry was a reminder that cooking is an orchestra, and every ingredient plays a crucial note.
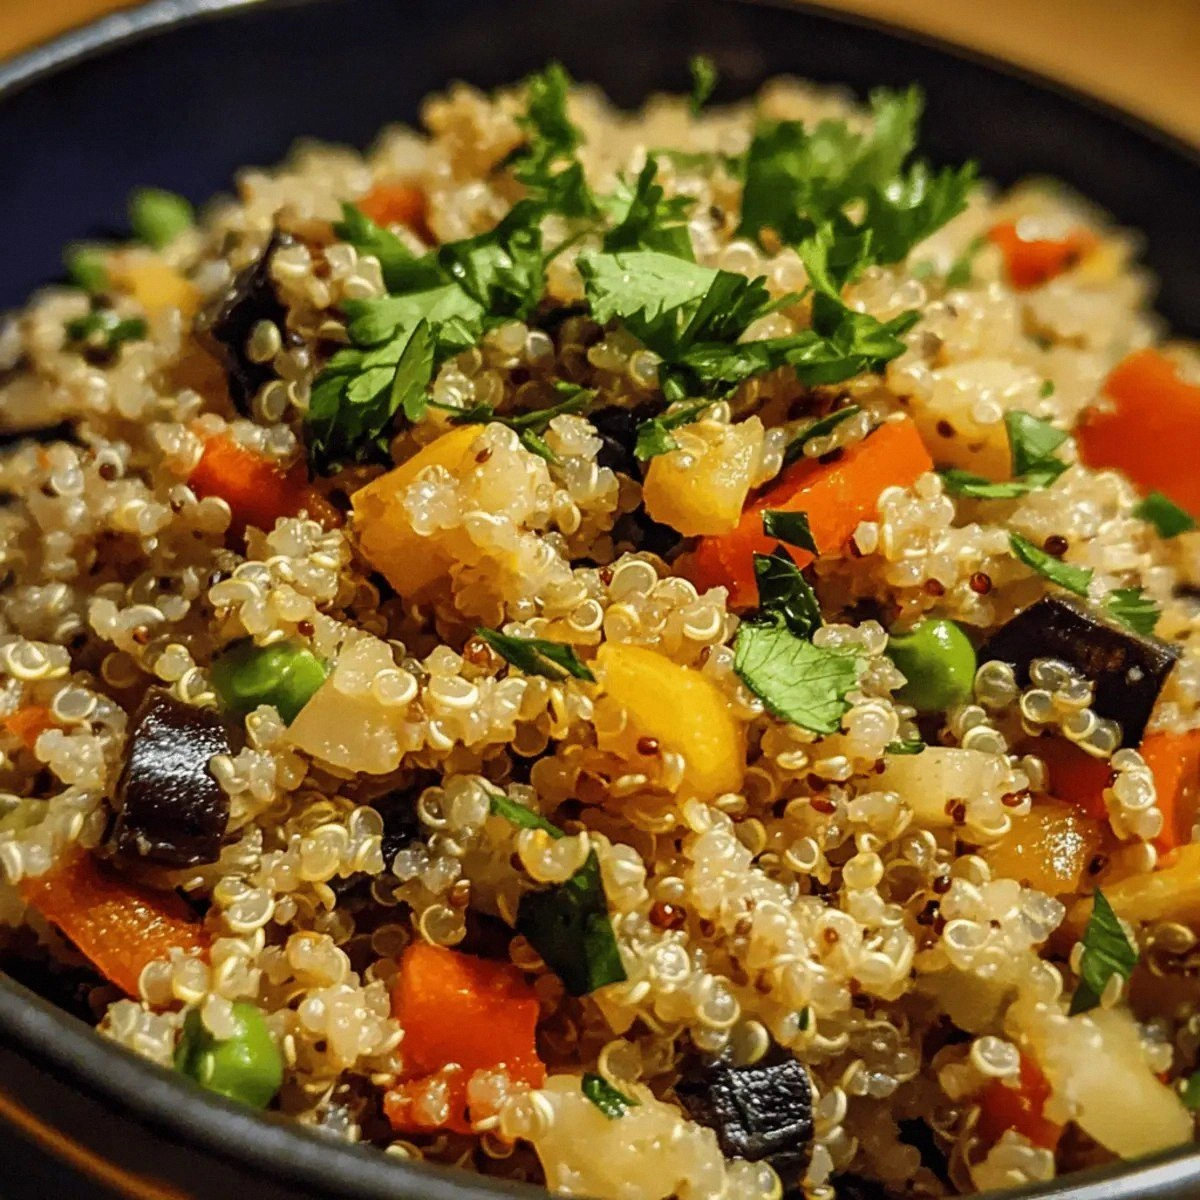
What makes this version stand out is that it marries the wholesome heartiness of quinoa with a burst of fresh vegetables, all while staying gluten‑free and incredibly simple. The broth is not just a liquid; it’s a flavor conduit that carries the subtle nuttiness of quinoa and the bright zing of lemon through every grain. The use of a single tablespoon of olive oil keeps the dish light without sacrificing depth. The vegetables are chopped to the same size, ensuring even cooking and a harmonious mouthfeel. And the finishing touch—handfuls of parsley and a squeeze of lemon—creates a bright, almost citrusy crescendo that lifts the entire dish. I dare you to taste this and not go back for seconds. This is hands down the best version you'll ever make at home.
I’ll be honest—I ate half the batch before anyone else got to try it. Most recipes get this completely wrong by over‑seasoning or under‑cooking the quinoa, but here we strike that perfect balance. Picture yourself pulling this out of the pan, the whole kitchen smelling incredible, and the steam curling like a fragrant halo. And now the fun part: we’re about to walk through every single step, so by the end you’ll wonder how you ever made it any other way. Stay with me here—this is worth it.
What Makes This Version Stand Out
- Taste: The dish is a symphony of flavors, from the nutty quinoa to the bright citrus notes, all balanced with a gentle savory base.
- Texture: Each vegetable retains a satisfying bite while the quinoa remains fluffy, creating a contrast that’s both comforting and exciting.
- Simplicity: With only a handful of ingredients and a straightforward method, this recipe is a breeze for beginners and a reliable go‑to for seasoned cooks.
- Uniqueness: The combination of lemon, parsley, and a single tablespoon of olive oil gives a fresh twist that sets it apart from ordinary pilafs.
- Crowd Reaction: Guests often comment on how the dish feels like a light dinner yet satisfies like a full meal—ideal for parties or family dinners.
- Ingredient Quality: Using organic quinoa and fresh, seasonal vegetables ensures a superior flavor profile and nutritional boost.
- Cooking Method: The quick sauté followed by a gentle simmer locks in moisture without overcooking, preserving nutrients.
- Make‑Ahead Potential: The pilaf can be prepared ahead of time and reheated without losing its vibrant taste or texture.
Alright, let’s break down exactly what goes into this masterpiece…
Inside the Ingredient List
The Flavor Base
The foundation of this pilaf begins with a splash of olive oil that coats the aromatics, allowing them to release their full flavor. The minced garlic and diced onion sauté until translucent, creating a fragrant bed that carries the subtle sweetness of the vegetables. Vegetable broth, a low‑sodium option if you’re watching the salt, infuses the dish with depth and acts as the liquid medium that cooks the quinoa. If you prefer a richer profile, a splash of vegetable stock or a drizzle of soy sauce can add umami without compromising the gluten‑free nature of the meal.
The Texture Crew
Quinoa is the star of this dish, offering a protein‑rich, gluten‑free grain that is both versatile and quick to cook. Rinsing it before cooking removes the saponins, which can otherwise impart a bitter taste. The diced carrots, bell peppers, and zucchini are cut into uniform bite‑sized pieces, ensuring they cook evenly and maintain a pleasant chew. If you’re in a hurry, pre‑cut frozen vegetables can be used, but fresh produce delivers a brighter flavor and better texture. The combination of crunchy vegetables and fluffy quinoa creates a satisfying mouthfeel that feels both hearty and light.
The Unexpected Star
Fresh parsley isn’t just a garnish; it’s a bright, herbal counterpoint that lifts the dish’s overall profile. A ¼ cup of chopped parsley adds a clean, slightly peppery note that balances the richness of the olive oil. Lemon juice, just a tablespoon, introduces a bright acidity that cuts through the earthiness of the quinoa and vegetables, giving the pilaf a lively finish. If you’re craving a slightly sweeter finish, a pinch of sugar or a splash of apple cider vinegar can substitute for the lemon while maintaining acidity.
The Final Flourish
Salt and pepper are added to taste, but the key is to season gradually, tasting as you go to avoid over‑salting. A pinch of salt enhances every ingredient’s natural flavors, while freshly ground pepper adds a subtle heat that complements the fresh herbs. If you’re looking for a low‑salt alternative, a dash of sea salt or a sprinkle of salt-free seasoning can be used. The final drizzle of lemon juice at the end brightens the dish, while a handful of parsley adds a fresh, green pop that’s visually appealing.
Everything’s prepped? Good. Let’s get into the real action…
The Method — Step by Step
- Begin by rinsing one cup of quinoa under cold running water for 30 seconds, then drain well. The rinsing step removes the quinoa’s natural bitter saponin coating and reduces cooking time. Set the quinoa aside while you prepare the rest of the ingredients. This small step saves time and prevents bitterness. As you rinse, you’ll notice the water turning milky—proof that the saponins are being washed away. Once drained, the quinoa will have a clean, slightly nutty aroma.
- Heat one tablespoon of olive oil in a large skillet over medium heat until shimmering. Add one medium diced onion and two minced garlic cloves, sautéing until the onion is translucent and the garlic is fragrant, about 3 to 4 minutes. Stir frequently to prevent burning; the garlic should release a sweet, savory aroma. The base should smell toasty, indicating that the aromatics are ready to carry the rest of the flavors. If the oil starts to smoke, reduce the heat slightly. This step is the flavor foundation that will permeate the entire dish.
- Add the diced carrots, bell peppers, and zucchini to the skillet, stirring to coat them with the oil and aromatics. Cook for 5 minutes, or until the vegetables begin to soften but still retain a slight crunch. The colors will brighten, giving the dish a vibrant look. The vegetables should still feel firm when you press them gently with a spoon. This sauté step locks in the vegetables’ natural sugars, creating a subtle caramelization. The mixture should emit a fresh, garden‑like scent that’s utterly inviting.
- Add the rinsed quinoa to the skillet, stirring to toast it lightly for 2 minutes. Toasting the quinoa enhances its nutty flavor and adds a subtle crunch to the grains. You’ll notice the quinoa turning a pale golden color and releasing a nutty aroma. Stir constantly to prevent the quinoa from sticking to the pan. This brief toast step is essential for depth of flavor. After 2 minutes, the quinoa should feel coated in the olive oil and aromatics.
- Pour in two cups of vegetable broth, ensuring the liquid covers the quinoa and vegetables by about an inch. Bring the mixture to a gentle boil, then reduce the heat to low and cover the skillet with a tight‑fitting lid. The broth should bubble softly, creating steam that will cook the quinoa evenly. The liquid should look like a light, savory broth. Keep the heat low to avoid scorching the bottom. This step is where the quinoa will absorb the flavors.
- Let the mixture simmer for 15 minutes, or until the quinoa is tender and the liquid is absorbed. Check the texture by gently pressing a grain of quinoa; it should be fluffy and fully cooked. The vegetables should be tender but still retain a slight bite. The aroma will become rich and comforting, like a warm hug. If the liquid evaporates before the quinoa is fully cooked, add a tablespoon of water to finish. This is the moment of truth—watch the steam rise and the colors deepen.
- Remove the skillet from heat and fluff the pilaf with a fork, gently lifting the grains apart. Stir in one tablespoon of lemon juice and ¼ cup of chopped fresh parsley, letting the herbs wilt slightly from the residual heat. Taste and season with salt and pepper to your liking, remembering that the broth is already seasoned. The lemon should give a bright, almost citrusy finish that lifts the entire dish. The parsley adds a fresh, green pop that’s visually appealing. This final touch ensures every bite is balanced and lively.
- Let the pilaf rest for 5 minutes covered, allowing the flavors to meld and the steam to finish cooking the vegetables. During this time, the quinoa will continue to absorb any remaining moisture, becoming even fluffier. The rest period also allows the lemon and parsley to fully integrate into the dish. When you lift the lid, you’ll notice a fragrant steam curling upwards. This resting step is crucial for a perfectly textured pilaf.
- Serve hot, garnished with a sprinkle of parsley or a wedge of lemon on the side. Pair it with a light salad or a protein of your choice for a complete meal. The dish is versatile enough to be served as a main or a side. The bright flavors will linger on the palate, leaving you craving more. This is the moment you can proudly say, “I did it.” And you can do it again, every time.
That’s it—you did it. But hold on, I’ve got a few more tricks that will take this to another level. Let’s dive into insider tips that will elevate your pilaf from good to unforgettable.
Insider Tricks for Flawless Results
The Temperature Rule Nobody Follows
Many cooks keep the heat on low after adding the broth, but the secret is to let the mixture come to a full, gentle boil before reducing the heat. This brief high‑temperature burst ensures the quinoa grains are fully coated and the liquid is evenly distributed. I once left the heat too low and ended up with a mushy pilaf that lacked texture. By starting with a rolling boil, you lock in the quinoa’s natural fluffiness and keep the vegetables crisp.
Why Your Nose Knows Best
Don’t rely solely on the timer; let your nose guide you. When the broth is about to be fully absorbed, you’ll smell a subtle nutty aroma from the quinoa. If the scent is too strong, the grains might be overcooked; if it’s faint, give it a few more minutes. My friend once skipped the “taste” step and the pilaf turned out dry. Trust your senses, and the dish will come out perfect every time.
The 5‑Minute Rest That Changes Everything
After removing the skillet from heat, cover it and let the pilaf rest for exactly five minutes. This allows the steam to finish cooking the vegetables and the quinoa to settle, resulting in a more cohesive texture. Skipping this rest period often leaves the grains separated and the vegetables slightly undercooked. I’ve found that this simple pause turns a good dish into a great one.
A Splash of Water Before Reheating
Reheating the pilaf can dry it out if you’re not careful. Before microwaving or reheating on the stovetop, add a tablespoon of water and cover for a minute. The steam created will restore moisture and keep the grains fluffy. This trick is especially useful for leftovers or when you’re in a hurry.
Use Fresh Herbs for a Burst of Color
If you want a pop of color, add chopped cilantro or basil at the end instead of parsley. The fresh herbs will release bright, aromatic oils that complement the lemon. I once swapped parsley for cilantro, and the dish took on a bright, almost tropical vibe. Experimenting with herbs is a simple way to keep the recipe fresh and exciting.
Creative Twists and Variations
This recipe is a playground. Here are some of my favorite ways to switch things up:
Spicy Sriracha Kick
Add a teaspoon of sriracha or a pinch of red pepper flakes during the sauté phase to give the pilaf a gentle heat. The spice balances the sweetness of the carrots and peppers, creating a dynamic flavor profile. This version is perfect for those who like a little bite with their vegetables.
Mediterranean Medley
Swap the zucchini for sliced olives and add a handful of sun‑dried tomatoes. Finish with a drizzle of extra‑virgin olive oil and a sprinkle of oregano. This variation turns the dish into a Mediterranean‑inspired bowl that pairs wonderfully with grilled chicken or fish.
South‑West Fusion
Incorporate corn kernels and black beans, and season with cumin and smoked paprika. Toss in a handful of chopped cilantro after cooking. The earthy cumin and smoky paprika give the pilaf a bold, southwestern twist that’s both hearty and vibrant.
Nutty Almond Crunch
Top the finished pilaf with toasted slivered almonds and a drizzle of honey for a sweet‑savory contrast. The almonds add a satisfying crunch while the honey gives a subtle caramelized finish. This version is a delightful surprise for breakfast or a light dinner.
Protein‑Packed Power Bowl
Add a handful of cooked chickpeas or grilled tofu to the pilaf for an extra protein boost. Stir them in during the last five minutes of cooking so they warm through without losing shape. This variation turns the dish into a complete, balanced meal that satisfies both taste buds and nutritional goals.
Storing and Bringing It Back to Life
Fridge Storage
Cool the pilaf to room temperature before transferring it to an airtight container. Store in the refrigerator for up to four days. The quinoa will stay fluffy, and the vegetables will retain their color. When ready to eat, reheat gently on the stovetop or in the microwave.
Freezer Friendly
Divide the pilaf into portioned containers and freeze for up to three months. Thaw overnight in the refrigerator before reheating. Adding a splash of water or broth before reheating will help restore moisture and prevent dryness.
Best Reheating Method
Reheat the pilaf in a skillet over medium heat, stirring frequently. Add a tablespoon of water or vegetable broth, cover, and let steam for 3–4 minutes. The gentle heat ensures the quinoa remains fluffy, while the steam keeps the vegetables moist. Finish with a squeeze of fresh lemon to brighten the flavors.