Picture this: it’s a sweltering Saturday afternoon, the kind where the kitchen feels like a sauna and the only thing on your mind is a cold glass of lemonade. I was frantically rummaging through my pantry, cursing the fact that the only thing left in the fridge were a few wilted lettuce leaves and a sad, solitary tomato that had clearly seen better days. Suddenly, my roommate burst in, waving a crate of heirloom tomatoes like a trophy, shouting, “You have to try these! They’re practically screaming for a tart!” I stared at those jewel‑toned beauties—sun‑kissed reds, purples, and yellows—and felt a spark of inspiration ignite. That moment was the birth of the Heirloom Tomato Ricotta Tart that has since become my kitchen’s most bragged‑about showstopper.
The first bite is a symphony of flavors that hits all the senses at once. The crust, buttery and flaky, gives way to a creamy ricotta filling that’s as light as a cloud but rich enough to make you close your eyes in bliss. Then the heirloom tomatoes arrive, their sweet‑tart juices bursting like fireworks against the mellow backdrop of oregano and garlic powder. I can still hear the gentle sizzle as the olive oil kisses the tomatoes in the pan, a sound that promises caramelized perfection. The aroma? Imagine a Mediterranean garden after a summer rain—earthy, herbaceous, and intoxicatingly fresh.
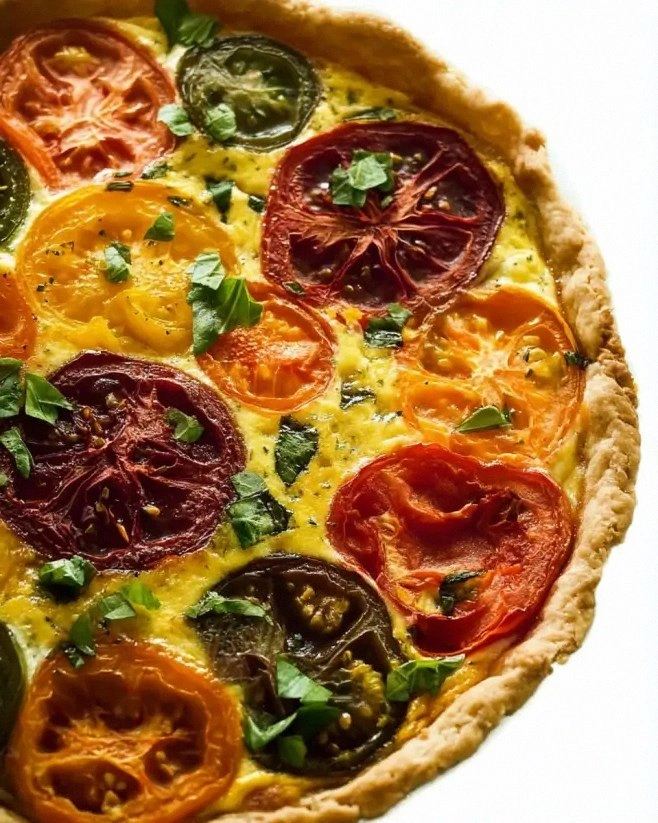
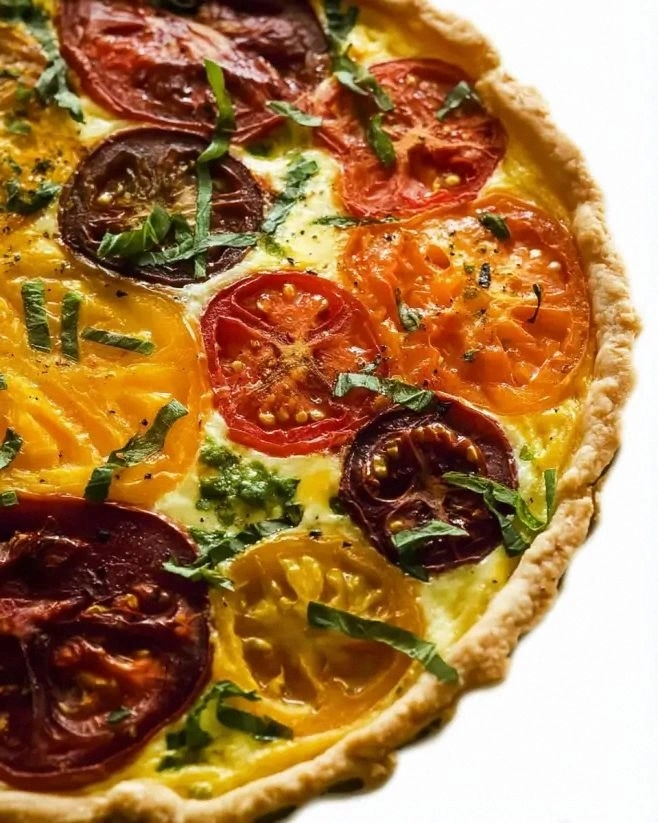
Most tart recipes out there treat tomatoes as an afterthought, slapping them on top without respect for their delicate flavor profile. This version, however, embraces the heirloom’s natural sweetness by lightly searing them first, then arranging them in a fan‑like pattern that showcases each color like a work of art. I dare you to taste this and not go back for seconds, because the combination of textures and the bright, herb‑forward finish will have you questioning every other tart you’ve ever made. I’ll be honest—I ate half the batch before anyone else got a chance to try it, and that’s a confession I’m not ashamed to make.
Okay, ready for the game‑changer? The secret lies in the crust: a quick‑mix dough that stays chilled until it hits the oven, ensuring those edges puff up just right, and a ricotta blend that’s whipped with Parmesan, egg, and a whisper of oregano for depth. I’m also throwing in a tiny dash of garlic powder that adds a subtle kick without overpowering the tomatoes. Picture yourself pulling this out of the oven, the whole kitchen smelling incredible, the golden crust glistening with a drizzle of olive oil, and the fresh basil leaves waiting to be torn over the top like confetti. Let me walk you through every single step — by the end, you’ll wonder how you ever made it any other way.
What Makes This Version Stand Out
- Flavor Explosion: The sweet, sun‑kissed heirloom tomatoes paired with a herb‑infused ricotta filling creates a taste that’s both bright and comforting, like a summer garden in your mouth.
- Texture Harmony: A buttery, flaky crust meets a silky ricotta center and juicy tomato slices, delivering a contrast that feels luxurious with every bite.
- Simplicity: Despite its gourmet vibe, the recipe uses pantry staples and takes under an hour from start to finish—no fancy equipment required.
- Ingredient Star Power: Heirloom tomatoes aren’t just pretty; their complex flavor profile elevates the tart beyond ordinary tomato dishes.
- Crowd‑Pleaser: Whether it’s a brunch gathering or a casual dinner, this tart consistently earns rave reviews and empty plates.
- Make‑Ahead Magic: The tart can be assembled ahead of time and baked just before serving, making it perfect for entertaining.
- Versatile Base: The crust can double as a gluten‑free base if you swap the flour for almond flour, expanding its audience.
- Visual Wow Factor: The fan‑like arrangement of colorful tomatoes turns the tart into a centerpiece worthy of Instagram.
Inside the Ingredient List
The Flavor Base
Ricotta cheese is the heart of this tart, providing a creamy canvas that absorbs the aromatic oregano and garlic powder without becoming heavy. Its mild tang balances the natural sweetness of the heirloom tomatoes, creating a harmonious flavor marriage. If you substitute cottage cheese, expect a grainier texture and a less luxurious mouthfeel. Freshly grated Parmesan adds a salty umami punch that lifts the entire dish, while the large egg acts as a binder, ensuring the filling sets beautifully without turning rubbery.
The Texture Crew
The crust starts with all‑purpose flour, which gives structure and a tender crumb when combined with the cold butter. The butter’s solid fat pockets melt during baking, creating those coveted flaky layers that shatter like thin ice when you cut into them. Ice water is the silent hero—just enough to bring the dough together without activating gluten, preserving that delicate crumb. Salt, though a tiny amount, amplifies all the other flavors, making each bite taste complete.
The Unexpected Star
Heirloom tomatoes are the show‑stopper. Their varied colors aren’t just for aesthetics; each hue brings a subtle nuance—deep reds are sweet, yellows are buttery, and purples have an earthy depth. When you slice them thin and give them a quick sear in olive oil, their sugars caramelize, adding a faint smoky note that pairs perfectly with the herb‑infused ricotta. If you can’t find heirlooms, go for the ripest vine‑riped tomatoes you can locate, but the flavor won’t be as layered.
The Final Flourish
Olive oil drizzled over the tomatoes before baking adds a glossy finish and helps the edges crisp just right. Fresh basil leaves, added after the tart comes out of the oven, contribute a fragrant burst that cuts through the richness of the cheese and butter. A pinch of pepper and a dash of sea salt on top elevate the dish, ensuring every component sings in harmony. Remember, the quality of each ingredient matters—use the best butter you can find, and don’t skimp on the Parmesan; it’s the secret that makes this tart unforgettable.
Everything's prepped? Good. Let's get into the real action...
The Method — Step by Step
First, whisk together the flour and salt in a large bowl. Toss in the cold, cubed butter and, using your fingertips, rub it into the flour until the mixture resembles coarse crumbs with pea‑sized butter pieces. This is the moment where you feel the dough’s future flakiness forming under your hands. Add the ice water a tablespoon at a time, gently mixing until the dough just comes together—don’t overwork it. Watch the dough stay crumbly; it should hold together when pressed, not turn into a paste.
While the dough chills, prepare the ricotta filling. In a medium bowl, combine the ricotta, grated Parmesan, egg, dried oregano, garlic powder, and a generous pinch of salt and pepper. Beat the mixture until it’s smooth and slightly airy—this incorporates air that will make the filling light as a cloud. Taste and adjust seasoning; the filling should be mildly salty because the cheese will mellow it during baking. Set the bowl aside, covering it with a clean towel to keep the mixture at room temperature.
Now, turn your attention to the heirloom tomatoes. Slice each tomato about ¼‑inch thick, discarding any overly soft spots. Heat a tablespoon of olive oil in a skillet over medium‑high heat, then lay the tomato slices in a single layer. Let them sizzle for 1‑2 minutes per side until they develop a golden‑brown edge and release a sweet, caramelized aroma. That sizzle when it hits the pan? Absolute perfection. Remove the tomatoes and pat them dry with paper towels to avoid excess moisture on the crust.
Roll out the chilled dough on a lightly floured surface to a 12‑inch circle, about ¼‑inch thick. Transfer it gently to a 9‑inch tart pan, pressing it into the corners and trimming any excess. Prick the base all over with a fork—this prevents bubbling during baking. Brush the crust lightly with olive oil, then blind‑bake it on a parchment‑lined baking sheet at 375°F (190°C) for 12‑15 minutes, or until the edges turn a pale golden hue. You’ll know it’s ready when the crust smells nutty and the surface looks set.
While the crust bakes, spread the ricotta mixture evenly over the partially cooked base, smoothing it with a spatula. Arrange the seared tomato slices on top in a fan pattern, overlapping them slightly for visual appeal. Sprinkle a few fresh basil leaves over the tomatoes, reserving some for garnish after baking. Drizzle a final splash of olive oil over the top to encourage caramelization.
Return the tart to the oven and lower the temperature to 350°F (175°C). Bake for an additional 20‑25 minutes, or until the ricotta filling is set and the tomato edges are bubbling and lightly browned. The crust should be golden‑brown and crisp, with the cheese forming a thin, creamy layer that holds the tomatoes in place. This next part? Pure magic. Once done, let the tart rest for 5 minutes; this makes slicing cleaner and the flavors meld.
Finally, garnish with a handful of fresh basil leaves, a pinch of flaky sea salt, and a grind of black pepper. Slice the tart into generous wedges and serve warm or at room temperature. The first bite will reveal a buttery crust that shatters delicately, a velvety ricotta center, and the bright, juicy burst of heirloom tomatoes—an orchestra of flavors that will have everyone reaching for seconds.
That's it — you did it. But hold on, I've got a few more tricks that'll take this to another level...
Insider Tricks for Flawless Results
The Temperature Rule Nobody Follows
Never let your butter melt before it meets the flour. Keep everything chilled, even the mixing bowl, and work quickly. I once tried to speed things up by leaving the butter out for “just a minute,” and the crust turned out dense and greasy—lesson learned. A cold dough creates steam pockets in the oven, which are the secret to that perfect flaky texture.
Why Your Nose Knows Best
The moment the crust turns a light golden brown and releases a nutty scent is your cue to pull it out of the oven. Trust that aroma over the timer; ovens vary, and the smell is a reliable indicator of doneness. If you wait too long, the crust can become overly crisp, losing that melt‑in‑your‑mouth quality.
The 5‑Minute Rest That Changes Everything
Allowing the tart to rest after baking isn’t just for aesthetics—it lets the ricotta filling set fully, preventing it from sliding off when you cut a slice. During this brief pause, the flavors meld, and the crust re‑absorbs a tiny bit of the tomato juices, enhancing every bite. Skipping this step often results in a soggy bottom and a messy plate.
Seasoning Layers, Not One‑Shot
Season each component individually: the crust, the ricotta mixture, and the tomatoes. This layered approach builds depth and prevents a flat taste. A pinch of salt on the tomatoes before searing draws out moisture and concentrates their natural sweetness.
Heat‑Resistant Baking Sheets Save the Day
Using a heavy‑duty, rimmed baking sheet under your tart pan prevents hot spots and ensures even browning. I once used a flimsy sheet and ended up with a burnt edge while the center stayed pale—never again. Investing in a good sheet is a small price for consistent results.
Creative Twists and Variations
This recipe is a playground. Here are some of my favorite ways to switch things up:
Go Green with Pesto
Swap the oregano for a swirl of fresh basil pesto mixed into the ricotta. The green hue adds visual contrast, and the pine‑nutty flavor complements the tomatoes beautifully.
Spicy Kick
Finely dice a small red chili and toss it with the tomatoes before searing. The heat adds a surprising punch that balances the cheese’s richness.
Cheese Overload
Mix in crumbled feta or goat cheese with the ricotta for a tangier, creamier filling. The salty bite pairs wonderfully with the sweet heirloom tomatoes.
Herbaceous Surprise
Replace basil garnish with fresh thyme or rosemary for an earthy, piney finish. Each herb brings its own personality to the tart.
Sweet & Savory
Add thin slices of caramelized onion between the tomato layers for a sweet undertone that deepens the overall flavor profile.
Mini Tartlets
Divide the dough into smaller rounds and bake individual tartlets—perfect for parties or a sophisticated appetizer spread.
Storing and Bringing It Back to Life
Fridge Storage
Allow the tart to cool completely, then wrap it tightly in plastic wrap or foil. Store in the refrigerator for up to three days. When ready to serve, reheat at 350°F (175°C) for 10‑12 minutes, covering loosely with foil to prevent over‑browning.
Freezer Friendly
Freeze the baked, cooled tart (uncovered) on a parchment sheet for one hour, then transfer to an airtight container. It will keep for up to two months. To reheat, let it thaw in the fridge overnight, then bake as above.
Best Reheating Method
Before reheating, splash a tiny drizzle of water over the surface and cover with foil. The steam revives the crust’s crispness while keeping the ricotta from drying out. This trick restores the tart to near‑fresh quality, making leftovers just as delightful.