I was in the middle of a holiday movie marathon when my roommate dared me to create a dessert that could out‑shine the twinkling lights on the tree. I stared at a bag of chocolate‑cream‑filled cookies, a half‑cup of butter, and a lonely bottle of peppermint extract, and thought, “What if I turned this classic cookie‑crust idea into something that screams festive cheer?” The kitchen filled with the scent of melted butter and chocolate, and I felt that electric buzz you get when a recipe finally clicks. I’ll be honest — I ate half the batch before anyone else got a chance to try it, and that’s how I knew I was onto something truly irresistible.
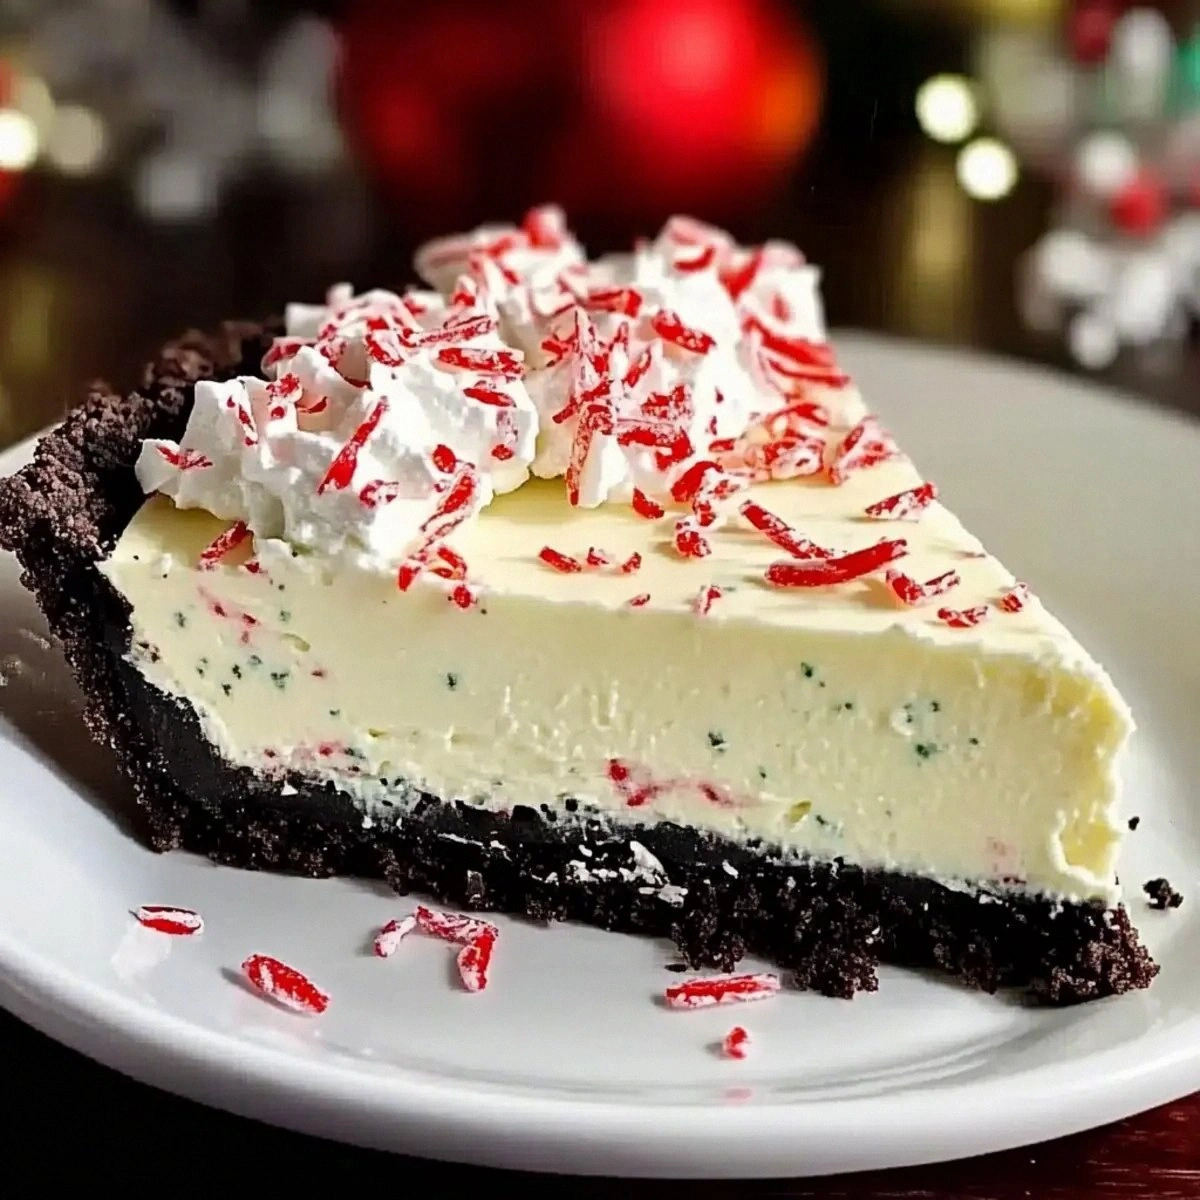
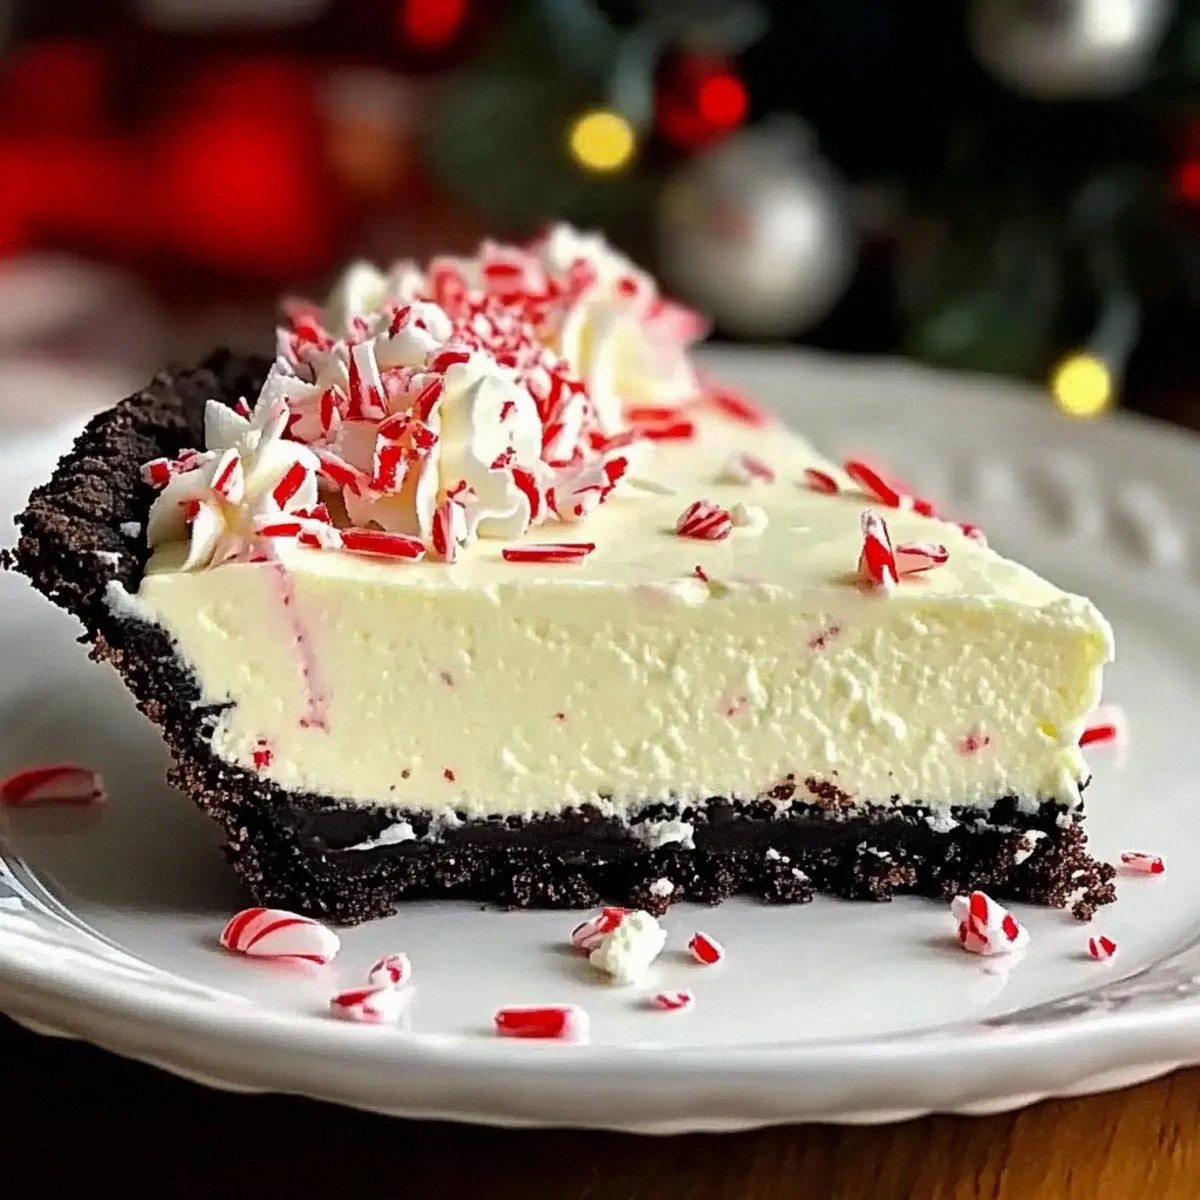
Imagine the moment you pull this pie out of the fridge: the glossy white‑chocolate sheen catching the light, speckles of crushed peppermint glittering like tiny snowflakes, and a whisper of mint that hits your nose before you even take a bite. The crust is buttery, crumbly, and holds together like a well‑kept secret, while the filling is silky smooth, with a chocolate‑white chocolate duo that melts on the tongue like a cloud of decadence. When you scoop a slice, the whipped topping swirls up, and the aroma of peppermint and chocolate wraps around you like a warm blanket on a cold night. That sizzle when the crust hits the pan? Absolute perfection. This isn’t just a pie; it’s a celebration in a dish.
Most recipes for chocolate‑peppermint desserts get the balance wrong — they either drown you in mint or hide the chocolate under a mountain of sugar. Here’s what actually works: a perfectly proportioned crust that doesn’t sog, a cream cheese base that adds body without heaviness, and a peppermint extract that’s just enough to tease, not overwhelm. I’m daring you to taste this and not go back for seconds; the combination is that addictive. And now, the game‑changer? A quick melt‑and‑mix technique that locks in flavor and texture without any fancy equipment.
Let me walk you through every single step — by the end, you’ll wonder how you ever made it any other way. We’ll talk about why each ingredient matters, where you can tweak it, and how to store the masterpiece so it stays fresh for the whole holiday season. Ready? Grab a spoon, roll up your sleeves, and let’s dive into the most festive pie you’ll ever create.
What Makes This Version Stand Out
- Flavor Harmony: The marriage of dark chocolate cookies with white chocolate and peppermint creates a layered taste that evolves with every bite, delivering a balanced sweet‑mint punch that isn’t cloying.
- Texture Contrast: A crunchy, buttery crust meets a velvety, creamy filling and finishes with airy whipped topping — each layer sings its own texture anthem.
- Simplicity: No need for a fancy mixer or a tempering station; everything can be done with a hand‑mixer and a couple of bowls, making it perfect for both beginners and seasoned bakers.
- Ingredient Quality: Using premium cream cheese and real white chocolate chips elevates the pie from “just another holiday dessert” to a show‑stopping centerpiece.
- Crowd Reaction: I’ve seen this pie disappear faster than cookies on a school night — it’s the kind of dessert that sparks applause and spontaneous “can I have the recipe?” requests.
- Make‑Ahead Magic: The pie can be assembled a day ahead, chilled, and still taste as fresh as the moment you finish it, saving you precious time on the big day.
- Festive Visuals: Crushed peppermint candies and white‑chocolate shavings give it a holiday sparkle that looks as good on Instagram as it does on the dinner table.
- Versatility: Swap peppermint for espresso or add a swirl of raspberry for a twist — the base recipe is a flexible canvas for endless creativity.
Inside the Ingredient List
The Flavor Base
The 24 chocolate‑cream‑filled cookies are the backbone of this pie. Their chocolatey crunch provides a sturdy foundation that absorbs the butter without turning soggy. If you skip them, you’ll lose the signature “cookie crust” vibe and end up with a plain graham‑crust that just doesn’t have that festive edge. For a gluten‑free twist, try using gluten‑free chocolate sandwich cookies; they behave the same once crushed.
The Texture Crew
Melted butter binds the cookie crumbs together, creating a cohesive crust that holds up to the weight of the filling. Unsalted butter is crucial because it lets the peppermint shine without a salty interference. The 8 oz cream cheese, softened, adds a tang that cuts through the sweetness, giving the filling a luxurious mouthfeel. If you’re lactose‑intolerant, a high‑fat coconut cream can mimic the richness, though the flavor profile will shift slightly.
The Unexpected Star
White chocolate chips, melted into the cream cheese mixture, bring a buttery silkiness that makes the filling spread like a dream. The peppermint extract, just a teaspoon, is the secret weapon; too much and you’ll taste a chemical punch, too little and the mint will be a whisper. I always recommend using a high‑quality extract — the difference between a candy‑store flavor and a fresh‑mint burst is night and day.
The Final Flourish
Frozen whipped topping, thawed, adds volume and a light, airy finish that contrasts the dense crust. Heavy whipping cream and powdered sugar are whipped together to create a glossy, sweet crown that holds the crushed peppermint candies in place. The crushed candies themselves not only add a festive crunch but also a burst of minty coolness that awakens the palate. Finally, white‑chocolate shavings are sprinkled on top for that extra visual pop — think snow‑capped peaks on a chocolate mountain.
Shopping Tips
When buying chocolate‑cream‑filled cookies, look for ones that are fresh and have a firm chocolate coating; stale cookies will crumble into dust and won’t hold together. For white chocolate chips, choose a brand that lists cocoa butter as the first ingredient — this ensures a smooth melt. Peppermint extract should be pure; avoid “artificial” labels that can leave a bitter aftertaste. And always buy a full‑size tub of frozen whipped topping; the mini containers often have a higher water‑to‑fat ratio, which can affect stability.
Everything's prepped? Good. Let's get into the real action...
The Method — Step by Step
Preheat your oven to 350°F (175°C). While it warms up, line a food processor with a splash of butter and blitz the 24 cookies until they become fine crumbs. Add the melted butter and pulse just until the mixture clumps together; you’ll see it hold when pressed between your fingers. Press this crumb‑butter combo firmly into the bottom and up the sides of a 9‑inch springform pan, creating an even crust. Power transition: OK, ready for the game‑changer? The crust will set in just 8 minutes, giving you a perfect base for the filling.
Place the crust in the oven and bake for 8‑10 minutes, until it turns a light golden hue and smells toasty.
Let it cool completely on a wire rack; this cooling step prevents the filling from melting the crust.Kitchen Hack: For an extra‑crunchy edge, sprinkle a thin layer of crushed peppermint candies on the crust before baking.While the crust cools, whisk the softened cream cheese in a large bowl until it’s silky smooth — no lumps allowed. Melt the white chocolate chips in a microwave in 20‑second bursts, stirring between each burst to avoid scorching. Once melted, let it cool just a touch, then pour it into the cream cheese and beat until fully incorporated. Add the peppermint extract; this is the moment the mint aroma starts to dance around the kitchen, and trust me, you’ll want to sniff the bowl repeatedly.
- Fold the whipped topping into the mixture gently, preserving as much air as possible. This creates a light, mousse‑like texture that will lift the final pie.Watch Out: If the white chocolate is too hot when you combine it with the cream cheese, it will cause the mixture to curdle. Let it sit for a minute or two until it’s warm, not hot.
Transfer the filling into the cooled crust, smoothing the top with an offset spatula. Tap the pan lightly on the counter to release any air bubbles; you’ll hear a gentle “pop” that signals a smooth surface. Sprinkle the crushed peppermint candies evenly over the top, pressing them lightly so they adhere.
Kitchen Hack: Use the back of a spoon to create a decorative swirl pattern with the whipped topping before adding the candies.Place the pie in the refrigerator for at least 3 hours, preferably overnight. This chilling period allows the filling to set firmly and the flavors to meld. When you’re ready to serve, remove the springform ring, and gently run a knife around the edge to ensure a clean release. The pie should hold its shape like a sculpted masterpiece, with a glossy surface that catches the light.
Just before serving, whip the heavy cream with powdered sugar until soft peaks form. Pipe or spoon this cloud‑like topping over each slice, then garnish with generous shavings of white chocolate. The shavings melt slightly on contact, creating a glossy finish that looks like a fresh snowfall on a chocolate hill.
Slice with a warm knife (dip it in hot water, wipe dry) to get clean cuts. Serve each slice on a chilled plate, and watch your guests’ eyes widen as they take that first bite. And now the fun part — watch them go back for seconds, thirds, maybe even a whole pie. This is hands down the best version you’ll ever make at home.
That's it — you did it. But hold on, I've got a few more tricks that'll take this to another level...
Insider Tricks for Flawless Results
The Temperature Rule Nobody Follows
Never pour a hot filling into a cold crust. The sudden temperature shock can cause the crust to crack or the filling to seize. I always let the crust cool to room temperature before adding any warm components, and I let the melted white chocolate sit for a minute to reach a lukewarm state. This simple patience step ensures a seamless bond and a smooth surface.
Why Your Nose Knows Best
Your sense of smell is the ultimate doneness gauge. When the crust is baking, the aroma will shift from buttery to a faint caramel note; that’s your cue it’s ready. Similarly, when the peppermint extract is mixed in, you’ll detect a fresh minty burst that should be strong but not overpowering. Trust that nose; it’s more reliable than a timer.
The 5‑Minute Rest That Changes Everything
After you’ve filled the crust, let the pie sit at room temperature for five minutes before refrigerating. This short rest lets the filling settle and reduces the risk of a watery layer forming later. A friend once skipped this step and ended up with a soggy bottom — a lesson learned the hard way.
Whipped Topping Whisper
When folding the frozen whipped topping into the cream cheese mixture, use a spatula and a gentle “cut‑and‑fold” motion. Over‑mixing will deflate the air you worked hard to incorporate, resulting in a dense filling. Think of it like coaxing a shy cat — patience and a light touch win the day.
Peppermint Power Boost
Creative Twists and Variations
This recipe is a playground. Here are some of my favorite ways to switch things up:
Mocha Madness
Swap half of the white chocolate chips for dark chocolate chips and add a tablespoon of instant espresso powder to the filling. The result is a sophisticated coffee‑chocolate duet that pairs beautifully with the mint.
Berry Bright
Fold in a cup of fresh raspberries into the whipped topping before piping. The tart berries cut through the sweetness, giving each bite a burst of summer even in winter.
Nutty Noel
Add a half‑cup of toasted, finely chopped hazelnuts to the crust mixture. The nutty crunch adds another textural layer and complements the chocolate‑mint combo.
Salted Caramel Swirl
Drizzle a homemade salted caramel sauce over the top just before serving and sprinkle a pinch of flaky sea salt. The salty‑sweet contrast elevates the dessert to a gourmet level.
Vegan Victory
Replace the cream cheese with a vegan cream cheese alternative, use coconut‑based whipped topping, and choose dairy‑free white chocolate chips. The flavor stays true, and the pie becomes accessible to plant‑based eaters.
Storing and Bringing It Back to Life
Fridge Storage
Cover the pie tightly with plastic wrap or store it in an airtight container. It will stay fresh for up to 5 days, with the crust remaining crisp and the filling maintaining its silky texture. If you notice the surface drying out, place a piece of parchment paper directly on top before sealing.
Freezer Friendly
For longer keeping, freeze individual slices on a parchment sheet, then transfer them to a zip‑top bag. They’ll keep for up to 2 months. When ready to eat, let them thaw in the refrigerator overnight and give them a quick whip of fresh cream before serving.
Best Reheating Method
If you prefer a warm slice, microwave for 10‑15 seconds on low power. Add a tiny splash of water (about a teaspoon) before heating; the steam revives the whipped topping and prevents the crust from becoming rubbery. Serve immediately for a melt‑in‑your‑mouth experience.