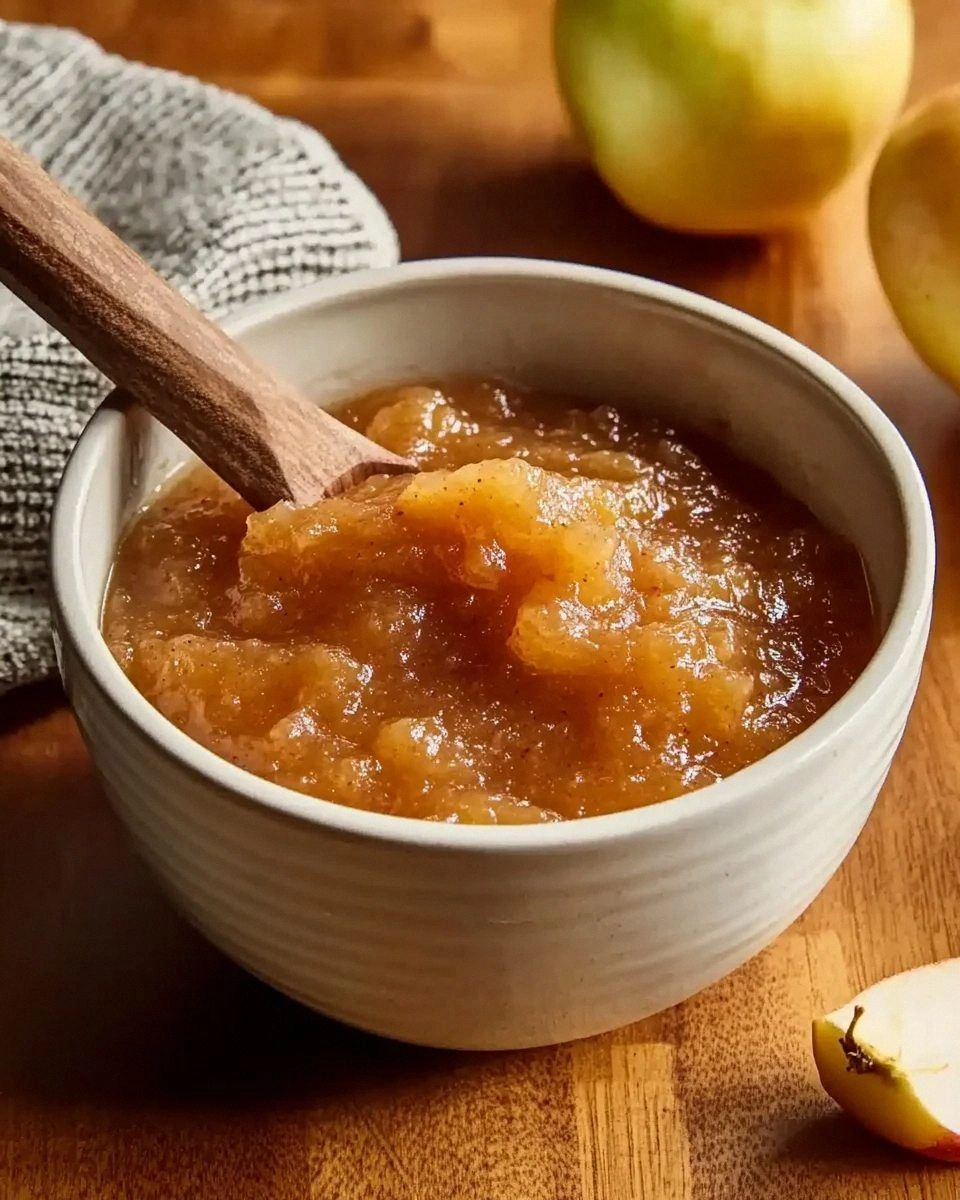
I ruined Thanksgiving dinner last year by forgetting the stovetop applesauce entirely. There I stood, apron splattered, relatives hovering, while my great-aunt muttered something about "the glue that holds the meal together." In desperation I dumped a bag of rock-hard apples into my slow cooker with a slosh of water and prayed. Six hours later the most hauntingly fragrant cloud drifted through the house—warm vanilla, sun-ripened fruit, a whisper of cinnamon—and suddenly the turkey could wait. We circled the crock like moths, spoons clinking, swearing we'd never go back to the jarred stuff again. That happy accident became my new holiday ritual, and now I'm handing you the keys to the kingdom.
Picture yourself on a blustery Sunday when the light turns honey-gold and the couch calls your name. You slice apples while a podcast hums in the background, toss everything into a single pot, then walk away. No stirring, no splatters, no timing anxiety—just the slow, steady alchemy of fruit collapsing into silk. By sunset your windows fog with autumn perfume and you have enough sauce to freeze for bleak February mornings when summer feels like a rumor.
What sets this version apart? We're skipping the heavy-handed sugar blitz most recipes demand and letting the fruit speak first. A kiss of maple coaxes depth, a bay leaf sneaks in an almost tea-like note, and a splash of apple cider vinegar brightens the whole affair so it tastes like orchard air bottled in a jar. The texture lands somewhere between cloud-soft and velvet-ribbon, flecked with tiny ruby jewels of skin because peeling is optional and life is short.
Stay with me here—this is worth it. By the time we're done you'll know which apples play nice together, how to dodge the watery-bland trap, and why a strip of lemon peel works harder than any spice in your rack. Let me walk you through every single step—by the end, you'll wonder how you ever made it any other way.
What Makes This Version Stand Out
- Flavor First: Most applesauce recipes drown the fruit in white sugar and call it a day. We use a restrained drizzle of maple syrup plus a bay leaf for subtle complexity, so the apples taste more like, well, apples.
- Set-It-and-Forget-It: No babysitting a burping pot on the stove. The slow cooker keeps the temperature gentle and steady, which prevents scorched bottoms and frees you to binge your favorite show.
- Texture Paradise: A quick whisk at the end releases pectin and yields that spoon-coating, almost mousse-like body that jarred versions can only dream of.
- Zero Waste Option: Leave the skins on half the apples for blushes of color and a boost of gut-friendly fiber. They melt down so finely even the picky eaters won't protest.
- Make-Ahead Hero: This stuff tastes even better on day three, freezes like a champ, and moonlights as a secret ingredient in muffins, cocktails, barbecue sauce, and pancake batter.
- crowd-Pleasing Flexibility: Vegan, gluten-free, nut-free, soy-free—it's the inclusive friend who gets along with every plate at the potluck.
Alright, let's break down exactly what goes into this masterpiece...
Inside the Ingredient List
The Flavor Base
Apples are divas—each variety brings its own personality to the party. For the most balanced sauce, I mix three players: a sweet-tart option like Honeycrisp for bright top notes, a mellow Fuji or Gala for honeyed body, and one bracing Granny Smith to keep things honest. Aim for about three pounds total, roughly six large fruit. If your farmers' market is having a moment, swap in a few Arkansas Black or Pink Lady for wine-like complexity; just avoid Red Delicious, which turns to bland mush faster than a sad prom date.
Water is next, but we're using just enough to prevent a scorched bottom—½ cup for a standard 4-quart slow cooker. Any more and you'll dilute flavor and spend precious time later boiling it off. If you want to feel fancy, trade the water for fresh apple cider; the extra tannins give the sauce backbone.
The Sweetener That Doesn't Overstay
Maple syrup brings warmth and woodsy depth without the one-note sugar blast of white table sugar. Two tablespoons is plenty for three pounds of mixed apples; remember, the cooking process concentrates natural fruit sugars. In a pinch, use dark brown sugar, but know you'll lose that subtle smoke. Skip honey—it ferments quickly and can turn the sauce boozy if you store it more than a week.
The Aromatic Curveball
One solitary bay leaf is the quiet genius in the corner. As the temperature creeps up, it releases eucalyptus-like oils that read mysteriously herbal, almost like someone whispered "autumn" into the pot. Fish it out before blending; otherwise you'll hit a bitter note. No bay? Try a 1-inch knob of fresh ginger for a spicy zing that pairs beautifully with pork chops later.
The Finishers
Apple cider vinegar is the final wake-up call, a scant teaspoon to sharpen flavors the way lemon lifts seafood. Add it at the end so the volatile acids don't cook off. Cinnamon is optional; if you crave it, use a ½-inch stick rather than the pre-ground stuff, which can taste dusty after a long simmer. A pinch of flaky salt at the very end amplifies sweetness without making the sauce actually salty—it's kitchen sorcery.
Everything's prepped? Good. Let's get into the real action...
The Method — Step by Step
- Wash your apples well—farmers sometimes use a food-grade wax that can mute flavor. Quarter them and slice out the core; don't stress perfect wedges because everything breaks down. If you hate texture, peel every apple now. If you want flecks of color and extra fiber, leave the skins on half. The seeds are bitter, so remove any stragglers you spot.
- Toss the apple quarters into your slow cooker and add ½ cup water or cider plus the bay leaf. Drizzle over two tablespoons maple syrup, but resist stirring; the bottom layer needs liquid contact first to prevent hot spots.
- Set the cooker to LOW for six hours and walk away. Your kitchen will start smelling like a cider house after the first hour, but don't lift the lid—every peek releases steam and adds roughly fifteen minutes to the cook time.
- At hour five, slide a fork into an apple piece. It should slide through like butter; if there's resistance, give it another thirty minutes. Once tender, fish out the bay leaf and add the cinnamon stick if using. Turn the cooker to HIGH, crack the lid slightly, and cook fifteen more minutes to evaporate excess liquid.
- Turn off the heat and let the mixture rest ten minutes. This pause allows carry-over heat to finish softening any stubborn bits and protects your blender from thermal shock.
- Transfer apples to a bowl and whisk vigorously by hand for a textured, rustic sauce, or blitz with an immersion blender right in the crock for silk. I dare you to taste this and not go back for seconds—pure autumn spooned into your mouth.
- Stir in the teaspoon of apple cider vinegar and a pinch of flaky salt while the sauce is still warm. Cool completely before storing; the flavors marry as it chills.
That's it—you did it. But hold on, I've got a few more tricks that'll take this to another level...
Insider Tricks for Flawless Results
The Temperature Rule Nobody Follows
Most folks dump cold apples into a cold pot and crank the heat, but giving your fruit a twenty-minute countertop warm-up first jump-starts pectin release. Room-temp apples soften more evenly, shaving thirty minutes off the cook and preventing that dreaded half-mush, half-chunk texture. If you've ever struggled with this, you're not alone—and I've got the fix.
Why Your Nose Knows Best
You'll know the sauce is near ready when the aroma shifts from bright and fruity to deep, almost caramelized. Trust your olfactory alarm bell; it's more reliable than any timer. A friend tried skipping this step once—let's just say it didn't end well and her house still smells faintly of scorched sugar on humid days.
The 5-Minute Rest That Changes Everything
After blending, let the sauce sit uncovered for five minutes. Steam escapes, color deepens, and flavors concentrate like a quick reduction without extra heat. Stir once more before tasting; you'll notice the difference between good applesauce and spoon-licking greatness.
Creative Twists and Variations
This recipe is a playground. Here are some of my favorite ways to switch things up:
Bourbon-Caramel Dream
Swap maple syrup for two tablespoons of dark brown sugar and add a tablespoon of bourbon. Alcohol cooks off, leaving smoky vanilla notes that make this taste like apple pie in disguise. Serve warm over vanilla bean ice cream and prepare for marriage proposals.
Berry-Apple Blush
Slide in a cup of frozen raspberries or blackberries during the last hour of cooking. Their acidity amplifies apple flavor and the rosy hue looks gorgeous in mason jars. Kids call it "pink applesauce" and devour it without noticing the extra antioxidants.
Savory Herb Blend
Omit sweetener entirely and add two sprigs of fresh thyme and a smashed garlic clove. Finish with cracked pepper and serve alongside roasted pork or turkey. It moonlights as a tangy condiment, cutting through rich meats like a champ.
Asian Pear Fusion
Replace half the apples with ripe Asian pears for a light, floral twist. Their high water content means you can skip the added liquid entirely; just reduce the cook time by an hour. The resulting sauce is delicate and perfect spooned over plain Greek yogurt.
Chili-Mango Heatwave
Add one small diced mango and a pinch of cayenne to the pot. The sweet heat plays beautifully with grilled chicken or as a glaze for shrimp tacos. Warning: you'll start dreaming of summer barbecues even in January.
Vanilla Bean Luxury
Split half a vanilla bean and scrape the seeds into the apples before cooking. The long, gentle heat coaxes out every last floral note, making this version taste like something you'd pay eight bucks for at a boutique deli. Save the emptied pod for homemade sugar—your morning coffee will thank you.
Storing and Bringing It Back to Life
Fridge Storage
Pack the cooled sauce into clean glass jars, leaving half an inch of headspace. It keeps ten days refrigerated, though I've never seen it survive past five in my house. Lay a small piece of parchment directly on the surface before sealing; it prevents the top layer from oxidizing and turning beige.
Freezer Friendly
Portion into silicone muffin cups, freeze solid, then pop the pucks into a zip bag. They thaw quickly and give perfect single-serve portions for lunchboxes. Label with the date; quality peaks at three months but remains safe longer. Add a tiny splash of water before reheating—it steams back to perfection.
Best Reheating Method
Microwave works in a pinch, but the stovetop wins for texture. Slide the frozen puck into a small saucepan with a tablespoon of water, cover, and warm over low heat, stirring once it loosens. The gentle steam restores that just-made silkiness without rubbery edges.