I was standing in my kitchen on the morning of a Saturday, the air thick with the scent of melted chocolate and crushed cookies, when my neighbor’s phone rang and announced that his St. Patrick’s Day party would be held in his living room. I stared at the pile of 36 mint Oreo cookies on the counter and felt the familiar urge to create something that would make the party unforgettable. That moment of culinary crisis turned into a delicious revelation: a mint Oreo cookie ball that packs a creamy, green‑white coating and a splash of festive sprinkles. I dare you to taste this and not go back for seconds because it’s so addictive. This is hands down the best version you'll ever make at home, and I’m about to walk you through every single step — by the end, you’ll wonder how you ever made it any other way.
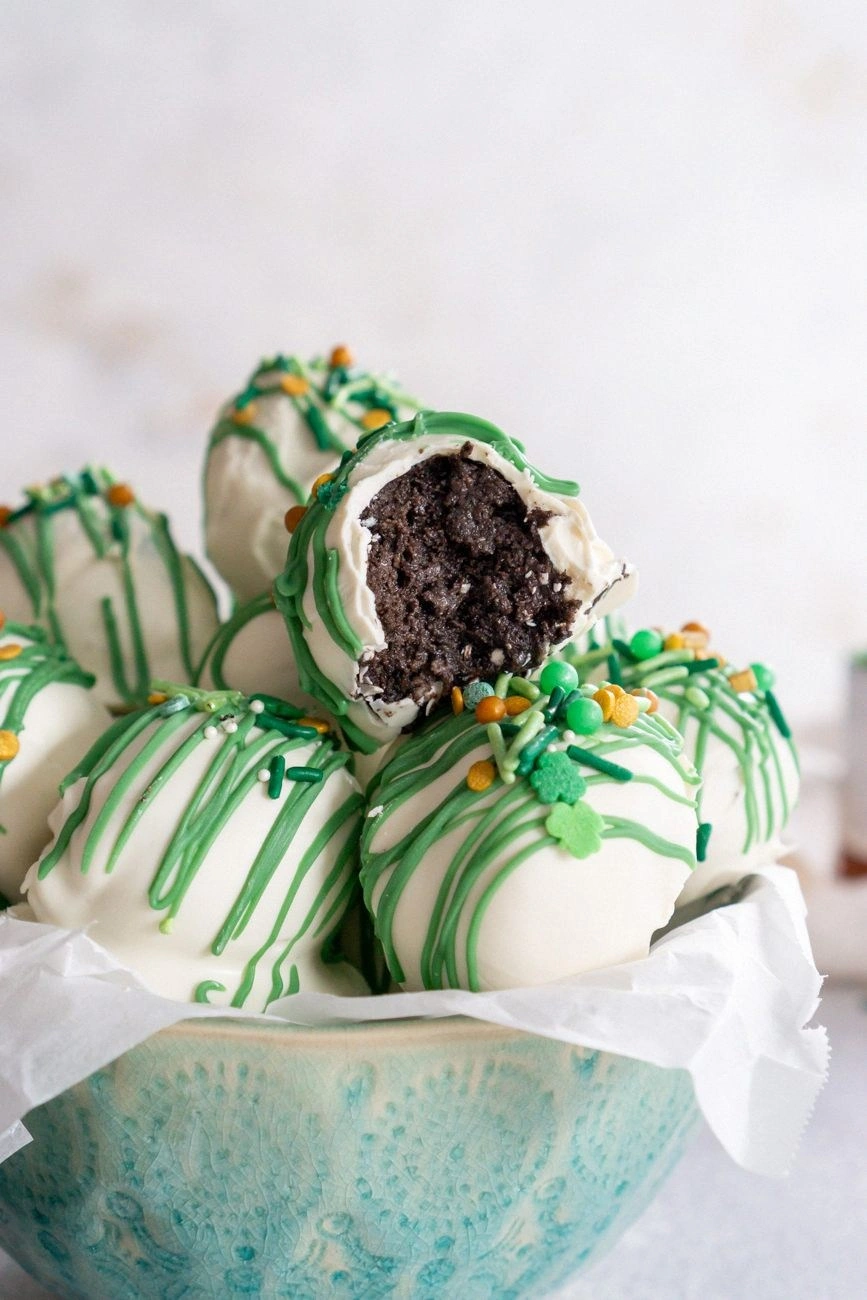
Picture the first bite: a soft, velvety center of brick‑cream cheese that melts like a dream, surrounded by a glossy shell of white and green candy melts that crackle faintly as you bite, releasing a burst of minty freshness. The crunch of the Oreo crumbs gives a satisfying texture that contrasts with the creamy interior, while the sprinkles add a playful pop of color and a subtle crunch that makes each bite an experience. The whole experience is a sensory symphony, from the bright green hue to the sweet‑mint aroma that fills the kitchen, to the instant satisfaction of that first bite. If you've ever struggled with creating a dessert that feels both indulgent and festive, you're not alone — and I've got the fix. And now the fun part: we’ll dive into the ingredients that make this masterpiece shine.
Most recipes get this completely wrong by using vanilla or chocolate coating, but I swear by the combination of white and green candy melts that gives the perfect minty sheen. The key is in the balance: the white melt keeps the coating smooth, while the green melt delivers that unmistakable mint flavor that lingers. I’ll show you how to melt them together so they stay glossy and never become tacky. I’ll also reveal the secret to making the cream cheese center silky without it being too runny. And trust me, the final result is a dessert that will make your guests shout “I can’t believe this is homemade!”
This version stands out because it transforms ordinary Oreo cookies into a sophisticated, mint‑infused treat that’s perfect for St. Patrick’s Day or any celebration. The mint flavor is so vibrant that it feels like a fresh breeze on a spring day, while the creamy center keeps it indulgent. The bright green coating and festive sprinkles create a visual spectacle that’s impossible to ignore. The recipe is simple enough for beginners but sophisticated enough for seasoned bakers. And the best part? You can make it ahead of time and keep it fresh for a week. Let’s break down exactly what goes into this masterpiece…
What Makes This Version Stand Out
- Flavor: The dual candy melt coating delivers a clean mint taste that isn’t overpowering, allowing the cream cheese to shine. It’s a refreshing twist on classic Oreo cookies.
- Texture: The crisp edge of the Oreo crumbs contrasts with the smooth, creamy center, giving each bite a delightful crunch.
- Visual Appeal: The bright green glaze and festive sprinkles create a festive look that’s perfect for St. Patrick’s Day parties.
- Simplicity: No baking required; the recipe is a no‑heat, no‑fry delight that can be assembled in minutes.
- Make‑Ahead: Freeze the coated balls for up to a week; they thaw at room temperature and keep their minty freshness.
- Ingredient Quality: Using brick‑cream cheese adds a tang that balances the sweetness, while high‑quality Oreos ensure a consistent crunch.
- Guest Reaction: The novelty of mint Oreo cookie balls always sparks conversation and garners rave reviews.
- Versatility: The base can be adapted with different candies or coatings for other holidays or seasonal flavors.
Alright, let’s break down exactly what goes into this masterpiece…
Inside the Ingredient List
The Flavor Base
The 8 ounces of brick‑cream cheese is the heart of this dessert. Its tangy profile balances the sweet mint coating, preventing the final product from feeling cloying. If you skip it, you’ll end up with a sugary ball that lacks depth and will quickly become stale. For a dairy‑free version, consider a coconut‑cream cheese substitute, but keep the tang by adding a splash of lime juice.
The Texture Crew
The 36 mint Oreo cookies provide the crunch and the chocolate base. Crush them finely to ensure each bite releases a subtle chocolate bite that pairs with the mint. If you prefer a smoother texture, pulse them in a food processor until they’re almost powdery, then mix with the melted candy for a more uniform coating. A small amount of powdered sugar can help bind the crumbs together if you’re aiming for a firmer center.
The Unexpected Star
The 12 ounces of white candy melts act as the glossy medium that holds everything together. They melt at a low temperature, which means you can stir them gently without scorching. The 12 ounces of green candy melts provide the minty flavor; the green pigment is natural, so it’s safe for kids and adults alike. If you can’t find green candy melts, a few drops of green food coloring in the white melt will do the trick, but the flavor might be slightly different.
The Final Flourish
St. Patrick’s Day sprinkles are the finishing touch. They add a crunch and a splash of color that makes the dessert feel celebratory. Sprinkle them generously on top of each ball after the coating has set. If you’re hosting a vegan party, look for sugar‑free or vegan sprinkles; they’ll give the same visual pop without compromising the flavor. Keep the sprinkles in an airtight container to preserve their crunch.
Everything's prepped? Good. Let's get into the real action…
The Method — Step by Step
- First, place the 8 ounces of brick‑cream cheese in a medium bowl and let it soften at room temperature for 10 minutes. This step ensures the cheese is creamy enough to blend smoothly with the melted candy. While the cheese is softening, gather your other ingredients so you’re ready to move on quickly. The goal is to keep everything at the right temperature for the next steps.
- Crush the 36 mint Oreo cookies into fine crumbs using a rolling pin or a food processor. Transfer the crumbs to a separate bowl and set aside. If you like a slightly gritty texture, keep the crumbs a bit larger; for a smoother finish, pulse until almost powdery. The texture of the crumbs will affect how the coating adheres to the ball.
- In a double boiler or a microwave‑safe bowl, melt the 12 ounces of white candy melts over low heat. Stir constantly until completely smooth. The white melt should reach a silky consistency that’s easy to drizzle. Keep an eye on the temperature; overheating can cause the candy to seize.
- Add the 12 ounces of green candy melts to the white melt and stir until the mixture is uniform. The green melt should blend seamlessly, giving the coating a bright mint hue. If the mixture looks too thick, add a teaspoon of water to thin it slightly. This step creates the glossy, minty shell that will encase the cream cheese center.
- Now, combine the softened cream cheese with the crushed Oreos. Mix until the crumbs are evenly distributed and the mixture holds together when pressed between your fingers. The crumb‑cheese mixture should feel firm enough to form a ball but still soft enough to roll without crumbling.
- Using a small cookie scoop or tablespoon, form the mixture into bite‑size balls. Place them on a parchment‑lined tray. If you’re making a large batch, keep the balls slightly apart to prevent them from sticking together during coating.
- Dip each ball into the melted candy mixture, ensuring it’s fully coated. Use a fork or a toothpick to lift the ball, letting excess coating drip off. Rotate the ball in the mixture to get an even glaze. This is the moment of truth; the coating should look glossy and not too thick.
- Once coated, roll each ball in St. Patrick’s Day sprinkles, pressing gently to adhere. If you’re short on sprinkles, you can sprinkle them on top after the coating has set. The sprinkles add a festive crunch and a pop of color that’s hard to resist.
- Place the finished balls on a wire rack set over a sheet of parchment paper to prevent them from sticking. Let them rest at room temperature for about 15 minutes, or until the coating has fully set and become firm. The setting time ensures the coating is solid enough to hold the sprinkles.
- Refrigerate the cookie balls for at least 30 minutes before serving to allow the flavors to meld together. When you take them out, you’ll notice the minty coating has a subtle shine and the cream cheese center is perfectly creamy. Serve chilled or at room temperature for the best experience.
That’s it — you did it. But hold on, I’ve got a few more tricks that’ll take this to another level. The next section will reveal insider tips that will help you achieve the perfect texture and flavor every time.
Insider Tricks for Flawless Results
The Temperature Rule Nobody Follows
The candy melts should never exceed 120°F. A quick kitchen thermometer can help you keep the temperature in check. If the mixture starts to brown, remove it immediately and add a splash of water to cool it down. This rule keeps the coating glossy and prevents it from becoming sticky.
Why Your Nose Knows Best
Smell the melted candy as you stir; a faint mint scent indicates the green melt has fully blended. If you don’t notice the mint aroma, you’re either under‑melted or the green melt is too thin. Trust your nose to guide you to the perfect consistency.
The 5‑Minute Rest That Changes Everything
After coating the balls, let them rest for 5 minutes before rolling in sprinkles. This short pause allows the coating to set just enough to hold the sprinkles without cracking. A quick test: press a sprinkle lightly onto the surface; it should stay in place without sliding.
Use a Silicone Mat for Easy Cleanup
A silicone baking mat keeps the cookie balls from sticking to the tray, making cleanup a breeze. It also prevents the balls from moving around during the coating process, ensuring a neat presentation. If you don’t have a silicone mat, parchment paper works, but it’s less forgiving.
Add a Splash of Water to Thicken
If your candy mixture feels too runny, add a teaspoon of water and stir until it thickens. This trick keeps the coating from dripping off the balls, giving you a cleaner finish. Just remember to keep the water to a minimum; too much can make the coating tacky.
Creative Twists and Variations
This recipe is a playground. Here are some of my favorite ways to switch things up:
Chocolate‑Mint Surprise
Swap the white candy melts for dark chocolate candy melts and keep the green for the mint flavor. The chocolate coating adds depth, while the mint still shines through. This variation is perfect for chocolate lovers who want a minty twist.
Coconut‑Cream Delight
Replace the brick‑cream cheese with coconut‑cream cheese for a tropical flavor. The coconut adds a subtle sweetness that pairs nicely with the mint. Finish with toasted coconut flakes for extra crunch.
Vegan Mint Balls
Use vegan cream cheese and vegan candy melts to create a plant‑based version. The texture remains the same, but it’s suitable for dairy‑free guests. Add a pinch of sea salt to balance the sweetness.
Chocolate‑Covered Mint Oreo Balls
After coating the balls with mint candy, dip them into melted chocolate for a double‑layered coating. The chocolate adds a rich finish that’s irresistible. Let them set on parchment paper before serving.
Spiced Mint Balls
Add a pinch of cinnamon or nutmeg to the cream cheese mixture for a warm, spiced flavor. The spices complement the mint and create a cozy dessert perfect for cooler weather. Sprinkle a touch of crushed pepper for a surprising kick.
Garnish with Fresh Mint Leaves
Tuck a small fresh mint leaf into the center of each ball before coating. The leaf adds a burst of fresh aroma when you bite into it. It also gives a professional look for a party setting.
Storing and Bringing It Back to Life
Fridge Storage
Store the coated balls in an airtight container in the refrigerator for up to a week. The mint coating will stay crisp, and the cream cheese center will remain creamy. Before serving, let them sit at room temperature for 10 minutes to soften slightly.
Freezer Friendly
Place the balls on a parchment‑lined tray and freeze them until solid, then transfer to a freezer bag. They can be kept for up to three months. Thaw in the refrigerator overnight before serving to preserve the texture.
Best Reheating Method
To revive frozen or chilled balls, microwave on low for 10–15 seconds, or let them sit at room temperature for 20 minutes. Add a tiny splash of water before reheating; it steams back to perfection. Avoid overheating, or the coating will melt and become sticky.
Now that you’re armed with all the knowledge and tricks, it’s time to roll up your sleeves and create these mint‑infused Oreo cookie balls that will wow anyone who tastes them. The process is so straightforward that even a novice can master it, and the results are nothing short of spectacular. Happy baking!