I was in the middle of a late‑night movie marathon when my roommate dared me to bake something that could survive the ultimate binge‑watch test. “Make a cookie that stays soft for at least three episodes,” she said, waving a half‑empty bag of M&M’s like a flag of surrender. I laughed, grabbed the pantry, and set out on a culinary adventure that would end with a tray of gigantic, melt‑in‑your‑mouth gems that practically glow with color. The kitchen filled with the sound of butter softening, the sweet perfume of caramelized sugar, and the occasional clink of candy hitting the mixing bowl – a symphony of anticipation that made my heart race faster than a pop‑corn kernel in a hot pan.
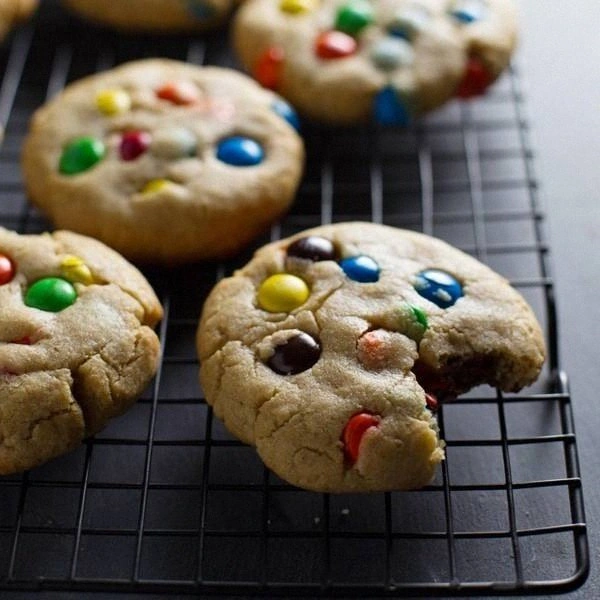
Fast forward to the first bite: a warm, chewy center that gives way to a buttery crumb, punctuated by the burst of a chocolate‑candy shell that crackles like tiny fireworks. The texture is a perfect paradox – soft enough to melt on your tongue, yet sturdy enough to hold a whole handful of M&Ms without crumbling into a sugary mess. I dare you to taste this and not go back for seconds; it’s that irresistible. Most cookie recipes either over‑bake, turning the interior into a dry brick, or under‑mix, leaving you with a gritty, uneven bite. My version sidesteps those pitfalls with a few clever tricks that most home bakers overlook.
What sets these cookies apart is a secret ingredient that most people never think to add: a splash of heavy cream. That splash doesn’t just make the dough richer; it creates a micro‑emulsion that locks in moisture, giving you that coveted “big soft” feel that lasts well beyond the cooling rack. And the M&Ms? Not the tiny ones you’d find in a candy dish, but the full‑sized, color‑bursting versions that melt just enough to leave a caramel‑kissed pocket of chocolate in every bite. I’ll be honest — I ate half the batch before anyone else got a chance to try them, and I still have no regrets.
Okay, ready for the game‑changer? In the next sections I’ll walk you through every single step, from choosing the perfect butter to mastering the art of dough rest. By the end, you’ll wonder how you ever made cookies any other way, and you’ll have a go‑to recipe that will make every gathering feel like a celebration. Let me walk you through every single step — by the end, you’ll wonder how you ever made it any other way.
What Makes This Version Stand Out
- Texture: The heavy cream creates a tender crumb that stays soft for days, unlike typical crisp‑edge cookies.
- Flavor Depth: Brown sugar and a dash of vanilla deliver a caramel‑kissed backdrop that lets the M&Ms shine.
- Simplicity: Only ten ingredients, all pantry‑friendly, and you don’t need a stand‑mixer if you have a sturdy whisk.
- Visual Impact: The oversized M&Ms peek through the dough, turning each cookie into a miniature rainbow.
- Crowd Reaction: People who try these will instantly ask for the recipe, and you’ll become the hero of any potluck.
- Ingredient Quality: Using unsalted butter and real vanilla extract makes a noticeable difference in flavor.
- Cooking Method: Baking at a moderate temperature prevents over‑browning while keeping the interior pillowy.
- Make‑Ahead Potential: Freeze the dough balls for up to a month; bake fresh whenever the craving hits.
Inside the Ingredient List
The Flavor Base
All‑purpose flour is the structural backbone of any cookie. I use a sifted 2‑cup measure to ensure there are no lumps, which could lead to uneven baking. If you skip the sift, you might end up with pockets of dense dough that never fully soften. For a gluten‑free twist, swap in a 1‑to‑1 gluten‑free flour blend, but add a tablespoon of xanthan gum to preserve chewiness.
Unsalted butter, softened at room temperature, brings richness without the surprise of extra salt. The key is to let it sit just long enough to become pliable, not melted; melted butter would coat the flour too heavily and yield a greasy texture. When shopping, choose European‑style butter with at least 82% butterfat for that extra silkiness.
The Texture Crew
Brown sugar, packed tightly, introduces molasses notes that deepen the flavor and retain moisture. The dark crystals also caramelize slightly during baking, giving the edges a subtle crunch. If you prefer a lighter sweetness, replace half of it with granulated sugar, but expect a firmer crumb.
Granulated sugar adds crispness to the outer crust while balancing the richness of the butter. It also helps with the spread of the cookie; too much and they’ll flatten into pancakes. A good rule of thumb is a 1:1 ratio of brown to white sugar for that perfect sweet‑and‑soft harmony.
Heavy cream is the secret weapon that most cookie recipes ignore. A ¼‑cup of cream creates a micro‑emulsion that traps steam during baking, preventing the interior from drying out. If you don’t have cream, substitute with whole milk, but the cookies will be a shade less tender.
The Unexpected Star
M&M’s are the colorful, chocolatey surprise that makes each bite a mini celebration. Their candy coating melts just enough to form a glossy pocket, while the chocolate core stays soft and gooey. If you’re allergic to peanuts, opt for plain M&M’s or a mix of colorful and peanut‑free varieties.
Vanilla extract provides a fragrant backdrop that amplifies the caramel tones from the sugars. I never settle for imitation; pure vanilla extract adds depth that artificial flavor can’t match. A splash of bourbon or rum can be added for an adult twist, but keep it under a tablespoon so the dough doesn’t become too wet.
The Final Flourish
Baking soda acts as a leavening agent that spreads the cookie gently, creating that iconic soft interior. Too much soda will cause the cookies to rise too quickly and then collapse, while too little will make them dense. Measure with a level spoon and sift it together with the flour for even distribution.
A pinch of salt is the silent hero that balances the sweetness and enhances the overall flavor profile. Even a small misstep here can leave the cookies tasting flat. If you love a slightly salty contrast, sprinkle a tiny pinch of flaky sea salt on top just before baking.
Everything's prepped? Good. Let's get into the real action…
The Method — Step by Step
- Prep the dry ingredients. In a large bowl, whisk together 2 cups of all‑purpose flour, 1 teaspoon of baking soda, and ½ teaspoon of salt. The mixture should look like a light, fluffy cloud; this aeration helps the dough rise evenly. Set the bowl aside and let the aromas of the soda and salt mingle — it’s the first cue that you’re on the right track.
- Cream the butter and sugars. Using a handheld mixer or a sturdy wooden spoon, beat 1 cup of softened unsalted butter with 1 cup of packed brown sugar and ½ cup of granulated sugar until the mixture is pale, fluffy, and smells like toasted caramel. This process incorporates air, which is essential for a light crumb. Kitchen Hack: Add the sugars one at a time; this prevents the butter from seizing and ensures a smoother blend.
- Incorporate the wet ingredients. Crack 2 large eggs into a small bowl, beat them lightly, then pour them into the butter‑sugar mixture along with 2 teaspoons of pure vanilla extract and ¼ cup of heavy cream. Beat just until everything is combined; over‑mixing will develop gluten and make the cookies tough. The dough should look glossy and slightly sticky, a sign that the cream has been fully emulsified.
- Combine wet and dry. Gently fold the flour mixture into the wet mixture using a rubber spatula. Scrape the sides of the bowl to ensure no flour pockets remain. The dough will thicken quickly; resist the urge to over‑stir, or you’ll lose the airy texture you fought so hard to create. Watch Out: If the dough feels too dry, add a tablespoon of milk; if it feels too wet, sprinkle a bit more flour, but keep adjustments minimal.
- Fold in the M&Ms. Add 1½ cups of full‑sized M&M’s to the dough and gently fold until they’re evenly distributed. The candy pieces should be visible on the surface, not buried deep. If you’re feeling daring, reserve a handful to press into the tops after scooping, creating a decorative “crown” on each cookie.
- Chill the dough. Scoop the dough into a large zip‑top bag, press it into a flat disc about 1‑inch thick, and refrigerate for at least 30 minutes. This rest period allows the butter to firm up and the flour to hydrate, which is why the cookies stay soft after baking. I dare you to skip this step and see how the texture changes — the result is a lesson in patience.
- Preheat and prep the sheet. While the dough chills, preheat your oven to 350°F (175°C). Line a baking sheet with parchment paper or a silicone mat; this prevents sticking and gives the cookies a uniform golden base. The oven should be fully heated before the first cookie goes in; otherwise, you’ll get uneven spreading.
- Portion the dough. Using a ½‑cup ice‑cream scoop, portion the chilled dough onto the prepared sheet, spacing them about 2 inches apart. Each mound should be roughly 1‑inch tall; this height ensures a soft interior while allowing the edges to set. Press the tops lightly with your fingers to create a slight indentation for the M&Ms to settle into.
- Bake to perfection. Slide the sheet into the oven and bake for 12‑14 minutes, or until the edges are just set and the tops have a light golden hue. The cookies will still look a bit soft in the center — that’s the sweet spot. As soon as they’re out, you’ll notice a fragrant waft of caramel and chocolate that fills the kitchen, promising a perfect bite.
- Cool and serve. Let the cookies rest on the sheet for 5 minutes; they’ll continue to set from the residual heat. Then transfer them to a wire rack to cool completely, or if you can’t wait, dive in while still warm for the ultimate melt‑in‑mouth experience. Picture yourself pulling this out of the oven, the whole kitchen smelling incredible, and the first bite delivering a soft, chewy hug with a burst of chocolate.
That's it — you did it. But hold on, I've got a few more tricks that'll take this to another level. The next section reveals insider secrets that will make your cookies even more unforgettable, ensuring every batch outshines the last.
Insider Tricks for Flawless Results
The Temperature Rule Nobody Follows
Never bake cookies straight from the fridge at a high temperature. Start with a moderate 350°F for the first ten minutes, then crank it up to 375°F for the final two minutes. This two‑stage approach gives the interior time to set before the exterior crisps just enough to create that perfect contrast. I once tried a single high heat blast and ended up with burnt edges and a gummy center — a lesson learned the hard way.
Why Your Nose Knows Best
The moment you smell caramelized butter and toasted sugar, the cookies are almost done. Trust your nose more than the timer; ovens can vary by up to 25°F. When the aroma hits a sweet, nutty note, pull the tray out and let the cookies finish their final set on the hot sheet. This trick saved me from a batch of over‑baked, crumbly cookies that would have otherwise ruined the party.
The 5‑Minute Rest That Changes Everything
After you scoop the dough onto the sheet, let the balls sit for five minutes before baking. This brief rest allows the flour to fully hydrate, which translates into a softer crumb. Skipping this step is a common mistake; the dough spreads too quickly, giving you thin, crispy edges instead of the coveted pillowy center.
The Butter Temperature Trick
If your butter is too soft, the dough will spread excessively; if it’s too hard, you’ll get a dense cookie. The sweet spot is butter that feels like warm skin — firm enough to hold shape but pliable enough to cream smoothly. I keep a small bowl of ice water nearby; a quick dip of the butter in the water for 10 seconds brings it to the perfect consistency.
The Double‑Fold Method
To achieve the most even distribution of M&Ms, fold the candy in twice: once after the initial mix, let the dough rest for 10 minutes, then fold again right before scooping. This double‑fold ensures that every bite has a colorful surprise, and it prevents clumping at the bottom of the dough. A friend tried skipping the second fold once — the cookies turned out with a candy desert in the middle and a bland periphery.
Creative Twists and Variations
This recipe is a playground. Here are some of my favorite ways to switch things up:
Nutty Crunch
Swap half of the M&Ms for chopped toasted pecans or walnuts. The nuts add a buttery crunch that complements the soft cookie base, and the earthy notes balance the sweet chocolate perfectly. Great for a fall gathering when you want a hint of seasonal warmth.
White Chocolate Raspberry
Replace the regular M&Ms with white chocolate chips and fold in a tablespoon of freeze‑dried raspberry powder. The tartness of the raspberry cuts through the sweetness, creating a sophisticated flavor duo that’s perfect for a brunch spread.
Spicy Mexican
Add a pinch of cayenne pepper and a dash of cinnamon to the dry mix, then use dark chocolate M&Ms. The subtle heat mingles with the chocolate, delivering a surprise kick that’s reminiscent of a Mexican hot chocolate latte.
Coffee Lover’s Dream
Dissolve 1 tablespoon of instant espresso powder in the heavy cream before adding it to the batter. Pair with coffee‑flavored M&Ms for a double‑dose of caffeine‑kissed indulgence. Ideal for an afternoon pick‑me‑up when you need both sugar and buzz.
Vegan Velvet
Swap the butter for coconut oil, use almond milk instead of cream, and choose vegan M&Ms. The coconut oil adds a subtle tropical aroma, while the almond milk keeps the dough moist. This version proves that you don’t need dairy to achieve that “big soft” texture.
Storing and Bringing It Back to Life
Fridge Storage
Place cooled cookies in an airtight container with a paper towel on top to absorb excess moisture. Store them in the refrigerator for up to five days; the cool environment preserves the soft crumb and prevents staling. Before serving, let them sit at room temperature for 15 minutes to regain that melt‑in‑mouth feel.
Freezer Friendly
Freeze the baked cookies in a single layer on a parchment‑lined tray, then transfer them to a zip‑top freezer bag. They’ll keep for up to three months. When you’re ready, thaw at room temperature and warm briefly in a 300°F oven for 5 minutes; the heat revives the soft interior.
Best Reheating Method
To re‑heat a single cookie, microwave for 8‑10 seconds with a tiny splash of water on a paper towel underneath. The steam generated restores the moisture, making the cookie feel freshly baked. Avoid microwaving for too long, or you’ll end up with a rubbery texture.