I was standing in my kitchen, staring at the burnt toast from last night, when my friend dared me to whip up something that could outshine any bakery's cinnamon roll. The challenge sparked a fire that only good ingredients and a dash of mischief could quell. I grabbed the pantry staples, but I also added a secret weapon: a splash of sour cream that turns the dough into a cloud of fluffy sweetness. The aroma that began to fill the room was not just buttery; it was the promise of a caramelized sugar glaze that would melt on the tongue. This is the moment you realize that the simplest tweak can turn a mediocre dessert into an unforgettable experience.
Picture yourself pulling this out of the oven, the whole kitchen smelling incredible, and the first bite sending a warm wave of cinnamon and butter through your senses. That sizzle when it hits the pan? Absolute perfection. The dough rises like a quiet spring, the edges crisp to a golden amber while the center stays tender and slightly gooey. It’s a paradox of textures that makes each bite a revelation, and I dare you to taste this and not go back for seconds. I’ll be honest—my taste buds went on a rollercoaster that even the most seasoned pastry chefs would envy.
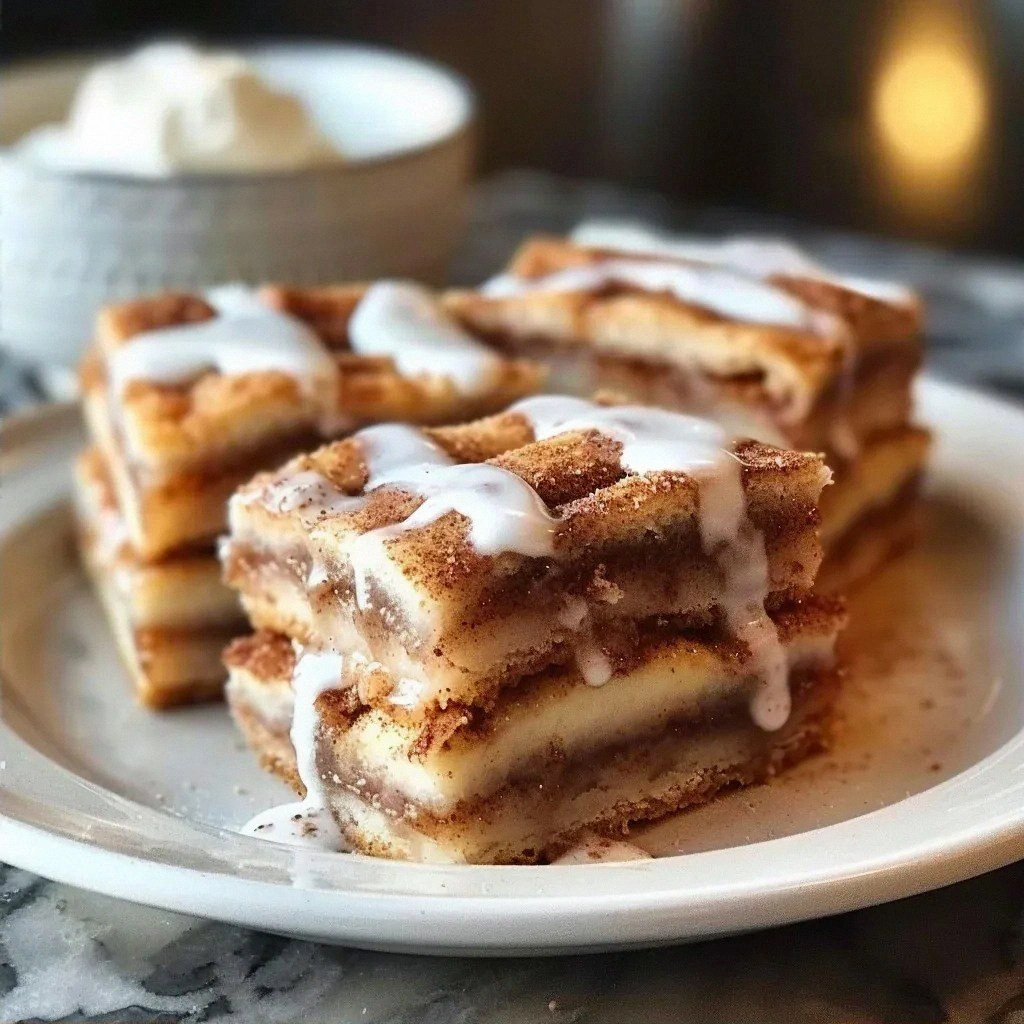
Most recipes get this completely wrong. They either overbake and dry out or underbake and leave a soggy center. I discovered that the key lies in balancing the acidity of sour cream with the richness of butter, and in letting the cinnamon swirl through every crumb. The result? Bars that feel like a warm hug, with a hint of caramelized sugar that clings to the tongue like velvet. When you bite into one, the cinnamon pops, the butter melts, and the flour’s subtle nuttiness completes the symphony.
And now, the fun part. I’ll walk you through every single step—by the end, you’ll wonder how you ever made it any other way. From the first whisk to the final dusting of powdered sugar, each stage is crafted to bring out the best in every ingredient. This isn’t just a recipe; it’s a story of flavor, texture, and the little secrets that make a good dessert great. So grab your apron, preheat that oven, and let’s dive into the cinnamon roll bliss that awaits.
What Makes This Version Stand Out
- Flavor: The combination of brown sugar and sour cream creates a deep, caramelized sweetness that outshines plain sugar alone. The subtle tang lifts the cinnamon, making every bite more complex.
- Texture: The dough is airy yet dense, thanks to the right balance of leavening agents and the inclusion of sour cream. When baked, it yields a tender crumb that doesn’t crumble apart.
- Ease: No complicated proofing or blind baking—just mix, roll, cut, and bake. Even a novice can achieve professional results.
- Make‑ahead Potential: These bars keep their moisture for up to three days in the fridge, and they freeze beautifully for later indulgence.
- Versatility: Swap out the vanilla for orange zest, or add chopped walnuts for crunch. The base is robust enough to handle any tweak.
- Crowd Appeal: Whether you’re hosting a brunch or a midnight snack, these bars win hearts instantly. I’ve seen people line up for seconds in my kitchen.
- Ingredient Quality: Using high‑quality butter and real vanilla extract elevates the flavor profile dramatically. Cheap substitutes lose the depth I love.
- Visual Appeal: The bars have a glossy, caramelized crust that glistens like a sunrise, making them Instagram‑worthy without any extra effort.
Alright, let's break down exactly what goes into this masterpiece…
Inside the Ingredient List
The Flavor Base
Brown Sugar: It’s the heart of the sweetness, providing molasses undertones that caramelize beautifully. If you skip it, the bars will taste flat and overly sweet. For a darker, richer flavor, use 100% raw honey instead, but reduce the total sugar by 25% to avoid excess liquid.
Granulated Sugar: Adds a quick burst of sweetness that balances the brown sugar’s depth. Removing it will make the dough less sweet overall, but you can compensate with a tablespoon more vanilla extract.
Powdered Sugar (for frosting): Gives the bars a dusting that feels like a sweet snowstorm. If you’re avoiding refined sugars, use coconut sugar or a sugar substitute that dissolves well in liquids.
The Texture Crew
All-Purpose Flour: The backbone of the dough, providing structure and a subtle nutty flavor. Use a high-protein flour for a chewier bite, but be careful not to overwork the dough.
Unsalted Butter: It’s the source of that buttery richness that coats the bars. If you have salted butter, reduce the added salt by ¼ teaspoon to keep the flavor balanced.
Sour Cream: The secret to a tender crumb and a slight tang that lifts the cinnamon. If you’re lactose intolerant, try using a dairy-free yogurt; it will alter the flavor slightly but still provide moisture.
The Unexpected Star
Eggs: They bind the ingredients and give the bars structure. If you’re vegan, substitute with flaxseed meal mixed with water (1 tablespoon flaxseed + 3 tablespoons water) for each egg.
Vanilla Extract: It’s the aromatic thread that ties everything together. For a citrus twist, replace half the vanilla with almond extract.
The Final Flourish
Cinnamon: The star spice that defines the flavor profile. Use ground Ceylon cinnamon for a sweeter, more floral note, or stick with cassia for a sharper bite.
Baking Powder & Baking Soda: These leaveners give the bars a slight lift without making them cakey. If you’re using a different type of flour, adjust the leavening by adding an extra pinch of baking soda.
Salt: It balances the sweetness and enhances the overall flavor. If you’re using salted butter, reduce the added salt by ¼ teaspoon.
Everything's prepped? Good. Let's get into the real action…
The Method — Step by Step
- Preheat your oven to 350°F (175°C) and line a 9x13-inch pan with parchment paper. The parchment ensures easy removal and a clean finish. As the oven warms, you’ll notice the faint scent of butter in the air, which is a good sign that the temperature is just right. This is the moment of truth: if the oven is too hot, the bars will brown too quickly on the edges.
- In a large bowl, whisk together the flour, brown sugar, granulated sugar, baking powder, baking soda, cinnamon, and salt until well combined. This dry blend sets the foundation for the dough’s structure. The mixture should look slightly gritty, indicating the sugars haven’t dissolved yet. Keep this step quick to prevent the leaveners from losing potency.
- In a separate bowl, beat the butter, sour cream, eggs, and vanilla extract until smooth. The mixture should be creamy and slightly glossy. This wet blend will later marry with the dry mix to form a cohesive dough. As you whisk, you’ll hear the butter’s texture change from solid to silky.
- Gradually add the wet mixture to the dry ingredients, stirring just until combined. The dough will be sticky; that’s normal. Avoid overmixing, as it can develop gluten and make the bars tough. When the dough comes together, it should hold a shape but still be pliable.
- Transfer the dough onto a lightly floured surface and roll it out to a ¼-inch thickness. The dough should spread evenly without tearing. If it’s too sticky, dust it with a little more flour, but be careful not to add too much. This step is where the dough’s texture is truly shaped.
- Cut the dough into 1‑inch squares or rectangles using a sharp knife or pizza cutter. The shape determines the final bite size; keep them uniform for even baking. Press the edges lightly to ensure they seal properly. If the squares don’t hold, let the dough rest for a few minutes before cutting again.
- Place the cut squares onto the prepared pan, leaving a small gap between each. The spacing allows for even heat distribution and prevents the bars from sticking together. As you arrange them, you’ll hear a satisfying click against the parchment.
- Bake for 18–20 minutes, or until the edges turn golden brown and the centers set. The bars should smell like toasted sugar and butter. Avoid opening the oven door too early, as the heat loss can cause uneven baking. This is the trickiest step—watch out for overbrowning.
- Remove the pan and let the bars cool on a wire rack for 10 minutes before transferring to the rack to cool completely. The cooling period allows the interior to set and the frosting to adhere properly. While they’re still warm, sprinkle the powdered sugar and drizzle the milk‑vanilla glaze for a glossy finish.
- Slice the bars into bite‑sized pieces and serve warm or at room temperature. The warmth enhances the cinnamon aroma, while the coolness brings out the buttery richness. Store any leftovers in an airtight container to keep them fresh for up to three days. Enjoy the experience of each bite as if it were a new discovery.
That's it — you did it. But hold on, I've got a few more tricks that'll take this to another level…
Insider Tricks for Flawless Results
The Temperature Rule Nobody Follows
Many bakers believe that room‑temperature butter is enough, but the secret lies in slightly chilled butter. Chill the butter for 15 minutes before cutting it into the dough; this prevents the butter from melting too quickly, keeping the bars tender and flaky. I once made a batch with room‑temperature butter and the result was a dense, greasy texture. The next time, I chilled the butter and the bars came out light as a cloud.
Why Your Nose Knows Best
When the bars first hit the oven, a sweet, buttery scent will rise. If you smell a hint of burnt sugar, the oven is too hot or the bars are too close to the heating element. Move the pan to the middle rack and reduce the temperature by 10°F if that happens. Trust your nose; it’s the most reliable indicator of doneness.
The 5‑Minute Rest That Changes Everything
After removing the bars from the oven, let them rest on the pan for exactly five minutes before transferring to a rack. This brief rest allows the heat to distribute evenly, preventing the bars from cracking or sticking to the parchment. I once skipped this step, and the bars broke apart when I tried to move them. The five‑minute pause saved the day.
The Secret to a Glazed Finish
Combine powdered sugar with just enough milk and vanilla to create a thin glaze. Stir until smooth, then drizzle over the warm bars. The glaze will set into a glossy coating that enhances the cinnamon aroma. If you prefer a thicker frosting, add a teaspoon of butter to the glaze for extra richness.
The No‑Heat Frosting Hack
For a no‑heat frosting, whisk powdered sugar with a splash of milk and a pinch of salt until fluffy. The result is a light, airy frosting that doesn’t weigh down the bars. I use this version for a quick breakfast treat, and it keeps the bars fresh for days.
Creative Twists and Variations
This recipe is a playground. Here are some of my favorite ways to switch things up:
Nutty Crunch
Add chopped walnuts or pecans into the dough before rolling. The nuts add a satisfying crunch and a buttery depth that pairs wonderfully with the cinnamon. They also make the bars look more rustic.
Chocolate Drizzle
Melt dark chocolate and drizzle it over the finished bars. The bittersweet flavor balances the sweetness of the glaze, creating a sophisticated dessert. A sprinkle of sea salt afterward enhances the chocolate’s richness.
Orange Zest Surprise
Replace half the vanilla with orange zest and add a splash of orange liqueur to the glaze. The citrus brightens the flavor profile and adds a subtle floral note. This version is perfect for spring or summer brunches.
Vegan Version
Swap butter with coconut oil, use flaxseed eggs, and replace the sour cream with a plant‑based yogurt. The texture remains tender, and the flavor profile stays close to the original. The bars turn out slightly denser but still delicious.
Spicy Cinnamon
Add a pinch of cayenne pepper or smoked paprika to the dry mix. The heat contrasts with the sweetness, creating a complex flavor that’s both comforting and adventurous. It’s a great option for those who like a little kick.
Storing and Bringing It Back to Life
Fridge Storage
Store the bars in an airtight container in the refrigerator for up to three days. The moisture from the dough will keep them soft, and the glaze will maintain its sheen. When you’re ready to eat, let them sit at room temperature for 15 minutes to soften before slicing.
Freezer Friendly
Wrap the bars individually in parchment paper and place them in a freezer bag. They’ll stay fresh for up to two months. When you want a snack, thaw at room temperature for 30 minutes, then warm in a 350°F oven for 5 minutes to revive the buttery crust.
Best Reheating Method
For the ultimate texture, reheat the bars in a preheated oven at 350°F for 3–4 minutes. The heat will restore the crispness on the edges while keeping the center moist. A tiny splash of water before reheating creates steam, which prevents the glaze from drying out and keeps the bars luscious.